Airframes
Benevolens Magister
PART ONE.
In between painting, illustrations and writing the Diorama Guide, I decided to make a start on the 21st Century '109G-14 kit, in 1/32nd. scale.
In order to see what additions might be needed in the cockpit, I gave the area a quick base coat, to bring out the moulded-in detail. I intended from the start to build this model without using aftermarket accessories, with the exception of an etched seat harness. But, as I have been unable to obtain this, I have had to resort to my usual practice, and make my own!
The first five pics show the preparation and modifications before assembly began, the main work involving the wheel wells, as the kit's wing is the same as used in this company's '109F kit.
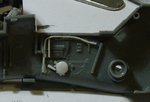
Photo 1 shows the cockpit walls with the base coat of dark grey. The white pieces are the first additions, made from plastic card, stretched sprue and scrap, and include the fuel line and oxygen regulator.
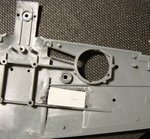
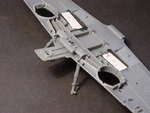
Photo 2 shows the plastic card over the 'open' radiator baths on the lower wing; the inner parts were painted matt black. Note the hefty structure of the moulding.
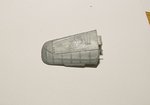
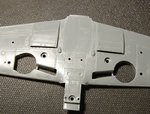
Photo 3 This is the work in progress to correct the shape of the gear wells. The well on the right is as per the kit, for the 'F' model, whilst the left hand well has been trimmed back to form the correct, 'straight' outer edge. No big job, just a bit of carving and sanding.
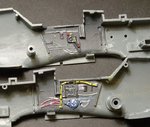
Photo 4. Some of the additional detail added to the cockpit and painted. Next step is to re-touch and tidy up.
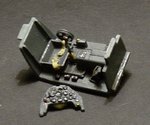
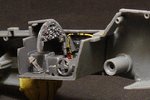
Photo 5 A bit of a'soft' shot, I'm afraid, but this is a general shot of the cockpit. I need to re-paint the dials on the instrument panel, as some of the detail fogged when the clear varnish was added to each instrument. The seat belt is made from cut and shaped pieces taken from an old fabric roller blind, with some buckles and adjusters fabricated from plastic card and scrap photoetch. The shoulder harness will be added later.
Photo 6 Is a general shot of the assembled cockpit, with a little more weathering and touching up still to be done. The rudder toe straps are made from painted strips of copier paper.
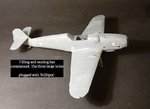
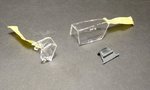
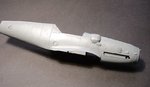
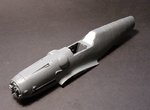
Photo 7 Here the fuselage is assembled, less the tail fin, and the 'Beule' added. Any filling, and correction of panels/hatches, will be done later. The white card on the rear cockpit bulkhead is covering the slots for the rear section of the 'F' canopy, and includes a piece to represent the stowage hatch cover.
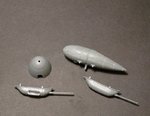
Photo 8 This shows the plugs that cover the screw holes. (screws not used.) They will be pushed in fully, covered by discs of card, then filled and sanded back.
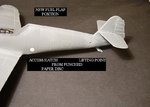
Photo 9. The method of attaching the landing gear means that the legs will have to be down during painting. They are designed to retract, but I don't want to risk them snapping or dislodging. It's not a major problem, and the method of installation ensures a strong fix, and the correct angle.
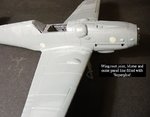
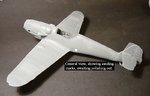
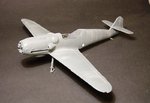
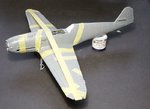
Photo 10. The tail in place, and the wings joined and fitted. This was the hardest part, as there are so many joining pegs, ensuring a good tight fit of the wing, that I had to keep separating the halves and re-glueing, whilst at the same time, trying to keep the moveable slats in place! The tape is holding the wing to fuselage joint until set, and maintaining dihedral. Once everything is fully set, any filling and sanding will be done, before fitting the tailplanes, upper wing blisters, supercharger intake and oil cooler bath. I intend to add a piece of scrap PE mesh to the latter, and, when nearly finished, aileron mass balances will need to be scratch-built.
I hope to be able to bring you more pics soon, as the build, and the painting, progresses.
Overall, I'm very pleased with this kit. The fit of parts, particularly the cockpit, is excellent, much better than a certain manufacturer's recent 1/32nd Mustang, and some of the assembly methods should, I feel, be copied by other kit producers. Considering this kit cost much less than the average 1/48th scale fighter, it really is good, and tremendous value for money. Reccommended!
In between painting, illustrations and writing the Diorama Guide, I decided to make a start on the 21st Century '109G-14 kit, in 1/32nd. scale.
In order to see what additions might be needed in the cockpit, I gave the area a quick base coat, to bring out the moulded-in detail. I intended from the start to build this model without using aftermarket accessories, with the exception of an etched seat harness. But, as I have been unable to obtain this, I have had to resort to my usual practice, and make my own!
The first five pics show the preparation and modifications before assembly began, the main work involving the wheel wells, as the kit's wing is the same as used in this company's '109F kit.
Photo 1 shows the cockpit walls with the base coat of dark grey. The white pieces are the first additions, made from plastic card, stretched sprue and scrap, and include the fuel line and oxygen regulator.
Photo 2 shows the plastic card over the 'open' radiator baths on the lower wing; the inner parts were painted matt black. Note the hefty structure of the moulding.
Photo 3 This is the work in progress to correct the shape of the gear wells. The well on the right is as per the kit, for the 'F' model, whilst the left hand well has been trimmed back to form the correct, 'straight' outer edge. No big job, just a bit of carving and sanding.
Photo 4. Some of the additional detail added to the cockpit and painted. Next step is to re-touch and tidy up.
Photo 5 A bit of a'soft' shot, I'm afraid, but this is a general shot of the cockpit. I need to re-paint the dials on the instrument panel, as some of the detail fogged when the clear varnish was added to each instrument. The seat belt is made from cut and shaped pieces taken from an old fabric roller blind, with some buckles and adjusters fabricated from plastic card and scrap photoetch. The shoulder harness will be added later.
Photo 6 Is a general shot of the assembled cockpit, with a little more weathering and touching up still to be done. The rudder toe straps are made from painted strips of copier paper.
Photo 7 Here the fuselage is assembled, less the tail fin, and the 'Beule' added. Any filling, and correction of panels/hatches, will be done later. The white card on the rear cockpit bulkhead is covering the slots for the rear section of the 'F' canopy, and includes a piece to represent the stowage hatch cover.
Photo 8 This shows the plugs that cover the screw holes. (screws not used.) They will be pushed in fully, covered by discs of card, then filled and sanded back.
Photo 9. The method of attaching the landing gear means that the legs will have to be down during painting. They are designed to retract, but I don't want to risk them snapping or dislodging. It's not a major problem, and the method of installation ensures a strong fix, and the correct angle.
Photo 10. The tail in place, and the wings joined and fitted. This was the hardest part, as there are so many joining pegs, ensuring a good tight fit of the wing, that I had to keep separating the halves and re-glueing, whilst at the same time, trying to keep the moveable slats in place! The tape is holding the wing to fuselage joint until set, and maintaining dihedral. Once everything is fully set, any filling and sanding will be done, before fitting the tailplanes, upper wing blisters, supercharger intake and oil cooler bath. I intend to add a piece of scrap PE mesh to the latter, and, when nearly finished, aileron mass balances will need to be scratch-built.
I hope to be able to bring you more pics soon, as the build, and the painting, progresses.
Overall, I'm very pleased with this kit. The fit of parts, particularly the cockpit, is excellent, much better than a certain manufacturer's recent 1/32nd Mustang, and some of the assembly methods should, I feel, be copied by other kit producers. Considering this kit cost much less than the average 1/48th scale fighter, it really is good, and tremendous value for money. Reccommended!
Attachments
-
 21 Gustav 001.jpg71.7 KB · Views: 217
 -
 21 Gustav 008.jpg106.4 KB · Views: 213
 -
 21 Gustav 007.jpg126.6 KB · Views: 219
 -
 21 Gustav 010.jpg120.9 KB · Views: 202
 -
 21 Gustav 014.jpg100.3 KB · Views: 232
 -
 21 Gustav 028.jpg81.9 KB · Views: 211
 -
 21 Gustav 026.jpg85 KB · Views: 214
 -
 21 Gustav 021.jpg57.8 KB · Views: 205
 -
 21 Gustav 019.jpg79.6 KB · Views: 206
 -
 21 Gustav 015.jpg80 KB · Views: 202
 Keep them comming....