Dirk's Airfix Bell P-39Q Aircobra

Ad: This forum contains affiliate links to products on Amazon and eBay. More information in Terms and rules

Time for some paint :woo:

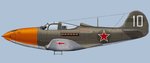
First I sprayed the bottom of the aircraft Neutral Gray, and then masked it to receive the top cote.

IMG_1639.jpg


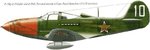
Looking at some of the paint pallets for this aircraft it doesn't appear to me that this crate should be straight Olive Green like the directions say. The one I liked best was from Wings Pallett. It seem to have a little brighter mix of green over all as opposed to the olive color around the Soviet Star on the fuselage. To obtain this color I used a combination of Model Masters Olive Green and Testors Beret Green.

IMG_1648.jpg


Let the spraying commence

IMG_1645.jpg


IMG_1647.jpg
 
After the top side was dried I set to work on the nose, but first I needed to mask off the rest of the plane to keep any red from going where is shouldn't.

IMG_1649.jpg


IMG_1650.jpg


IMG_1651.jpg


Unmasked

IMG_1655.jpg


IMG_1656.jpg


IMG_1657.jpg


IMG_1658.jpg


Till next time, thanks for looking
 
Looking very nice. But I'm not sure if the green and the one on undersides are correct. I think these might have been the Olive Drab and the Natural Grey paints though.
 
Here is the profile I'm using as a guide

1_24.jpg


While I didn't have any Crimson red for the nose I feel the green is pretty darn close. I think once it gets a matt cote gets applied it should look pretty close. The next P-39 I build which is already in the stash will be straight Olive.

Thanks for the comments guys. It means a lot
 
Back to the Russian Kobra.

IMG_1659.jpg


As with most kits the landing gear doors are extremely thick. This Airfix kit is no different. At first I was going to make some new ones with an old beer can but decided against it this time. Instead I broke out the old rasp file and filed down the plastic to a more reasonable thickness.

IMG_1660.jpg


IMG_1661.jpg


IMG_1663.jpg


IMG_1662.jpg


Next I gave it a cote of Future and while I was at it I gave the B-29 a second cote to seal in the decals.

IMG_1664.jpg


Thanks for looking
 
Here is the profile I'm using as a guide

1_24.jpg

I have found a couple of profiles of the P-39 including our Mate Clave's one. Please don't get me wrong. I would like to show you all how different can look images of the same thing issued by many different publishers. And ....I would like to make a focus on a minor detail that can be noticed in these all profiles. The US ( I assume just these were on the plane ) national markings were overpainted with darker green paint. If the entire plane was re-painted with the " Russian" green, these wouldn't be seen at all. Or the US stars and the strip on the fin would be seen from under the paint partially.
Also please notice how different the two profiles of the one you followed seem to be. I used the profile from the Wings Palette site. Then one was brightened up.
Comparing to Clave's profile both of them look more different.
Finally the profile ( I found on the Wing's Palette site too...) from a Russian source ( a book ? ). I think the one is the best of them. Of course the differences in tonalities of colours might be the effect of the printing process. But these seem to be very close to the real ones. I don't think Russians " were playing " with re-painting planes they received because of the Land-Lease help when all of them were worth a fortune at the front line. The red ( crimson) "nose" of the Airacobra might have been caused by the Olive Drab dark background as well. But the dark red (crimson) paint is also possible. To sum up... I think, the camo scheme of the plane was of Olive Drab/Natural Grey colours with the dark red or crimson painted front part. The US national and other markings were overpainted with a dark green paint.
 

Attachments

  • P39 russian1c.jpg
    P39 russian1c.jpg
    43.3 KB · Views: 74
  • P39 russian1b.jpg
    P39 russian1b.jpg
    22.3 KB · Views: 96
  • P39 russian1a.jpg
    P39 russian1a.jpg
    31.4 KB · Views: 66
  • P39 russian1.JPG
    P39 russian1.JPG
    25.7 KB · Views: 59
That's some good information. I admit I like the top two profiles better but alas neither was available to me so it's going to have to be what it is. Thank you for the information thou. Keep it coming...

Decals applied. Next is another clear cote to seal in the decals and then some weathering. The finish line is in sight...

IMG_1669.jpg


IMG_1670.jpg


Thanks for looking
 

Users who are viewing this thread

Back