**** DONE 1/48 DAP Beaufighter 21 A8-159 E-SK "Ginger Meggs" Heavy Hitters GB

Ad: This forum contains affiliate links to products on Amazon and eBay. More information in Terms and rules

Thanks Terry

I didn't know about the wing panel lines - I'll take a look. I was aware of the elevator trim actuators, and I also need to look at the recognition light number and positions.

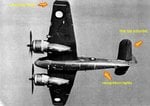
Some aircraft had various seams sealed with tape, particularly at the wing tips, either with black or white as appears in the case of A8-358.

Here's a picture of A8-358 underneath with these features id'd

Cheers

Peter
 

Attachments

  • A8-358 underneath - resized.jpg
    A8-358 underneath - resized.jpg
    67.5 KB · Views: 179
Thank you Aaron, Wayne and VB

I've found a short history of 93 Squadron - 1 pager - you may like to read, in the March 2005 edition of the "Whisperer", the newsletter of the Queensland Beaufighter and Boston Association (now disbanded). I'll attach it here as a PDF.

Also, here is a picture of the first Squadron Leader of 93, D.K.H. Gulliver, along with the Unofficial badge of the squadron, the "Green Ghosts" - spookus sneakinus. The badge appeared on the tail of his aircraft A8-87 SK-G.

Most of the aircraft of 93 sported some pretty creative artwork, and were individually named. Babs, Bambi, Betty, Nancy, Paddy, Miss Lorrace, Hillary, Shirley Faye, Marge, Pattie to name some.

Cheers

Peter

(Image: Aviation Heritage Museum of WA)
 

Attachments

  • Green Ghost Squadron badge - resized.jpg
    Green Ghost Squadron badge - resized.jpg
    67 KB · Views: 163
  • Green Ghosts.pdf
    1.1 MB · Views: 122
Last edited:
Cheers Guys

I've started on the interior, and inside there were numerous differences between the DAP produced Beaufighters and the ones produced by Bristol in England.

I have concentrated on the most obvious ones (to me) as really very little on the interior will be seen through the cockpit or Navigator/Obs bubble and Mr Tamiya did not provide a whole lot of detail anyways, probably for that fact. If I miss something important, give me a nudge.

Most obvious was the interior paint colour, which in the case of the DAP version was something like "Apple Green". not the familiar interior green. To replicate this I have used Humbrol Matt 101. I'll do some dry brushing later, once everything is in.

After the interior colour, the Observers Seat was next. I have put up a couple of shots from two different restored DAP's at Camden and Moorabbin. The seat back and cushion are just a different style. A Very simple exercise using plastic card to make a more realistic version.

More soon.

Cheers

Peter
 

Attachments

  • seat nav station 1 - resized.jpg
    seat nav station 1 - resized.jpg
    158.6 KB · Views: 161
  • seat nav station 2 - resized.jpg
    seat nav station 2 - resized.jpg
    75.6 KB · Views: 164
  • seat 1 - resized.jpg
    seat 1 - resized.jpg
    33.1 KB · Views: 163
  • seat 2 - resized.jpg
    seat 2 - resized.jpg
    27.8 KB · Views: 158
  • seat 3 - resized.jpg
    seat 3 - resized.jpg
    50.3 KB · Views: 171
Nice work Peter. You're right, not much can be seen through the front or back on the Tamiya model. The heater ducting and ammo tanks are worth painting though, as the 'shapes' can just about be seen, especially the ducting curving down to the cockpit. If you decide to cut out the doors in the armoured bulkhead, then more light gets through, and the ammo tanks can just be seen from the front.
 
Thanks Jan

Terry, the DAP Beau's did not appear to have either the armoured bulkhead or the heater ducting, so i've given both these things the chop!

The first pic is a reference photo that shows the lack of these features and is a good view straight through to the pilot's cockpit. At the top centre of the photo is the Observers Instrument panel and this matches the one found in the Descriptive Manual for the DAP.

I chopped the bulkhead off above the spar beam, and just glued the bottom part to the floor.

The next thing was to create a new Observers Instrument Panel, as the Tamiya version is differernt than that fitted to DAP versions. 8) I used plastic card and made two pieces. I'll glue one over the top of the other after drilling instrument holes, which I'll fill with clear glue. The bottom panel i'll paint and raid the spares box for some instrument decals to place below the front panel holes. Hopefully this will work out.

Cheers

Peter
 

Attachments

  • seat nav station 3 - resized.jpg
    seat nav station 3 - resized.jpg
    68.6 KB · Views: 176
  • bulkhead chop - resized.jpg
    bulkhead chop - resized.jpg
    9.5 KB · Views: 183
  • nav station 2 - resized.jpg
    nav station 2 - resized.jpg
    9 KB · Views: 171
  • nav station 1 - resized.jpg
    nav station 1 - resized.jpg
    7.8 KB · Views: 169
  • nav station 3 - resized.jpg
    nav station 3 - resized.jpg
    8.5 KB · Views: 181
  • nav station 4 - resized.jpg
    nav station 4 - resized.jpg
    24.4 KB · Views: 184
Nice one Peter! Didn't know the DAP Beaus left out the bulkhead. Good work on the instrument panel, and being a bit bigger than the British one, some of it should just be visible.
 
Thanks for your encouragement guys, a small update today.

Props - I painted them white first, so the yellow tips would be easier to paint, did the yellow tips and then painted the black. Is this how everybody else does it? :?:

Cheers

Peter
 

Attachments

  • props 1 - resized.jpg
    props 1 - resized.jpg
    48.8 KB · Views: 164
  • props 2 - resized.jpg
    props 2 - resized.jpg
    37.8 KB · Views: 171
Looking good. I normally just paint the yellow freehand after painting the props, using enamels. Normally, with such a small area, one pass with the paintbrush is enough, per side. Might be a lot different with acrylics though.
 

Users who are viewing this thread

Back