**** DONE: 1/48 Hurricane Mk1 V6555 S/L RR Stanford Tuck BoB GB (1 Viewer)

Ad: This forum contains affiliate links to products on Amazon and eBay. More information in Terms and rules

Thanks for the positives guys, but it hasn't gone all smoothly....
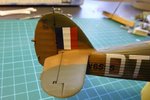
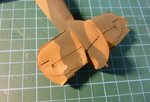
Pic 1
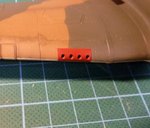
I have only a suspicion of what happened to the elevator here. The Humbrol 29 was sprayed on the tail last, so I'm thinking that some of the pigment or "matting agent" had started to settle in the airbrush. I use an Iwata with a small gravity feed cup so it's a bit peculiar - spray time was no longer than 3-4 minutes. I spent about half an hour stirring the Humbrol pot because all the pigment had settled into a lump on the bottom. Perhaps it should of been a few minutes more.:rolleyes:

Anyway the powdering got progressively worse with time and this is the result. Looked okay just before laying on the dark green.

Does look bad doesn't it? Still it was an easy fix to sand back and re-spray. The dark green is from the model master range. I had no problems with it.
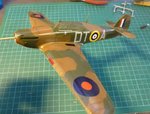
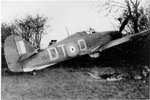
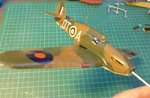
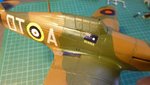
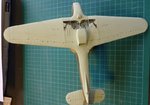
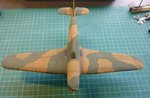
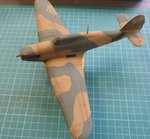
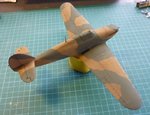
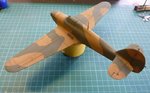
Pic 2,3,4,5,6
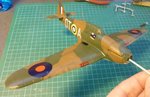
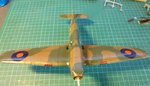
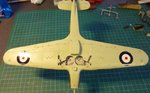
Okay fix up done and masks off. Gloss coat to follow.

Cheers

Peter
 

Attachments

  • painting tail bad 001 - resized.jpg
    painting tail bad 001 - resized.jpg
    68.7 KB · Views: 119
  • painting final 001 - resized.jpg
    painting final 001 - resized.jpg
    66.2 KB · Views: 122
  • painting final 003 - resized.jpg
    painting final 003 - resized.jpg
    63.1 KB · Views: 127
  • painting final 004 - resized.jpg
    painting final 004 - resized.jpg
    91.6 KB · Views: 118
  • painting final 002 - resized.jpg
    painting final 002 - resized.jpg
    77.7 KB · Views: 123
  • painting final 005 - resized.jpg
    painting final 005 - resized.jpg
    69.6 KB · Views: 126
Last edited:
Thanks Karl, CR and Glenn

Got the gloss coat on plus decals today, including all the stencils. Productive day for me, and I made a start on the 109 so all good.

Pic 1 2
Painted the gun port areas deep red. Will do some blast staining a bit later.

Pic 3
Reference photo (again, but useful to refer). Note the style and size of the fin flash and the placement of the DT codes in relation to the serial number. The first part of the 'D' obscures the third number.

Pic 4
The Aeromaster decals set comes with a taller fin flash which goes from the bottom to the top of the vertical stabilizer and was not what I wanted. I sourced a replacement from another decal set I have, which I think is more the correct size and height.

Pic 3,4,5,6,7
General views of the decals work done. Happy with the quality of the decals but they took a couple of applications of softener to sit down properly. Hopefully no silvering, fingers crossed. Not happy with the size of the Burmese flag on the starboard side. Miles too big compared to the real deal and it just fits on the door. Hard to fix so it stayed.

End of update.

Cheers

Peter
 

Attachments

  • decals 002 - resized.jpg
    decals 002 - resized.jpg
    78.7 KB · Views: 139
  • decals 001 - resized.jpg
    decals 001 - resized.jpg
    55.4 KB · Views: 111
  • Hurricane DTO V6604 resized.jpg
    Hurricane DTO V6604 resized.jpg
    66.3 KB · Views: 128
  • gunports 002 - resized.jpg
    gunports 002 - resized.jpg
    52.9 KB · Views: 125
  • gunports 001 - resized.jpg
    gunports 001 - resized.jpg
    68.4 KB · Views: 118
  • decals 003 - resized.jpg
    decals 003 - resized.jpg
    69.2 KB · Views: 132
  • decals 004 - resized.jpg
    decals 004 - resized.jpg
    60.7 KB · Views: 109
  • decals 005 - resized.jpg
    decals 005 - resized.jpg
    59.8 KB · Views: 112
  • decals 006 - resized.jpg
    decals 006 - resized.jpg
    73.6 KB · Views: 119
  • decals 007 - resized.jpg
    decals 007 - resized.jpg
    58.3 KB · Views: 110
Last edited:
Gloss must of been enamel if you are at it this fast Peter?? it was a first in a long time for me Pete but I used a very thin thin wash of burnt umber acrylic /alcohol to deepen the lines some on those for this build.I then washed with alcohol petty quick now on an older Hurri my son got when young I did this let dry for a while and it streaked out nice and dirty.The streaks looked like she had leaks and had seen some abuse anyway you will know what is best for the your crate.:thumbleft:Cheers

PS: got $5 Pete finishes nest ;)
 
Very nice work there Peter. Pity about the Burma flag - it's getting towards 1/48th scale - wonder how they managed to get that wrong?
The fin flash is a good example of why reference pics should be checked. It's the style adopted later, and similar to the style used before the 'long' stripes. Although not unique, it was uncommon for the period.
That problem with the paint is one of a number of problems which have occured since the Humbrol factory closed, and is very annoying. It might be that the paint is cellulose based, which has happened, and is another inconsistent thing with these paints nowadays. I've had different 'consistencies' and finish on three different tins of the same colour before now! I don't know where Hornby have the stuff made these days, but it's about time they found a new manufacturer, or go out of business because of the poor quality !
BTW, I have Humbrol 30 as Dark Green, and Dark Earth as 29, the latest tin having a gloss finish on the lid, even though it's matt. It also dries patchy, and needs at least 15 minutes of stirring before use, and constant attention during use !!
 
Thanks Kevin, Wayne, Glenn, CR, magnu, Wojtek and T

Gloss must of been enamel if you are at it this fast Peter?? it was a first in a long time for me Pete but I used a very thin thin wash of burnt umber acrylic /alcohol to deepen the lines some on those for this build.I then washed with alcohol petty quick now on an older Hurri my son got when young I did this let dry for a while and it streaked out nice and dirty.The streaks looked like she had leaks and had seen some abuse anyway you will know what is best for the your crate.:thumbleft:Cheers

PS: got $5 Pete finishes nest ;)

Enamel it is Kevin - Humbrol Gloss Cote. I will be doing something similar with this one, although I'm not sure how dirty I want to make it. Hurricanes did tend to get very oily underneath.

Your $5 could be at risk Kev :rolleyes::lol::lol::lol::lol:

Cheers

Peter
 
Very nice work there Peter. Pity about the Burma flag - it's getting towards 1/48th scale - wonder how they managed to get that wrong?

BTW, I have Humbrol 30 as Dark Green, and Dark Earth as 29, the latest tin having a gloss finish on the lid, even though it's matt. It also dries patchy, and needs at least 15 minutes of stirring before use, and constant attention during use !!

Thanks Terry, It's near 1/32 size on a 1/48 model that's for sure.

I'm swapping to MM where I can, and your right, DE is 29. I had a tin of 30 out as well and the number must of stuck somehow! Edits made.

Cheers

Peter
 
No problem Peter, I've just noticed I made a similar mistake. I meant "getting towards 1/32nd scale", not 1/48th ! But I guess you realised that !
I've asked my local shop to see if they can stock White Ensign paints. Every time I open a Humbrol tin these days, I wonder what's going to happen - that is, if it hasn't already gone hard. Then I have to fight to get the lid to stay on when replaced !
 
Terry or Pete anyway to tell old humbrol tins from new?My LHS has alot of humbrol and it really has never sold and just wondering if any of the old is still in there?

Hey we know it wouldn't be enyaW.he'll never figure that out we are safe
 
Last edited:

Users who are viewing this thread

Back