Navigation
Install the app
How to install the app on iOS
Follow along with the video below to see how to install our site as a web app on your home screen.
Note: This feature may not be available in some browsers.
More options
You are using an out of date browser. It may not display this or other websites correctly.
You should upgrade or use an alternative browser.
You should upgrade or use an alternative browser.
**** DONE: 1/48 Messerschmitt Bf 110 G-2 - Me/ Fw Group Build.
- Thread starter Gerry
- Start date
Ad: This forum contains affiliate links to products on Amazon and eBay. More information in Terms and rules
More options
Who Replied?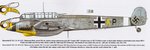
- Thread starter
- #62
Gerry
Staff Sergeant
Thanks Evan.
Erich, I understand your suggestion regarding the aircraft numbers but suspect I may have as much difficulty sourcing decals for those, as I'm having finding coloured letters.
Andy, thank you again for your kind offer of decals. I'm reluctant to put you to the trouble and expense of posting from Canada but really appreciate the gesture. If you decide to do so, I will forward my postal address by private message.
As regard the codes, I'm still strangely drawn to M8+EM, presuming that identification stands up to scrutiny. Despite probably having to hand-stencil the 'E', the ref photos are very good. Your (M8)+AM, would give me a good fall-back as indeed would my own, 3U+KR.
I don't know a lot about the Wespengeschwader and am currently trying to research it. I've found it listed for the Eastern Front and in Italy. Did it take part in the Defence of the Reich, also? The few photos for it I've found seem to be of Bf110Fs, mainly. The profile you posted certainly looks a nice scheme but would you know if it carried the ventral cannon pod? To date I haven't found any photos with it.
 Gerry
Gerry
Erich, I understand your suggestion regarding the aircraft numbers but suspect I may have as much difficulty sourcing decals for those, as I'm having finding coloured letters.
Andy, thank you again for your kind offer of decals. I'm reluctant to put you to the trouble and expense of posting from Canada but really appreciate the gesture. If you decide to do so, I will forward my postal address by private message.
As regard the codes, I'm still strangely drawn to M8+EM, presuming that identification stands up to scrutiny. Despite probably having to hand-stencil the 'E', the ref photos are very good. Your (M8)+AM, would give me a good fall-back as indeed would my own, 3U+KR.
I don't know a lot about the Wespengeschwader and am currently trying to research it. I've found it listed for the Eastern Front and in Italy. Did it take part in the Defence of the Reich, also? The few photos for it I've found seem to be of Bf110Fs, mainly. The profile you posted certainly looks a nice scheme but would you know if it carried the ventral cannon pod? To date I haven't found any photos with it.
Gerry- Thread starter
- #63
Gerry
Staff Sergeant
Don't know where the smiley, with the shades, came from!
Crimea_River
Marshal
Hi Gerry, lots to look into here. Once again, Kagero is to be taken with a grain of salt. The above profile is purported to represent a II Gruppe machine in Italy in September 1943 but by that time the Gruppe had moved to France. That scheme would have represented the aircraft as it likely appeared between May and July'43 and it likely would not have had the cannon pod but rather an ETC rack for bombs. The pic of 2N+FN I have does show that it sported the cannon pod.
I will gather up whatever decals you want and post them to you by Wednesday, after which I will be travelling for a while. I'll post some questions on your PM tonight.
I will gather up whatever decals you want and post them to you by Wednesday, after which I will be travelling for a while. I'll post some questions on your PM tonight.
A4K
Brigadier General
Looking forward to this...
Btw Gerry, the 'cool guy' is made typing an 8 with a ) after it: 8) !
Btw Gerry, the 'cool guy' is made typing an 8 with a ) after it: 8) !
- Thread starter
- #66
Gerry
Staff Sergeant
Evan thanks, that explains it, as I was trying to type (M8(bracket).
Andy, you'll probably have received my 2nd PM, explaining why I'm not going to attempt the Wespe scheme, by the time you read this. Thanks, however, for all your help.
Andy, you'll probably have received my 2nd PM, explaining why I'm not going to attempt the Wespe scheme, by the time you read this. Thanks, however, for all your help.
- Thread starter
- #67
Gerry
Staff Sergeant
Well, I've received the sets of resin parts I ordered, so really, I have no further excuse not to start this build. I spent the waiting time researching the Bf 110 G-2 and found some good refs but also, a lot of areas, about which, I have a load of questions.
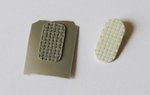
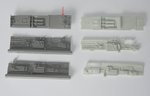
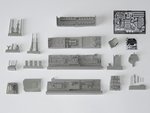
I'll start with some photos. Photo 1. The two sets of Resin I ordered: The Aires Bf 110G Cockpit Set and the Quickboost Exhausts Set. The Cockpit Set covers both the G-2 and G-4 versions so there are a lot of surplus items for the G-4 (I think) such as the 'Schrage Musik' (sorry, don't know how to find the umlaut, on this keyboard) cannons and spare ammo drums. There's also two types of rear-firing machine guns. As well as that, there's a PE Set and printed film for the instruments.
Photo 2. Just to compare the Aries cockpit to the kit parts The Aries are the darker pieces. As you can see, the detail on the Aires set is a lot sharper and more defined. Having said that, the kit parts stand up quite well in comparison, bearing in mind that there are parts moulded on the fuselage sides that fill the slots. I would give the kit parts 7-8 out of ten and I feel you could build a pretty good interior without the expense of an additional kit. Two ammo drums are cast on the Aries floor (arrowed), which I believe will have to be removed or the rear floor removed and replaced by the kit floor.
My research would seem to indicate that the interior cockpit colour would be RLM 66 at this period. Can anyone confirm this? And what about wheel wells and interior slats etc? RLM 02 or 66? My gut feel would be RLM 02, still.
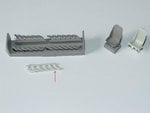
Picture 3. The Quickboost Exhausts and the Aries seat against the kit parts. I went for the drilled exhausts simply because I have nothing motorised that I could drill the exhausts with - and to find and buy something that would do the job would probably take a lot of time and be a lot more expensive. I normally drill circular holes with a drill bit, between my fingers. But to drill those pipes, by hand, I'd still be here at Christmas!
The Aries seat is a lot thinner and a more correct shape than the kit part, otherwise not a lot of difference.
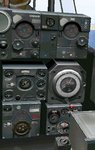
Picture 4. The Radio/Radar assemblies. Again my research would seem to indicate that the Aries part A is conformed for the G-4 version, with the top three units being for the Lictenstein Radar? I think it would be more correct for the G-2 to lose the top 3 pieces from part A and have part B, from the kit on the shelf behind the pilot. (I am assuming that the G-2 Dayfighter didn't carry this radar but I'm open to correction on this).
Picture 5. The bench seat for the Radio operator/Rear Gunner. I'm intrigued by this as it seems a step backwards from the earlier variants of the Bf 110, which had a 'real' seat. Can anybody enlighten me as to what the reason was for this change? My guess would be that the 110 G variant was designed for dual use, with the G-2 having a two-man crew and the G-4 a three-man crew, including a radar operator. Am I correct in my musings?
If that is the case, how many lap belts should I include on the seat, one or two? I suppose a Radio Operator/Gunner might also have been shifting position during missions so maybe two lap belts even with a two-man crew?
As usual, more questions from me than answers. Once again, I throw myself on the mercies of the Forum Members, who from past experience, will come to my rescue.
Gerry
I'll start with some photos. Photo 1. The two sets of Resin I ordered: The Aires Bf 110G Cockpit Set and the Quickboost Exhausts Set. The Cockpit Set covers both the G-2 and G-4 versions so there are a lot of surplus items for the G-4 (I think) such as the 'Schrage Musik' (sorry, don't know how to find the umlaut, on this keyboard) cannons and spare ammo drums. There's also two types of rear-firing machine guns. As well as that, there's a PE Set and printed film for the instruments.
Photo 2. Just to compare the Aries cockpit to the kit parts The Aries are the darker pieces. As you can see, the detail on the Aires set is a lot sharper and more defined. Having said that, the kit parts stand up quite well in comparison, bearing in mind that there are parts moulded on the fuselage sides that fill the slots. I would give the kit parts 7-8 out of ten and I feel you could build a pretty good interior without the expense of an additional kit. Two ammo drums are cast on the Aries floor (arrowed), which I believe will have to be removed or the rear floor removed and replaced by the kit floor.
My research would seem to indicate that the interior cockpit colour would be RLM 66 at this period. Can anyone confirm this? And what about wheel wells and interior slats etc? RLM 02 or 66? My gut feel would be RLM 02, still.
Picture 3. The Quickboost Exhausts and the Aries seat against the kit parts. I went for the drilled exhausts simply because I have nothing motorised that I could drill the exhausts with - and to find and buy something that would do the job would probably take a lot of time and be a lot more expensive. I normally drill circular holes with a drill bit, between my fingers. But to drill those pipes, by hand, I'd still be here at Christmas!
The Aries seat is a lot thinner and a more correct shape than the kit part, otherwise not a lot of difference.
Picture 4. The Radio/Radar assemblies. Again my research would seem to indicate that the Aries part A is conformed for the G-4 version, with the top three units being for the Lictenstein Radar? I think it would be more correct for the G-2 to lose the top 3 pieces from part A and have part B, from the kit on the shelf behind the pilot. (I am assuming that the G-2 Dayfighter didn't carry this radar but I'm open to correction on this).
Picture 5. The bench seat for the Radio operator/Rear Gunner. I'm intrigued by this as it seems a step backwards from the earlier variants of the Bf 110, which had a 'real' seat. Can anybody enlighten me as to what the reason was for this change? My guess would be that the 110 G variant was designed for dual use, with the G-2 having a two-man crew and the G-4 a three-man crew, including a radar operator. Am I correct in my musings?
If that is the case, how many lap belts should I include on the seat, one or two? I suppose a Radio Operator/Gunner might also have been shifting position during missions so maybe two lap belts even with a two-man crew?
As usual, more questions from me than answers. Once again, I throw myself on the mercies of the Forum Members, who from past experience, will come to my rescue.
GerryAttachments

Catch22
Major
No idea! Looks like a good set though.
Erich
the old Sage
Gerry two things to help hopefully, the other chaps will have to help you out on the model parts but.............
yes the G-4 Nachtjäger had a three man crew, the G-2 did not.
the rear mg protection for both the night fighter version and the day time bomber destroyer had the twin mg 81 zwilling installation
have fun !
yes the G-4 Nachtjäger had a three man crew, the G-2 did not.
the rear mg protection for both the night fighter version and the day time bomber destroyer had the twin mg 81 zwilling installation
have fun !
Looking good so far!
A4K
Brigadier General
With all, some great resin there!
Gerry, if you have a Praktiker or Baumax near you, you should be able to get an Einhell motorised tool - basically a Dremel at a tenth of the cost!
(Lidl sometimes have them too I think - there's one in Westmeath if not in Dublin)
Gerry, if you have a Praktiker or Baumax near you, you should be able to get an Einhell motorised tool - basically a Dremel at a tenth of the cost!
(Lidl sometimes have them too I think - there's one in Westmeath if not in Dublin)
Nice resin set.....so get stuck into it!
Airframes
Benevolens Magister
Nice stuff Gerry. You can also get a Dremmel 'look-alike' from Aldi, when they have them, for around £10, but to be honest, for such delicate work, it's best done with a pin vice.
Cockpit was RLM 66, wheel wells, inside slats etc RLM02.
Lap belts only on both rear seats, full harness on pilot's seat.
Cockpit was RLM 66, wheel wells, inside slats etc RLM02.
Lap belts only on both rear seats, full harness on pilot's seat.
- Thread starter
- #75
Gerry
Staff Sergeant
Cory, Erich, Jerry, Gnomey and Wayne, thanks for your comments. It is indeed a nice set of resin. I just hope I do it justice.
Evan and Terry, thanks for the info on the motorised tool. I have both Lidl and Aldi stores within 5 minutes walk of where I live. Just never occurred to me that they would carry that type of item. I'll check them out in the next week or so. And Terry, thanks for the confirmation of the colours. Do you have a view on the Radio/Radar configuration?
Evan and Terry, thanks for the info on the motorised tool. I have both Lidl and Aldi stores within 5 minutes walk of where I live. Just never occurred to me that they would carry that type of item. I'll check them out in the next week or so. And Terry, thanks for the confirmation of the colours. Do you have a view on the Radio/Radar configuration?
Airframes
Benevolens Magister
I think so, somewhere - leave it with me and I'll check.
Crimea_River
Marshal
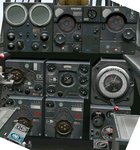
Hi Gerry. I don't have actual photos of the radio stack but have used these as references. They are screen shots from the IL-2 combat flight simulation and, despite being a bit distorted, give a pretty good (in my opinion) representation of what this area probably looked like.
Attachments
Vic Balshaw
Major General
That is one nice looking resin set Gerry, well worth the investment.
Airframes
Benevolens Magister
Good stuff Andy, and better than the photos I've found so far.
- Thread starter
- #80
Gerry
Staff Sergeant
Thanks, Terry, Andy and Vic. Excellent references Andy, they should be a real help. Hope you had a good trip to Toronto, I'm assuming you're back home now? Do you guys think the top three units would have been used in the Dayfighter? My research seems to suggest that they're for the Lichtenstein Radar, which I thought was only carried in the Bf 110 G-4 nightfighter.
I've spent the last couple of days cutting resin (tedious) and plastic. If I have one moan about resin, it's the moulding blocks that have to be cut off. It was particularly tricky on the floor pan as it's stepped - and to cut a straight line all the way across would have destroyed the recessed cannon breeches. Luckily I spotted the problem in time and worked around it - but there must be a better way. I've decided to present the model with the flaps down and the slats deployed, so I've just finished cutting them out - again tricky with the lower slats, as they are very thin, only about 1mm, at the wingtip. My next problem is to make the flaps fit in deployed mode. There's a problem with the split undercarriage nacelle fit. I don't have any references for the real thing, but I assume the rear part of the nacelle, attached to the flap, folded into the front part of the nacelle? So I've got to make that work properly.
Anyhow, I'll take some photos of progress to date, in the next day or two, and post them as soon as I can.
Users who are viewing this thread
Total: 1 (members: 0, guests: 1)