**** DONE: 1/48 Tamiya Spitfire Mk.I DW-O 610 Sqdn BoB GB (1 Viewer)

Ad: This forum contains affiliate links to products on Amazon and eBay. More information in Terms and rules

Thanks Vic, Wayne, and Glenn.

Got a bit done today. Cockpit is now done and glued in on the right side. But first, I detailed the port side of the pit.

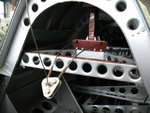
Shown below is the port side (compare to post 49). Added were the wireless control (black unit at top right with wires to aft and forward), a placard below that, the gun camera indicator above the trim wheel, cockpit light above that, flare control box top to left of map box (in black), a map holder on the map box (difficult to see but this is a shaped piece of plastic card with a hand cut-out glued to the front of the box), and finally, the connector tube between the air tanks.

101011 Cockpit Left.jpg


Next up is the the seat and frame glued into the starboard side. The home made dials on the panel show up well in this shot. Added here is a scratch built-radiator flap lever (the bar to the left of the seat with the white button on top) and the landing lamp controller and wires (aluminum coloured box and lever on the lower panel to the left of the compass).

101011 Cockpit with Seat In 1.jpg


Next up is a similar view from the front. The shoulder belt harness has yet to be connected to the rear framing and is just kind of hanging there at the moment. Also seen are the offset rudder pedals. The stick has been pulled back slightly as the elevators have been cut off and will be deflected upwards.

101011 Cockpit with Seat In 2.jpg


That's it for now. Next, the fuselage halves will be glued together and progress should be reasonably quick after that. Thanks for looking in.
 
Last edited:
Lookin' good. I had considered making the oxygen tank and hose but held off. I kind of wish I had after seeing yours.
 
Thanks Jay. The tank is dead easy. The piece came straight off the trees that came with the kit. A bit of cutting and filing, add the straps and it's done.

The hose is a different matter. Luckily, I kept the length of coiled steel wire that I found somewhere but when it runs out, I'll be back to tryong to make my own using fine gauge copper wire coiled around itself. I have not yet perfected the technique as the stuff is so soft it keeps breaking.
 
Very nicely done Andy, you could take it for being the real thing. I often wonder if when entering for a competition (on the floor of a show that is) if the judges come armed with a pencil torch and magnifying glass to check out the aircraft pits......................if not, there's a lot of good modelling detail they are missing.
 
Bl**dy good work mate! Note that the tail strap for the Sutton harness was connected to a Bowden cable, which ran over the horizontal stiffener in the frame at the rear of the cockpit, and was anchored to a pully and release on the top of the mid-rear fuselage.
When you run out of the wire, use lead wire, wrapped around either cotton thread, or, better, thin copper or brass wire, to make the convoluted oxygen hoses. Just attach one end with CA, then wrap around until satisfied, then glue with CA at the opposite end, and trim as needed.
 
Hi Terry. Yes, I have a good pic of the harness arrangement (see below).

As for the hose, thanks for the info. I tried making a hose out of 30ga copper wire and got to about .75 inch long before it broke. Lead wire? Where on earth do you get that?
 

Attachments

  • 07628_011-640x480.jpg
    07628_011-640x480.jpg
    48.8 KB · Views: 158
Plus Model do a range of lead wires and foil sheet, in various gauges. The wires are in 0.2mm to 1.0mm, at around £1.25 to £1.75 per pack, with a lot of lengths, each around 8 inches or more long.
If you have problems finding some, let me know, as my local Model Shop stocks it.
 
Hmm. Don't know about the 'eco laws' in Canuck land, but as a modelling product, it might scrape through? it can be ordered via Hannant's etc, but if you're interested, let me know, and I'll e-mail a pic of the packaging and contents. It's no prob for me to get some and send it, and probably a lot easier and quicker than ordering on line. Oh, and the first pack is on me - I owe you for not getting to Duxford - bad Terry !!
 
Terry, you owe me nothing mate. You sent me that CF-5 article remember? I owe you to finisha that build (hopefully before your Buccaneer!). And there will be other Duxfords for me to come and further chances to meet. I plan to see Legends at some time as well.

As for the lead wire, a US post on another site said Bass Pro fishing shops have it in spools. One just opened last year here in town so I may get around to check it out.

I'm actually stocked for some time as the steel coil I found was after I tried making my own and, being about 8 inches long, should give me a fair nnumber of needed 1/48 hoses for a while.

As always, your willingness to help is very much appreciated.
 
Did a bit of modeling through the week and today. The wings went together and were glued to the fuselage, requiring a bit of seam work, and the cockpit was finished off.

As nice as the fit on this kit was supposed to be, I did have a few issues that I needed to address. Below is starboard wing root which had a small gap to take care of. This was done with the white putty/Cutex technique which filled the gap nicely.

101016 Putty Stbd Wing.jpg


Whereas the port wing root had no gap, there was a misalignment between the top of the wing and the surface of the wing root where it was to blend in, resulting in a small step. This I removed by carefully filing and sanding the wing root step down to where it met the top of the wing (pic below).

101016 Port Wing Root.jpg


Also, having followed the instructions for a change, I had glued the small carb intake to the bottom of the wing before gluing the wing to the fuselage. The underside of the engine cowl was glued on afterwards, which I did per the instructions, only to find that there was a gap that needed work. So off came the intake and on went the putty (below).

101016 Putty Underside.jpg


After this area is smoothed down, the intake will be glued back on.

Next came the completion of the cockpit. The next two pics show the addition of the two Sutton harness cables to the rear interior of the fuselgae. This was a simple matter of gluing on some stretched sprue cut to length.

101016 Harness from Left.jpg

101006 Harness from Right.jpg


Finally, the gunsight was painted and installed so I could start getting the canopies in place for painting.

101016 Gun Sight.jpg


Thanks for tuning in once again. More pics tomorrow likely as the canopies are being masked and installed and a probable primer coat will go on.
 
Exceptionally nice work there Andy, bl**dy good show old chap! Just noticed Tamiya have provided the later MkII gunsight, with the rectangular reflector screen. Those during the BoB period normally had a circular screen, but I wouldn't bother changing it - I'm not sure when the actual screen change occurred, and I think I've seen both in the later stages of the Battle.
Found out when the seat changed from metal to 'plastic' - 14th February 1940 on the production lines.
 

Users who are viewing this thread

Back