Navigation
Install the app
How to install the app on iOS
Follow along with the video below to see how to install our site as a web app on your home screen.
Note: This feature may not be available in some browsers.
More options
You are using an out of date browser. It may not display this or other websites correctly.
You should upgrade or use an alternative browser.
You should upgrade or use an alternative browser.
**** DONE: 1/48 Tamiya Spitfire Mk.I DW-O 610 Sqdn BoB GB
- Thread starter Crimea_River
- Start date
Ad: This forum contains affiliate links to products on Amazon and eBay. More information in Terms and rules
More options
Who Replied?
- Thread starter
- #102
Crimea_River
Marshal
Thanks everyone. Terry, thanks for the added bits of info. Looks like I'm OK with the seat, albeit with the debatable added flare rack. As for the gunsight, If I hadn't have glued the winscreen on already I would have changed it but c'est la vie.
- Thread starter
- #103
Crimea_River
Marshal
Had a set back today. Just like Jason, I managed to break the little rear canopy piece. This g***am thing is molded too wide and in trying to get it to fit the narrower fuselage, I snapped it. This has now held up progress as I want this glued in and feathered in to the fuselage before I begin painting.
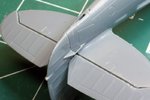
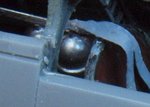
I've scavanged a part from one of my ICM Spit IX's but it will need to be reshaped. So there's a bit of a hiatus while I get this new piece fitted. In the meantime, I managed to replace the kit rudder link with a bit of stretched sprue:
I've scavanged a part from one of my ICM Spit IX's but it will need to be reshaped. So there's a bit of a hiatus while I get this new piece fitted. In the meantime, I managed to replace the kit rudder link with a bit of stretched sprue:
Attachments
Vic Balshaw
Major General
Your going great guns Andy.
ozhawk40
Master Sergeant
Great work CR, shame about the rear canopy piece, but I'm sure you'll come up trumps. 8)
Cheers
Peter
Cheers
Peter
T Bolt
Colonel
Too bad about the canopy Andy, I'm sure you'll get it worked out. The cockpit looks fantastic!
- Thread starter
- #108
Crimea_River
Marshal
Thanks guys.
Airframes
Benevolens Magister
Hope you get the canopy sorted Andy. Let me know if you continue to have problems, as I have two or three different Spit canopies which might work.
- Thread starter
- #110
Crimea_River
Marshal
Thanks Terry. Furtunately I'm in the same boat with two unbuilt ICM kits. Mind you, the parts still need shaping but so did the Tamiya one.
Don't know how I got such a crappy fit on this one. Very unlike Tamiya and I'm wondering if this led to Jason's mishap and whether Glenn had this problem.
Don't know how I got such a crappy fit on this one. Very unlike Tamiya and I'm wondering if this led to Jason's mishap and whether Glenn had this problem.
Last edited:
Sorry to hear you had the same problem Andy. I think mine has the same problem. The front was hitting the top of the seat and I thought the seat sat too high or the canopy was too short. After reading what you posted I'm starting to believe that the piece is too wide and that's why it's not fitting. I may need to build it up and sand it flush to make it fit right.
Last edited:
- Thread starter
- #112
Crimea_River
Marshal
Exactly my issue. The front was hitting the top of the seat bulkhead and the bottom edges protruded beyond the fuselage surfaces. I had the masking tape on and in pinching the bottom edges in a few times for dry fits, I noticed what looked like a hairline crack. When I lifted the tape, away it went right through.
I looked at Glenn's pics and it looks like he got his on with only a slight overbite which I could have lived with but mine was way more than that.
Oh well, going with plan B.
I looked at Glenn's pics and it looks like he got his on with only a slight overbite which I could have lived with but mine was way more than that.
Oh well, going with plan B.
T Bolt
Colonel
I had a closer look at mine and it doesn't even look as bad at it did in the picture, just a slight overhang on the left side. The only thing I can think of that would make a difference between your two Spits and mine is possibly that I used Testors tube glue to join the fuselage halves and the thickness of that glue might possibly made the fuselage just enough wider that the clear part fit.
Last edited:
- Thread starter
- #114
Crimea_River
Marshal
No way that the amount of overhang on mine would have been made up by glue Glenn. Here's a question though: if you look at your joint between the seat bulkhead and the fuselage wall where the hatch is on the port side, do you have a gap or is it closed? I had to clamp my fuselage together to close a sizable gap at that point and I have a feeling that may have pinched the fuselage tighter. But it was needed to close this very visible gap at the hatch location.
At any rate, I got a new piece on from my ICM Spit VIII and there's also a bit of an overhang. However, it's almost completely hidden by the open canopy so I think I'll be back in production soon.
At any rate, I got a new piece on from my ICM Spit VIII and there's also a bit of an overhang. However, it's almost completely hidden by the open canopy so I think I'll be back in production soon.
Dr. Wartenberg
Airman
- 25
- Feb 1, 2010
Amazing cockpit detail!
Glad you will overcome this slight hiccup rather quickly, Andy...
T Bolt
Colonel
No way that the amount of overhang on mine would have been made up by glue Glenn. Here's a question though: if you look at your joint between the seat bulkhead and the fuselage wall where the hatch is on the port side, do you have a gap or is it closed? I had to clamp my fuselage together to close a sizable gap at that point and I have a feeling that may have pinched the fuselage tighter. But it was needed to close this very visible gap at the hatch location.
At any rate, I got a new piece on from my ICM Spit VIII and there's also a bit of an overhang. However, it's almost completely hidden by the open canopy so I think I'll be back in production soon.
My cockpit is sealed up right now for decaling and clear-coating, but I looked at some un-resized pics I took right after I slid the cockpit into the fuselage and it looks tight. Did you close the fuselage halves around the cockpit, or close up the fuselage first, then slide the cockpit in from the bottom? maybe that's why you had the gap between the frame and the side. Anyway with the bubble canopy slid back over the rear section a little ledge shouldn't be noticeable.
Attachments
- Thread starter
- #118
Crimea_River
Marshal
Thanks Glenn.
I actually glued the pit onto the right half before gluing the left half, then closed the gap with clamp. That may have contributed, but only if the pit was in th eworng spot which I'm sure it wasn't.
Anyway, that's ancient history now. The ICM part has been glued in, filed and sanded down, polished and has a coat of Future that's drying now. Pics soon.
Airframes
Benevolens Magister
Sounds like you've got it sorted Andy, well done mate.
T Bolt
Colonel
Thanks Glenn.
I actually glued the pit onto the right half before gluing the left half, then closed the gap with clamp. That may have contributed, but only if the pit was in th eworng spot which I'm sure it wasn't.
Anyway, that's ancient history now. The ICM part has been glued in, filed and sanded down, polished and has a coat of Future that's drying now. Pics soon.
I think I have it figured out! I looked back at pics of your cockpit and comparing them with mine it looks like my rear bulkhead is sitting a millimeter or so too high. The wedge shaped of that bulkhead would have spread the fuselage wider as I pushed the assembly into place. So it looks like by pushing the cockpit in a little too far it saved myself a headache with the canopy.
Users who are viewing this thread
Total: 1 (members: 0, guests: 1)