**** DONE: 1/48 Tamiya Spitfire Mk.I DW-O 610 Sqdn BoB GB

Ad: This forum contains affiliate links to products on Amazon and eBay. More information in Terms and rules

Thanks Bill.

Glenn, that could do it, but then you should have had a broblem with the top of the bulkhead interfering with the glazing. Mine was almost touching already and it's lower.

Anyway, here are some pics of the fixed glazing. The first picture is the before shot with the ICM part attached. The part is inferior to the Tamiya one as it's not as clear. It had received a coat of Future and was then glued onto the fuselage with CA glue so that it would survive some vigourous shaping. Note the width of the glazing at the bottom and the "overbite" where it meets the fuselage. You can also see that part way up the glazing is fairly straight whereas the fuselage is more rounded so there's a bit of a step. Also note the lovely finger print which, of course, is on the inside of the glazing and was only noticed in the picture. (Damned camera!:mad:
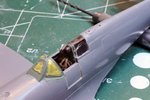
). The front windscreen frame has received a coat of interior green before the camo is applied so we get the right colour inside.

The second pic is the "after" shot where the overbite and step have been filled, sanded, and polished to feather the edge into the fuselage. The panel line had to be rescribed in the process. I was also partly successful in getting at the finger print using a bent piece of stretched sprue with a little piece of tissue on it pushed through the tiny gap between the glazing and the bulkhead.

I need to explain that the access hatch is only there to mask the canopy from spray and will be discarded when the finish is done. It's the scrap piece that was sawn out of the fuselage and is held in with PVA glue so it can be easily removed.

So as we stand tonight, the canopy is fully masked and a coat of primer has been applied to the model to find the imperfections that are no doubt still there.

Thanks for all the support and feedback guys. I really appreciate it.
 

Attachments

  • 101020 Rear Canopy before Shaping.jpg
    101020 Rear Canopy before Shaping.jpg
    78 KB · Views: 124
  • 101020 Rear Canopy after Shaping.jpg
    101020 Rear Canopy after Shaping.jpg
    85.7 KB · Views: 123
Thanks Glenn. And as you correctly observed, a lot of this work will be hidden anyway once the sliding canopy is put over top in the open position.
 
Cheers guys. Primer coat has been inspected and some minor blemishes are being addressed. Should get some good progress this weekend.

I'm likely going to mask the letters right onto the primer as it seems a decent colour.
 
Primer on, blemishes fixed, and ready to paint after I mask the squadron letters. I think the primer itself is a suitable colour for the letters although it looks a lttle whiter in these shots.
 

Attachments

  • 101022 Primer On.jpg
    101022 Primer On.jpg
    88 KB · Views: 84
  • 101022 Primer On Closeup.jpg
    101022 Primer On Closeup.jpg
    73.1 KB · Views: 83
Wonderful Andy! Can't even see you had trouble with the rear canopy. I'd go with using the primer for the code color, when I sprayed on the gray for them I had a hard time telling where the prime ended and the gray started!
 
This series of shots shows today's progress.

First up, to make the masks for the codes, I cut and placed the kit decals onto a piece of wide Tamiya tape.

101023 DWO Mask Decal Template.jpg


Next, using the decals as a template, I carefully cut the masks with a sharp x-acto knife

101023 DWO Mask Cut.jpg


Then, with some temporary paper roundels cut from paper and stuck to the model to enable proper position of the masks, the code letters were applied over the primer on both sides.

101023 DWO Mask Left.jpg

101023 DWO Mask Right.jpg


Finally, the temporary roundels were removed and spraying of the Sky underside was completed.

101023 Sky Bottom.jpg


Tomorrow, I'll get a coat of Dark Earth on and maybe even the Dark Green. See you then.
 

Users who are viewing this thread

Back