**** DONE: 1/72 Bf-109E Hasegawa - Me/ Fw Group Build. (1 Viewer)

Ad: This forum contains affiliate links to products on Amazon and eBay. More information in Terms and rules

Thanks guys.

Today's update;

decal time, and unfortunetly i had a severe arthritic attack while doing them and ruined the kill marks and one swastika, so i used the hasegawa decals to cover up. Its one of the really bad things about getting older, sometimes my body fails while I'm doing something, but otherwise it came out decent i think.

decals.jpg

decals1.jpg

decals2.jpg


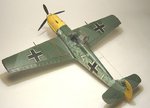
i believe my camo blend has a pretty good effect. Another way to do dappling guys, besides butching a brush is one i sometimes use you make like. I take a piece of medical gauze, strech it over my finger and dip it in paint, and carefully apply it to the model, you get nice results. here is an example of a previous 109 I made using this technique:
9.jpg


BTW, would any of you guys happen to have 1/48 german pilot you could spare? I just got a 1/48 109 but it came without a pilot, only his arms!
 
Last edited:
Looking good. Another way to do the mottle without an airbrush is to use a cotton bud (Q Tip), and I think the technique is described in the brush painting guide I posted some time ago. Here's a pic of a 1/48th '109E I built about 20 years ago, which was entirely brush painted, including the numerals and Gruppe bars, with the mottle done that way. OK, it's not brilliant, but the overall effect is acceptable, especially to the naked eye.
 

Attachments

  • Gallery models 105.jpg
    Gallery models 105.jpg
    49.9 KB · Views: 95
Thanks guys.

Today's update;

Painted the canopy, this was done over two days by masking the main lines, but the front was freehand painted as I could not see clearly to mask it. It seems ok. It was then attached to the plane using elmer's white glue, my preferred canopy agent as it dries clear and extremly hard yet won't damage the paint and cleans up with water.
canopy.jpg


Next the exhausts are painted a rust color, and the next phase will be to paint the guns and then weather her with some careful washes. The porpellar is also touched up and teh black ring is added to the prop spinner.
canopy1.jpg

canopy2.jpg


Home strech now guys!
 
Thanks guys.

Today's update;

The plane has now been given a pin wash to pick up some detail, and I added exhuast stains on teh sides as well as gunsmoke trails on the fuselage and wings. I also added some detail to the cowling by way of some black highlights. The plane was then hand washed in vallejo dull finish to make sure the paint job looks even.

weathering.jpg

weathering1.jpg

weathering3.jpg

weathering2.jpg


All that is needed now is to attach the landing gear and I can call this one complete!
 
OK, guys, this is it:

BF-109E Flown by Adolph Galland during the battle of britain, a model by Chris constructed for the group build on WW2aircraft.net

complete2.jpg

HPIM0001.jpg

complete.jpg

complete1.jpg

complete5.jpg

complete4.jpg

complete7.jpg

complete6.jpg

complete9.jpg

complete8.jpg
 
Last edited:
Nicely done Chris, but if you are done then you must start a new thread for the finished model with the 6 mandatory pictures and if you want, up to an additional four shots of your choosing.

Here is one of my examples with appropriate heading and entry details.

http://www.ww2aircraft.net/forum/4-heavy-hitters/finished-hasegawa-1-48-junkers-ju-87g-2-kdr-sg2-heavy-hitters-gb-22846.html


This thread has the angles of the pictures required when presenting your finished model. Post #2 has a PDF link showing the angles.

http://www.ww2aircraft.net/forum/group-builds/group-build-photo-requirements-17034.html

Also can I ask if you could take the pictures again on a lighter background, makes judging a little easier.

Just PM me if you have any questions.
 
Last edited:

Users who are viewing this thread

Back