**** DONE: 1/72 De Havilland Sea Venom FAW 53 – Carrier Aircraft GB

Ad: This forum contains affiliate links to products on Amazon and eBay. More information in Terms and rules

made some further progess tonite but no photos. Attached the wing assemblies and the tail boom. spent the night sealing and sanding the seams. havea bit to go yet, will post update photos soom. venom has a very interesting shape, and IMO Frog did a pretty good job with the outside skin. It all went together pretty nicely and the type plastic used by Frog is pretty good as well. i was pleasantly surprised .

I have yet to make a decision on retouching the ejection seats, and also whether to olpen the canopy. im thinking not at this stage. Shaping the vac form canopy is going to be tricky as it is, even if I leave it closed, ill have a think about it over the next couple of days.

The best thing about the frog kit is its simplicity. The worst thing is...its simplicity. If you get over its total lack of interior detail, and some other dinky things, its actually not a bad rendtion. And it goes together very niclely for a kit its age. Its not as flashy as the newer kits like CMRs, but it is a pretty good low cost kit really...well, at least so far and IMO
 
Have made some good progress in the last week, basically getting the body surfaces ready for painting, and also applying the base coat (Tamiya Sky). Ive also applied the masking and am just about to apply the Tamiya Dark Grey to the upper surfaces. I have shaped the Vac-Form canopy, but have not yet made a decision about opening the canopy or not. Probably wont though because I just dont think the canopy will be as clean looking open than if its closed up. Ive re-installed the seats, and realize that even with the canopy open, its just not posible to see all that much of the cockpit interior. Its there, and (without being too smart about it), it looks good,, because the details are there (and whilst not faithfully accurate, they look the business) , but it just isnt posible to take in all the detail Ive done, mostly because of the dark cockpit colours. Having a canopy open or shut wont make much difference to viusibility to be honest.

However, the sill area behind the cockpit is highly visible, but Im also pretty happy with the way its scrubbed up. I applied the "scale black" as a base coat, and then dry brushed The ejection seats I finished up retouching, very slightly, mostly to redo the yellow and black striping at the top, but also to bring out a bit better the seat harness. They look better for it i think.

At this stage, I hope to apply the Dark Grey to the upper surfaces tonite and should be in a position to post progreass shots either tonite or tomorrow. Ive found incidentally that mixing the paint about 3 parts paint to 1 part acrylic thinner gets a nice consistency for the paint, avoiding poor quality applications, whilst retaining a good colour density. We'll see how that theory stands up i guess.
 
Looking forward to seeing the pics too. And I must apologise - I totally forgot to get some exterior detail shots of the example at Newark Air Museum last Friday. I only remembered when we were preparing to leave, after the hangar had been locked !
 
I'll get some when I go next time, so you can keep them on file for any future builds. Access is much closer than at Duxford and, if arranged before hand, and staff available, the Museum will allow personal access to the whole aircraft. (Got a whole set of exterior detail shots of the Jaguar, at angles not normally possible without being up close.)
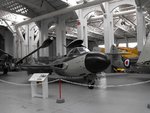
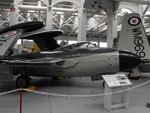
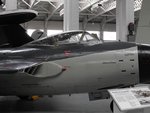
Meanwhile, here's a couple of the Duxford example, which might help with some small details.
 

Attachments

  • Czech 090.jpg
    Czech 090.jpg
    104.1 KB · Views: 98
  • Czech 091.jpg
    Czech 091.jpg
    98.1 KB · Views: 108
  • Czech 092.jpg
    Czech 092.jpg
    88.2 KB · Views: 106
Terry. Fantastic and helpful photos. I have just completed (early this morning before going to work), the Tamiya Dark Sea Grey Coat. Finish was good, but unfortunately for me, Ive made a couple of errors in the masking. I can see from your photos, and the one I have attached, that the grey extends over the leading edge, to form a small grey overlap on the underside of the wing. At the moment ive pained it to the mid point of the leading edge.

I may also have not taken the curving grey paint line on the top of the nose quite far forward enough. i motice on the RN example that the curving actually touches the black nose, whereas in the RAN copy thereis a distinct gap of Sky green separating the black nose from the grey hue. But I think my gap is just too much, but will check tonite when i remove the masking.

Some other details that I noticeed are :

The Australian copies have red gunports whilst the RN copy is black or grey
The triangular "danger" symbol is wholly in the grey colour of the RN sample, whilst for the RAN copy the triangle straddles the pain line
The RN grey seems to be more black than the RAN copy....
 

Attachments

  • 20071112_dH_Sea_Venom_WZ931_SAAM_092.sized[1].jpg
    20071112_dH_Sea_Venom_WZ931_SAAM_092.sized[1].jpg
    57.6 KB · Views: 91
  • WZ939_18th_March_2007[1].jpg
    WZ939_18th_March_2007[1].jpg
    64.8 KB · Views: 683
I think that normally, on RN versions, the upper surface grey curves in the same way as the RAN scheme, with a slight gap between it and the black radome. This is just visible in the partial view of the one at Newark in one of my pics. Also, in the pics taken at Duxford, the grey looks slightly darker due to the diffuse lighting in the hangar - it was a humid, overcast day, and this caused rather 'flat' lighting conditions through the high windows - the colours should be the same shade in both cases.
 
I have the Dark Grey 2nd colour down and will post some progress shots soon. Just a bit of tidying up to do at this stage. Quite happy with the results. Its by this stage that I can start to tell whether the finishes are looking okay or not, and generally Im happy.

I just noticed that the air intakes have some baffles that are not depicted in the Frog kit. They are quite significant visual elements, so I am going to have to scratch build something in those intakes. From the photos Terry and I posted, they look like they are plates or fins rather than just struts. Must be some sort of guide for the incoming air I would think
 
Sorry guys for the long sojurn, home and work committments are pretty vicous at the moment. ive made some good progress, and am quite happy with the results.
ill let the photos do most of the talking.
ive had to ndertake a bit of scratch building, and a lot of surface preparation to get to the point i have....intake thingys, mods to the undercariage, two resprays....im pretty happy i put the aftermarket cockpit in, and am happy with the progress Ive made with the vacform canopy (not shown). I am over half way now......have had to "make/pinch' decals for the bird in oz livery....hopefuly they work.

Decalling arming fitting the exhaust stack and arrester gear are the next jobs to be done.
 

Attachments

  • 110_2466[1].jpg
    110_2466[1].jpg
    65.4 KB · Views: 118
  • 110_2467[1].jpg
    110_2467[1].jpg
    63.9 KB · Views: 111
  • 110_2469[1].jpg
    110_2469[1].jpg
    64.9 KB · Views: 111
  • 110_2470[1].jpg
    110_2470[1].jpg
    76.9 KB · Views: 112
  • 110_2471[1].jpg
    110_2471[1].jpg
    67.9 KB · Views: 112

Users who are viewing this thread

Back