**** DONE: A6M5 Zero - ATAIU*SEA U.K. - Captured / Aircraft in Foreign Service GB

Ad: This forum contains affiliate links to products on Amazon and eBay. More information in Terms and rules

N4521U

Colonel
13,398
5,595
Nov 1, 2009
Miranda, NSW
User Name : N5421U
Real : Bill
Category : Still somewhere in the middle
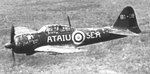
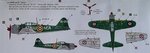
Entry : British marked ATAIU*SEA captured A6M5 Zero.
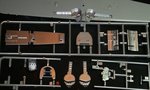
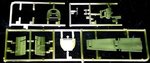
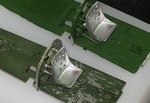
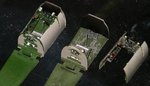
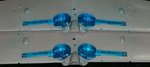
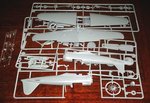
Kit : Hasegawa 1/48th scale..... OTB! Maybe some scratch build stuff. Gonna keep this one simple.
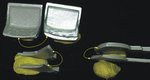
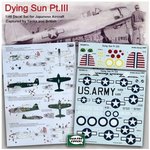
Accessories : Decals see photo.

OK, this is the revised ATAIU*SEA build to fit the decals I have. Silly reason to start another build I know, but I have never claimed to be the brightest star in the universe. I do have to thank Wayne for contributing to this revision tho. The things we do for one another. What a place eh?
 

Attachments

  • Zero 1a the plane.jpg
    Zero 1a the plane.jpg
    22.7 KB · Views: 1,409
  • Zero 1b decals.jpg
    Zero 1b decals.jpg
    69.4 KB · Views: 627
  • Zero 1c decals.jpg
    Zero 1c decals.jpg
    54.4 KB · Views: 391
  • Zero 1d kit.jpg
    Zero 1d kit.jpg
    89.3 KB · Views: 345
Last edited by a moderator:
Look at me, I don't even know what build I'm in.

Anyway, I have started off on this one. Silver undercoat, Tamiya Leaf spray can, for the cockpit and will ude a darker green from the bottom, a lighter, faded, green from the top. Will do some wire brushing to remove color for Age. Wheel wells and gear doors wil be the tranparent blue. Gonna do the same on the overall and remove copius amounts of color for the look in the photo. This plane will be overall green outside without the gray underside. I think this will be correct for the end of the war???? Yes, no?

I've thinned the outside panel on the gear doors for scale. Same with the seat back. Made a dimple for the hub center with the end of a dremmel tool and scribed the little acces door with a punched template. Not gonna do all them rivets tho. That would be wayyyy tooo much.
 

Attachments

  • Zero 2a thinning.jpg
    Zero 2a thinning.jpg
    15 KB · Views: 227
  • Zero 2b wheel doors.jpg
    Zero 2b wheel doors.jpg
    70.9 KB · Views: 231
  • Zero 2c undercoat.jpg
    Zero 2c undercoat.jpg
    76.8 KB · Views: 232
Started the painting process this morn. instead of golf............. I must be seious about this one eh!!!!!?

I did the gear bay and doors in Tamiyas transparent blue. Discovered why it's always so dark on kits. Seems the transparent paint gets a little spotty from the gun. Coat after coat to get it even, and wallah, dark transparent blue! Can't get away from it it seems.

Green on the cockit parts, dark first, then washed out, added white from the tops to make it faded. Can be seen in the picture. I will try wire brushing the color off the silver undercoat to get the Used look.

Nope, it'a not a 4 wheeler! I'm building a second one as new, kinda before and after. Will post it as a built aircraft later not in the GB.

I sailor on.
 

Attachments

  • 3a trans blue.jpg
    3a trans blue.jpg
    98.7 KB · Views: 205
  • 3b interior base.jpg
    3b interior base.jpg
    79.8 KB · Views: 232
:cool:

Bill, your choice, but your Zero appears to be a Mitsubishi built aircraft, therefore the wheel wells and both sides of the undercariage covers should be in the same colour as the lower surfaces, this colour is similar to FS 16350
 

Attachments

  • 14201,16350, 36307 Japanese colours_Zero.jpg
    14201,16350, 36307 Japanese colours_Zero.jpg
    4.1 KB · Views: 241
Last edited:
Dam Wayne....... This color was so difficult to put on, I think it may stay on. If anyone thinks about using this color, and if I had, I wouldn't have. It goes on rather thick since it is transparent in order to get the color to go away from blotchy. I would recommend MASKING the opening, I had to scrape all the color off the wing surface, very anoying.

I'm showing both A/C for comparrisons. I used a small flat dremmel tool and flattened the 3D instrument from the panel making a recess. Punched the instruments from the decal sheet, cut half the backing off, put a dab of white glue in the hole and pressed the decal into it and cover the face with another dab of white glue. You can see what the wire brushing did to the green coat on the panel and other surfaces.

Painted the side panels, made a new throttle quadrant, and the seat adjustment bar on the right side of the seat. I also drilled out the dimples in the seats. The interiors for both the new plane, and the captured are ready to install.

And finally a picture of the cleaned up wing surfaces of the transparent blue, whice one would really WANT to use. I don't reccomend it, but if used, I sure would do some serious masking.
 

Attachments

  • 4a punch instruments.jpg
    4a punch instruments.jpg
    87.4 KB · Views: 240
  • 4b apply instruments.jpg
    4b apply instruments.jpg
    92.5 KB · Views: 210
  • 4c panels finished.jpg
    4c panels finished.jpg
    69.2 KB · Views: 213
  • 4d int sides.jpg
    4d int sides.jpg
    74.7 KB · Views: 214
  • 4e seats.jpg
    4e seats.jpg
    81.7 KB · Views: 287
  • 4f interiors.jpg
    4f interiors.jpg
    77.3 KB · Views: 217
  • 4g wheel wells.jpg
    4g wheel wells.jpg
    67.8 KB · Views: 218
Stalled a little with the NZAF plane but just the fuselage to go on these two, sorry for the delays.
 

Users who are viewing this thread

Back