Navigation
Install the app
How to install the app on iOS
Follow along with the video below to see how to install our site as a web app on your home screen.
Note: This feature may not be available in some browsers.
More options
You are using an out of date browser. It may not display this or other websites correctly.
You should upgrade or use an alternative browser.
You should upgrade or use an alternative browser.
**** DONE: Kittyhawk Mk III James F. "Eddie" Edwards RCAF - Aircraft of the Aces GB.
- Thread starter Crimea_River
- Start date
Ad: This forum contains affiliate links to products on Amazon and eBay. More information in Terms and rules
More options
Who Replied?- Thread starter
- #242
Crimea_River
Marshal
Thanks everyone. So my learning from this is that it seems to be easier to create the codes using a reverse process, i.e. I should have painted the white first, before any camo colours were applied, then masked the white with tape of consistent width to form the letters. I did my Mk II Spitfire DW-O that way and it turned out better I think. Mind you, these letters were much smaller and tighter so any slight variance in width of the mask became very noticeable. Anyway, I'm satisfied with the results but am not sure this would stand up to model contest scrutiny.
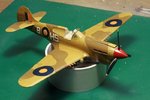
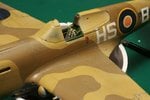
Having now finished the codes, I did some subtle panel line highlighting with a sharp .5mm pencil, darkened the engine area underneath with pastel, and sprayed a coat of Future on making sure there was a good thick coat over the codes. I'll let his set for a few days, give it a light sanding, and then get a flat coat on. Here's how it looks after today's work. The prop has been stuck in temporarily.
Thanks again everyone. I appreciate your comments.
Attachments
hub
Senior Airman
Nice one Andy
The unit codes came out really well you can't tell how much grief they gave you!
Mike
The unit codes came out really well you can't tell how much grief they gave you!
Mike
Airframes
Benevolens Magister
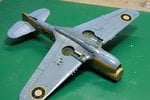
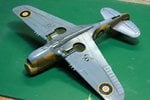
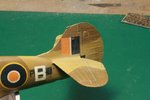
Beaut work Andy, and I agree, - reverse masking is often much easier and more accurate. Hadn't realised that the aircraft carried 'A1' underside roundels.
looks good Andy
Like the look of that Andy!
- Thread starter
- #247
Crimea_River
Marshal
Thanks everyone. Terry, the A1 roundels are clearly visible in the pictures in post 1.
- Thread starter
- #249
Crimea_River
Marshal
Thanks Chris. It's going to get a lot more worn looking after I'm done with it.
Looks great Andy!
Airframes
Benevolens Magister
Andy, yes, but I hadn't known they used this type until now - see, modelling is educational !
tigerdriver
Staff Sergeant
Some really good work there
Coors9
Senior Airman
Beauty job.

brucejscott
Staff Sergeant
O. K. Andy. You have hooked me. I am now going to have to build a P-40 in RAF colours.
vikingBerserker
Lieutenant General
Nice!
- Thread starter
- #257
Crimea_River
Marshal
Thanks everyone. So I sprayed the entire model with Tamiya Flat Base X-21 mixed with about 20% Future. Not being familiar with Tamiya paints my question is this: is this the stuff that's supposed to give a nice dull flat coat? I'm not familiar with it and normally use Testors Dullcoat. This stuff sprayed on and immediatley dried and clouded severely. I knew going in that it would give a dusty look but I never though it would be that bad. I managed to wipe it off by rubbing over it with tissue paper and it did give the model a rather desert-worn look and I got a bit of the sheen back (pics later) but I'm wondering if I'm using the wrong product?
Unfortunatley I didn't get any pictures of the initial spray as I was a bit spooked and immediately went to work on it. Any advice would be appreciated.
EDIT: Well, I did a bit of surfing and found out what I did wrong. Much too much X-21 to Future ratio. A few threads on other forums have revelaed I'm not alone. Off I go to scrub some more.
Last edited:
uh oh Andy hope theres no pemanant damage
Ah...correct Andy the flat base should be used starting small to more to get the desired sheen, wrong proportions will give the snowy effect if you have too much. The flat base IS the additive not the other way round.
I had a few issues like you've described long ago including some cracking issues and chose to change to the Gunze stuff, with this I've never had an issue.Hope you sort it out man...
I had a few issues like you've described long ago including some cracking issues and chose to change to the Gunze stuff, with this I've never had an issue.Hope you sort it out man...
- Thread starter
- #260
Crimea_River
Marshal
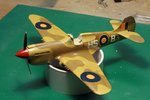
Thanks guys. As you can see, I've been able to get most of the snowy stuff off. I must say it was a bit exciting there for a while. After it first showed up in the middle of spraying, I couldn't decided whether to stop or to keep going so that at least the finish would be consistent. I decided to keep going. Pity I didn't get pictures but believe me, it looked as if the model was sitting in a dusty attic for 15 years. I knew that the finish might give a bit of a dusty appearance but that's what I was going for to give it a desert worn look. There are still some remnants on the tail that I'll need to attend to. After that, I'll go back to my Testors Dullcoat.
Attachments
Users who are viewing this thread
Total: 1 (members: 0, guests: 1)