Navigation
Install the app
How to install the app on iOS
Follow along with the video below to see how to install our site as a web app on your home screen.
Note: This feature may not be available in some browsers.
More options
You are using an out of date browser. It may not display this or other websites correctly.
You should upgrade or use an alternative browser.
You should upgrade or use an alternative browser.
Doras Galoras - Unofficial GB
- Thread starter Crimea_River
- Start date
Ad: This forum contains affiliate links to products on Amazon and eBay. More information in Terms and rules
More options
Who Replied?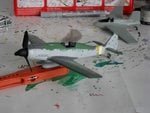
Nicely done so far!
- Thread starter
- #423
Crimea_River
Marshal
Come a long way already Igor.
A4K
Brigadier General
Great work mate!
Wayne and Dan, wanted to build my Doras production line style too, but now plan to just do 2 D-9s for now to get them done.
Will do the other 2 D-9s, plus D-11 and D-13 conversion together later on.
Excuse the belated start here too btw, trashed and burgled flat took care of the weekend. Plan to start tomorrow.
"Trashed and Burgled Flat" you serious man....that sucks bigtime Evan not too bad i hope...
- Thread starter
- #426
Crimea_River
Marshal
Aw, man.....
Catch22
Major
Yikes, hope you didn't lose much Evan.
A4K
Brigadier General
Cheers guys!
Just the movable appliances taken mostly (oven, washing machine, and microwave - they tried the fridge but must have been too heavy), plus bar stools and stuff.
Luckily the flat itself is okay, just one door and most of the furniture needing to be repaired.
Just the movable appliances taken mostly (oven, washing machine, and microwave - they tried the fridge but must have been too heavy), plus bar stools and stuff.
Luckily the flat itself is okay, just one door and most of the furniture needing to be repaired.
Goddamit...F#*king @ssh*les, Evan glad it was just replaceable items man, real glad you or Ivett didn't get in the crossfire...
looks good Igor
Looks good to me!
Out of interest, was there a specified red for the JV 44 birds (standard RLM 23?)
Evan the MM enamel is a very light i will spray some and post a pic i used a flat red on mine.
- Thread starter
- #432
Crimea_River
Marshal
Evan, I hope they catch the ba$tards and you have a chance to get your stuff back.

I did a bit of work on Black 6 today while waiting for my Ar234 canopy to cure. A while back I had cut back the spent ammo casing chutes rather than hollowing them out and I know some of you were curious how I would do this. For this, I turned to my trusty aluminum foil tape, cut a section of the required length, and stuck it to the chute stub one face at a time. Then it was a mater of squaring up the end. Below is one of them finished.

Here are both finished and painted

Unfortunately, all this effort turned out to be a waste of time as it all got kinda crushed when I attached the wing to the fuselage. This involved considerable jostling and the fragile tape was pushed out of the way when I got the wing on. Anyway, the wing has now been assembled to the fuselage and I can do a bit of fishing in the chutes to straighten them out. I the meantime, here's a series of shots showing the fit, starting with this overall shot.

The upper wing in the port side fit quite nicely to the fuselage. However, there is a very slight longitudinal misalignment that should be easily fixed. The opening for the MG151 on this side will be covered up.

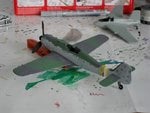
On the starboard side, there is a bit of a gap at the back that will need to be filled. As you can see, on both sides the whole assemble could have been slid forward a tad as the leading edges show a bot of a lip. However, the front edge of the wing assembly on the bottom butted up nicely in the opening so it will be a simple matter of sanding the lip out. On this side, the cannon bay will be opened up for viewing so there will be a pile of detailing done here.

Here's the joint at the bottom cowl - pretty good fit.

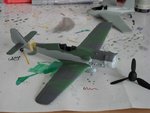
A different story at the back where there will need to be a bit of filling done:

All in all, this operation went reasonably well, considering all the stuff that had to line up. Thanks for looking in.
I did a bit of work on Black 6 today while waiting for my Ar234 canopy to cure. A while back I had cut back the spent ammo casing chutes rather than hollowing them out and I know some of you were curious how I would do this. For this, I turned to my trusty aluminum foil tape, cut a section of the required length, and stuck it to the chute stub one face at a time. Then it was a mater of squaring up the end. Below is one of them finished.
Here are both finished and painted
Unfortunately, all this effort turned out to be a waste of time as it all got kinda crushed when I attached the wing to the fuselage. This involved considerable jostling and the fragile tape was pushed out of the way when I got the wing on. Anyway, the wing has now been assembled to the fuselage and I can do a bit of fishing in the chutes to straighten them out. I the meantime, here's a series of shots showing the fit, starting with this overall shot.
The upper wing in the port side fit quite nicely to the fuselage. However, there is a very slight longitudinal misalignment that should be easily fixed. The opening for the MG151 on this side will be covered up.
On the starboard side, there is a bit of a gap at the back that will need to be filled. As you can see, on both sides the whole assemble could have been slid forward a tad as the leading edges show a bot of a lip. However, the front edge of the wing assembly on the bottom butted up nicely in the opening so it will be a simple matter of sanding the lip out. On this side, the cannon bay will be opened up for viewing so there will be a pile of detailing done here.
Here's the joint at the bottom cowl - pretty good fit.
A different story at the back where there will need to be a bit of filling done:
All in all, this operation went reasonably well, considering all the stuff that had to line up. Thanks for looking in.
Woah, Crimea; your wing went together very different to my Eduard builds! I know its likely WAAAY to late now, but to get those pesky wing gun doors to fit, you really need to line the entire wings ection up ON THE GUN BAYS - last of my builds, I used a block of Pencil eraser cut down to size and wedged into the wing setion of the gun bay; which didnt really really work as well as I had hoped (as the lip of the bay on the fuselage fouled it), but I was still able to re-insert the eraser block once things were together and elastic bands around stuff - this is one area that the only real way to line it up right is to assemble dry and then run thin Weldene (or whatever thin glue is you preference) down the seams...
Pencil erasers are pretty awesome actually, as they come in soft and hard and all sorts of shapes and can be cut SLIGHTLY large and thus can compress and apply pressure to a seam - the current D-15 project has a a BUNCH of stuff rattling round in side it, including a large chunk of eraser that spread the fuselage sides (as those pesky Dragon/DML 'banana' fuselage sides need something to spread the wing roots). I tried to cut it out afterwards so I could reuse bits, but that didn't work... so now there's a firewall in place, there is so much CRAP floating round in side the thing (eraser, metal, bits of plastic shim, etc) that it sounds like a baby rattle!
D
- Thread starter
- #434
Crimea_River
Marshal
Dan, there was no way those bays were going to line up. Even if I opened up the front of the wing section where it butts against the cowl, the spent cartridge chutes are tight up against the wing spar so no way the wing can move back. The macro lens makes it look a lot worse that it is. The misalignment is very small and I'm pretty confident I'll make it work.
And Just when I have some time to sit down and work on the D-15, what happens? Alclad explosion! I sh|t you all not - Brand new bottle of Black Microfiller-primer, 'Shake thoroughly' as per instructions and previous experience - BOOM! Big hole appears in the side and most of the 150ml-ish (4oz. whatever that translates to in real measurements) empties itself onto me, the airbrush, the compressor, model parts, etc!
Has anyone ever experienced cleaning your FACE and Lips and Nostrils and Shaved Head and Arms and Body where it soaked through my shirt, etc, with ACETONE at midnight? Not to mention, trying to save the kit and parts....
NOT HAPPY ALCLAD!!!!!
Has anyone ever experienced cleaning your FACE and Lips and Nostrils and Shaved Head and Arms and Body where it soaked through my shirt, etc, with ACETONE at midnight? Not to mention, trying to save the kit and parts....
NOT HAPPY ALCLAD!!!!!
- Thread starter
- #437
Crimea_River
Marshal
Never heard that before but that's serious sh!t.....
Damn Dan, thinking the same as Andy on that Alclad business....
While a like your Eraser idea....Now a Pointer for you AVOID leaving any Eraser inside your model, especially ANY touching the inside of the outer surfaces, there is BIG potential for it reacting with the plastic and melting into the plastic and distorting it over time....
While a like your Eraser idea....Now a Pointer for you AVOID leaving any Eraser inside your model, especially ANY touching the inside of the outer surfaces, there is BIG potential for it reacting with the plastic and melting into the plastic and distorting it over time....
vikingBerserker
Lieutenant General
DAM!
Users who are viewing this thread
Total: 1 (members: 0, guests: 1)