Eduard 1/32 109E-7 TROP

Ad: This forum contains affiliate links to products on Amazon and eBay. More information in Terms and rules

ellis995

Staff Sergeant
1,077
8
Mar 15, 2009
Easington Lane UK
Hi guys

Back again :D:oops:. ( 2 days work :D)
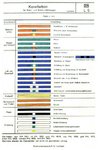
Question What colour was the lines on the sidewalls.Yellow etc.:oops:
me109 e-7 1.jpg


me109e-7 2.jpg


me109e-7 3.jpg


me109e-7 4.jpg


me109e-7 5.jpg
 
Last edited:
Do you mean the cockpit side walls, and if so, which lines? There's a colour pic in Javlin's 1/24th scale Bf109E thread, but basically, the whole lot was RLM02, although the actual grey appears to be in between this and RLM66.
 
Hi folks,

The reissue of L.Dv.521 in November 1941 stipulated that all cockpit areas or crew areas visible through a glazed covering were to be painted BlackGray 66, principally as an antiglare measure.

The remainder of the interior, including weapons bays and undercarriage housings, were to be finished in Green-Gray 02. Instrument panels were to be Gray 41 with individual instrument locations identified
by a letter/number combination, usually hand painted, in either 04 or 21. Certain equipment packs
were painted in other shades of 12 gray, e.g., battery housing in Gray 42.

Internal piping was color coded for maintenance purposes, using the colors yellow (04), white (21), black
(22), red (23), blue (24), green (25) and brown (26). Where 04 Yellow 04 Gelb
23 Red 23 Rot 26 Brown 26 Braun services terminated at an external point, the relevant coloring was
used to identify the specific service.
Additionally, instructions and symbols relating to maintenance were painted externally on the airframe.


Maybe this helps ( Source : Monogram German Aircraft Interiors)

Me109E-4Ntrop.jpg


Thomas
 
Last edited:
Here you go Keith? my German is not that good anymore 30yrs of no use you might say.A fella over at LSP supplied these for me and mentioned its colors for engine plumbing.Cheers
 

Attachments

  • plumbing.jpg
    plumbing.jpg
    90.6 KB · Views: 213
Last edited:
Hi guys
Further updated pics of the build. Build wise its done :D
One of the pics shows which bird i am building. Lovely kit to build, few sink marks and flashing nice fitting parts.:)

trop 1.jpg


trop 2.jpg


trop 3.jpg


trop 4.jpg


trop 5.jpg
 
Looking good Keith. The neatness shows how much you've improved mate. Hope you can get the gear and canopy masked for painting without any damage.
 
Keep practising Keith, but you've got to start sometime. OK, maybe not on this kit, but try it out on another model, even if it's one already painted you'd like to do again. Once you use it for 'real', you'll find that you'll be more focused on the job, and take care to get it right. I know what you mean though, as even now, when I go to spray a model which has taken a lot of time and effort, it's a deep breath first, then gently lead the brush to the model !
 
Yep, that's a good one to use - plenty of room to have fun ! I still have an old Revell 1/32nd scale P51B I use for practising and testing - it's got more paint on it than plastic these days !!
 
Hi guys

Update come across a small problem with the rlm colour 78
I thought i had the right colour blue for RLM 78 :oops: the nearest i have is RLM 76 so i will have to either use the 76 or try to mix a colour nearest to the 78.Painted the right shade of brown ( RLM 79 ) and Yellow ( RLM04 )
 

Users who are viewing this thread

Back