Eduard 1/48 Bf-110C

Ad: This forum contains affiliate links to products on Amazon and eBay. More information in Terms and rules

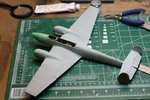
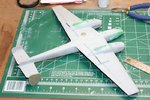
I work with a good pair of tweezers under a magnifying glass with good light. Gap filling superglue in tiny amounts works very well. I'd never attempt this in 1/72 scale. 1/48 is kind of pushing it for me too. I've been experimenting with my limits, treading the fine line between enjoyment and insanity. This is only my 3rd build after being out of the hobby for 25 years.

Well from where I'm sitting you can't tell you've had such an extensive hiatus from the hobby. I look forward to this and other builds from you.
 
Here are some more progress shots taken with my new lens. Since the last update, I've been busy puttying and sanding and a coat of primer was applied to highlight any defects. There are still some areas that need to be gone over again but it's getting there.

First 2 Photos are top and underside primed. The tape over the nose is to hold the cowl on and protect the tiny gun barrels from getting broken off. I give them 50/50 chance of surviving the rest of the build unscathed. You can see that a bit of additional sanding was done at the underside wing root.

Photo 3 is a detail shot of the gap that was filled between the flap and nacelle. This was done with plastic card. You can see that the gap is much reduced from the huge canyons the were present in the previous progress post.

Photos 4 and 5 are close-ups of the cockpit that I couldn't previously shoot with the equipment I had.

Photo 6 shows an aftermarket exhaust stack made by Quickboost dry fitted in place. The are great parts. They cost 5 bucks for the whole set and save a ton of work assembling each individual stack and drilling them out as prvided by Eduard.

Hopefully I'll get a bit more done this coming weekend. Thanks for your continued interest.
 

Attachments

  • 091112 Topview Primed.jpg
    091112 Topview Primed.jpg
    103.2 KB · Views: 255
  • 091112 Underside Primed.jpg
    091112 Underside Primed.jpg
    113.1 KB · Views: 261
  • 091112 Gap in Nacelle.jpg
    091112 Gap in Nacelle.jpg
    50.7 KB · Views: 269
  • 091112 Cockpit Port Side.jpg
    091112 Cockpit Port Side.jpg
    71.8 KB · Views: 262
  • 091112 Cockpit from Back.jpg
    091112 Cockpit from Back.jpg
    61.5 KB · Views: 266
  • 091112 Exhaust Stack Dry Fit.jpg
    091112 Exhaust Stack Dry Fit.jpg
    54.9 KB · Views: 257
Lovely job CR. I very rarely use aftermarket parts, but I have to say the Quickboost products are extremely good, and excellent value for money. There's no way I could have made the Beaufighter exhausts as good as their resin examples.
 
Lovely job CR. I very rarely use aftermarket parts, but I have to say the Quickboost products are extremely good, and excellent value for money. There's no way I could have made the Beaufighter exhausts as good as their resin examples.

Thanks Terry. Agree with you on the Quickboost stuff. I also got some exhausts for my Dora that awaiting assembly and they look equally good.
 
The Heavy Hitters GB had me putting this one aside while I worked on my Sturmvogel.

The chosen scheme is to complete this machine as a Bf-110 C-4 in worn winter camo as depicted on page 1 of this thread. Pics below of what the model looks like today. The yellow areas have been painted in preparation for masking and topcoat (Pics 1 and 2). Also, the canopy has been masked (Pic 3). Good thing that Eduard included precut masks otherwise this would have been a bigger chore than it already was. Some of these masks were slightly big so that by the time I put several on, the cumulative difference made the exposed areas too small so I ended up trimming a few.

Today was also spent on trying to determine/confirm exactly where the fuselage band started. Comparison of the Kagero profile and photo on page 1 and some fiddling with scaling from the photo confirmed to me that the width and location of the band shown on the profile is pretty close. Unfortunately, I'll need to widen the yellow strip I painted on the model as I didn't allow enough on the forward edge.

During the course of this exercise, I've found that the decals provided by Eduard for the fuselage Balkenkreuz scale to 900mm whereas Ullmann and Eagle Cals state that these should be 1000mm. Despite this, the Eduard crosses look perfect for the fuselage. Can anyone confirm if 900mm crosses were used on the 110 fuselage?
 

Attachments

  • 100120 Topside Overall.jpg
    100120 Topside Overall.jpg
    106.1 KB · Views: 202
  • 100120 Underside Overall.jpg
    100120 Underside Overall.jpg
    99.5 KB · Views: 203
  • 100120 Canopy Masks.jpg
    100120 Canopy Masks.jpg
    102.8 KB · Views: 204

Users who are viewing this thread

Back