Eduard 1/48 Bf-110C

Ad: This forum contains affiliate links to products on Amazon and eBay. More information in Terms and rules

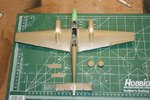
Here's some more progress after tonight.

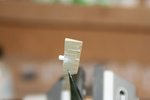
The fit of the tail planes is quite loose so it's not easy getting them straight and exactly horizontal. So I had to improvise this set up which worked OK.
IMG_0365.jpg


Note to self: Read the label stupid!. Last night I clamped one of the nacelles to the wing with Quik-grips and applied a few strokes of what I thought to be my ProWeld glue. I didn't discover until tonight after doing the second nacelle that I was putting on copious amounts of this oddly-performing liquid crap to make the proper bond. Tunrs out that ProWeld styrene glue and Solv-a-Set decal solutions have similar sized bottles and I was gluing everything with decal solution:oops: Oh well - good thing I wasn't applying ProWeld to my decals. That could have been trouble.......

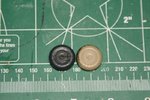
Here's the fit issue I was talking about at the nacelle/wing joint. Needless to say, Solv-a-Set didn't Solv-a-Gap. Putty time!
IMG_0366.jpg


Finally, one of the nacelles with the nice sidewall details glued in place. I drilled out the little holes in the ribs based on references.
IMG_0367.jpg


More later

Andy
 
Finished the gun bay details today. 26 and 30 ga. copper motor winding wire was used for the gun wiring.

IMG_0368.jpg

IMG_0369.jpg

IMG_0370.jpg


Now working the horrid nacelle/wing joint puttying and sanding, my least favourite part of modelling. Then it's on to finalizing the Wespe scheme that I'll use and final assembly.
 
Beautifully done CR!

Note to self: Read the label stupid!. Last night I clamped one of the nacelles to the wing with Quik-grips and applied a few strokes of what I thought to be my ProWeld glue. I didn't discover until tonight after doing the second nacelle that I was putting on copious amounts of this oddly-performing liquid crap to make the proper bond. Tunrs out that ProWeld styrene glue and Solv-a-Set decal solutions have similar sized bottles and I was gluing everything with decal solution

I did something similar. I was thinning some enamel with what I thought was thinner and turned out to be decal solution. It made sludge and I kept smelling pickles and conldn't figure out why.
 
It is indeed, although I think I didn't push one of them in far enough. It takes quite a bit of force and it springs back. Its a shame because the are so many other areas on this kit where the fit is absolutely top notch.

Brett Green noted the same issue in his published guide to this kit. However, the kit is still excellent and highly recommended.

Good luck in the show Wayne. Let us know how you do.

Thanks man, will know soon enough....then let you know!:D
 
Got around to assembling the major chunks this weekend. Wings fit to the fuselage nicely although I found it necessary to hollow out the large flat area on the wing and reduce the tab size. Once that was done, they fit quite well with only minimal filling needed. The major problem areas are, of course, the nacelle to wing joints. Putty has started and I'll spend the next few nights getting this area right.
IMG_0004.jpg

IMG_0005.jpg


The gap between the nacelle and fairing on the flap is way too big, also the product of not having been able to push the nacelle into the wing far enough. I'll fill this gap with some plastic card.
IMG_0006.jpg


Sorry for the blurry images. They match my eyesight. Maybe a new lens for Christmas.
 
Well progress has been a bit slow while I tried to figure out what version of the 110 I would build and what scheme to do. I settled on a BF-110 C-4 code S9+SM of 4/SKG 210 in a faded winter camouflage. My separate thread (below) talks about the selected scheme in more detail.

http://www.ww2aircraft.net/forum/start-finish-builds/bf-110-fans-help-needed-paint-scheme-21471.html

SO! Now that I've settled on a C-4, and having scoured John Vasco and Fernando Estanislau's excellent book "Messerschemitt Bf-110 C, D, and E An Illustrated Study", I found a number of mods I needed to make, since it seems the kit had some parts molded as an E variant. In particular, the wheels needed a smaller hub as typical of the C series. Also, the trim tabs on the elevator have multiple actuators/links molded on. The C only had the single actuator on the bottom of the tab.

Photo 1 shows everything as it was this morning. The tape over the nose is to protect the protruding MG. I'm not sure it will survive, even so. I cut the elevators off so that I could deflect them downwards. I wish model companies would stop molding the control surfaces as part of the rest of the wings. I like droopy elevators and twisted rudders and almost always have to cut them off. I'm debating whether to move the rudders. The filling over the engine cowl area is evident. A couple of passes have been done with varying wet/dry sandpapers and these areas should be ready for primer.

Photo 2 Detail work on the elevator trim tab. The 2 actuators on the bottom were cut off, leaving the fairing for one. The trim tab was cut and deflected upwards, opposite to the elevator deflection which will be downward. A new actuator rod and linkage were added with sprue and card.

Photo 3 Shows the two tires side by side. The one on the right is as it was supplied with the kit with the larger hub. The one on the left is after the modification. I used my Dremel tool to remove the outer ring of the hub and filled the gouge with putty. It didn't turn out as smooth as I would have liked but this is as good as it will get as I reached the limit of my patience. The E model actually had slightly larger tires as well but the tires supplied with the kit scale close to the 875mm diameter supplied for the C so I didn't need to do anything else.

Tomorrow will be for filling some areas on the underside, including the gap behind the nacelles.

Thanks for your interest.
 

Attachments

  • 091107 Trim Tab.jpg
    091107 Trim Tab.jpg
    45.2 KB · Views: 236
  • 091107 Overview.jpg
    091107 Overview.jpg
    111.8 KB · Views: 249
  • 091107 Tire Mods.jpg
    091107 Tire Mods.jpg
    92.3 KB · Views: 260
I work with a good pair of tweezers under a magnifying glass with good light. Gap filling superglue in tiny amounts works very well. I'd never attempt this in 1/72 scale. 1/48 is kind of pushing it for me too. I've been experimenting with my limits, treading the fine line between enjoyment and insanity. This is only my 3rd build after being out of the hobby for 25 years.
 

Users who are viewing this thread

Back