- Thread starter
- #61
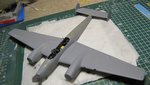
I've been doing some minor filling and sanding here and there, but for the moment that isn't all that interesting (pics of that will follow eventually though) Among other things I've been working on is the radar equipment. The Eduard kit provides 3 versions of the SN2 dipoles (A/B/D variants) But given the period Jabs used this a/c I think his kits at the time also would need an Additional FuG212 mast on the nose, similar to the one as can be seen of PIC 1 (of Wim Johnens' a/c as photographed on Dubendorg, Switzerland after he had to land there)
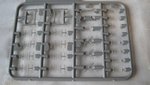
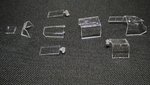
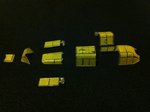
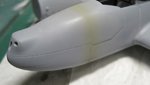
So I thought a bit about how to create this. I suddenly remembered by CyberHobby Bf-110D kit (which I sadly messed up) and that it comes with parts to make a FuG202 radar set. So, I looked up these parts and set out to create some new radar antenna's. The Dragon kit comes with a small bag of plastic parts to make the FuG202 completely out of plastic and also gives on the option to use thin metal pieces for the actual antennas (PIC 23). Truth be told, I had to cheat a little, as this is for a FuG202 antenna and the FuG212 antenna's are a tad smaller, so I clipped the metal antenna parts slightly. The mount itself probably also is a little smaller on the actual thing, but I felt that was rather difficult to accomplish without wrecking the entine mount (it's really small bits and pieces)
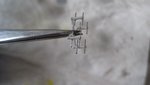
So, PIC 4 shows how it ended up looking after. As said, it isn't completely accurate, but it works for me. I did look for FuG212 after market stuff in 1/48 scale, but wasn't able to find any. I still need to find a way to place it on the nose of the 110, but that shouldn't be too difficult to accomplish. The nose section of this Eduard G-4 kit has a small hole in it for what I think is part of the optional gun camera that could be installed. Kit instructions want you to close it up with a little plastic cap, but perhaps this was also utilized to install this additional radar antenna.
NOTE: A fellow Dutch model builder also offered to send me some PE FuG212 antenna's from the Dragon 1//48 Ta-154 kit, so perhaps I'll leave my own creation as is and exchange it for a 'proper' FuG212 arrangement.
So I thought a bit about how to create this. I suddenly remembered by CyberHobby Bf-110D kit (which I sadly messed up) and that it comes with parts to make a FuG202 radar set. So, I looked up these parts and set out to create some new radar antenna's. The Dragon kit comes with a small bag of plastic parts to make the FuG202 completely out of plastic and also gives on the option to use thin metal pieces for the actual antennas (PIC 23). Truth be told, I had to cheat a little, as this is for a FuG202 antenna and the FuG212 antenna's are a tad smaller, so I clipped the metal antenna parts slightly. The mount itself probably also is a little smaller on the actual thing, but I felt that was rather difficult to accomplish without wrecking the entine mount (it's really small bits and pieces)
So, PIC 4 shows how it ended up looking after. As said, it isn't completely accurate, but it works for me. I did look for FuG212 after market stuff in 1/48 scale, but wasn't able to find any. I still need to find a way to place it on the nose of the 110, but that shouldn't be too difficult to accomplish. The nose section of this Eduard G-4 kit has a small hole in it for what I think is part of the optional gun camera that could be installed. Kit instructions want you to close it up with a little plastic cap, but perhaps this was also utilized to install this additional radar antenna.
NOTE: A fellow Dutch model builder also offered to send me some PE FuG212 antenna's from the Dragon 1//48 Ta-154 kit, so perhaps I'll leave my own creation as is and exchange it for a 'proper' FuG212 arrangement.
Attachments


Last edited:
")