Eduard P-400 Weekend Edition. (1 Viewer)

Ad: This forum contains affiliate links to products on Amazon and eBay. More information in Terms and rules

machine shop tom

Senior Airman
503
222
Apr 13, 2007
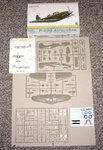
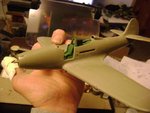
My latest project has settled on the Eduard P-400 Cactus Air Force, Weekend Edition. I was a little leery about buying this one. My first W/E was the Lavochkin LA-7. While nice, that particular kit was a bit sparse. The P-400 kit, on the other hand, is very impressive. It seems that this kit is from the same molds as the Accurate Miniatures P-400 kit. Many finely molded parts abound, and the detail is very nice.

So, here I go........

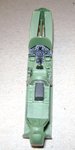
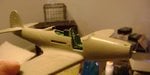
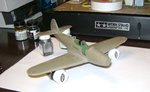
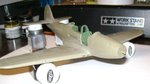
Here the beginning pics. I've got the pieces all washed, now I have to do some research and get the paints ready.
 

Attachments

  • P-400 parts.jpg
    P-400 parts.jpg
    176.8 KB · Views: 287
That's a great kit Tom, I've just finished one of these also in the MTO group build. The only real difficulty is the fit of the doors, so you need to pay very careful attention to the fit of the fuselage halves if you want to display with them closed.

Enjoy!8)

Peter
 
That's a great kit Tom, I've just finished one of these also in the MTO group build. The only real difficulty is the fit of the doors, so you need to pay very careful attention to the fit of the fuselage halves if you want to display with them closed.

Enjoy!8)

Peter

Thanks for the heads-up.

I really want to get started on this, so of course I have a busy weekend coming up. I'll be lucky if I get any time for it...........


tom
 
Tom:

I'll be going to school on this build. I have a couple of 1/72 Academy kits of the P-39 that are on my to-build list for this year.

Pete
 
Here's the progress so far on the P-400. Here are some pics of the cockpit and front wheel well. I used a black Sharpie on the instrument panel, then I dry-brushed it with flat white. I also dry-brushed the cockpit with flat black, after painting it flat green, to bring out the detail.

I'm going to try to grow a third hand with teeny-tiny fingers. It would come in handy for some of these small, multi-part assemblies.............

tom
 

Attachments

  • Front wheel well.jpg
    Front wheel well.jpg
    82.6 KB · Views: 222
  • P-400 cockpit 1.jpg
    P-400 cockpit 1.jpg
    64.6 KB · Views: 241
  • P-400 cockpit 2.jpg
    P-400 cockpit 2.jpg
    89.2 KB · Views: 232
Last edited:
It's gonna be a while for me to get this project done. I'm finding it hard to do much fitting with a smashed, broken left thumb.............

:eeeeek:


tom
 
Last edited:
Sorry to hear about the thumb Tom, just hope you're not left handed. It can still be done though - my left hand is totally stiff - can't grip or make a fist. Just makes things a bit more frustrating and time consuming - oh, and a good way of inventing new curses!
Looking good on the details mate, and thanks for the explanation of the 'P400' story!
 
I attached the wing assembly to the fuselage today. There was a major mis-match at the top wing-to-fuselage joint. It took a lot of gap-filling super glue and sanding to fix. I have to re-scribe some panel lines. I still have to decide whether to free-hand the camo or tape off the color intersections. The box art and some pictures I have found seem to show a fairly distinct or sharp line between the brown and green camo colors. Plus I have to figure out how to tape off the cockpit areas.

Sorry to hear about the condition of your hand, Mr. Airframes. Makes my temporary condition seem like an just an annoyance (which it is...... ).
 

Attachments

  • Assembly 1.jpg
    Assembly 1.jpg
    62 KB · Views: 195
  • Assembly 2.jpg
    Assembly 2.jpg
    35.8 KB · Views: 199
  • Assembly 3.jpg
    Assembly 3.jpg
    61.7 KB · Views: 201
  • Assembly 4.jpg
    Assembly 4.jpg
    51.7 KB · Views: 187

Users who are viewing this thread

Back