Galland's Bf 109E-4 1/32 scale (1 Viewer)

Ad: This forum contains affiliate links to products on Amazon and eBay. More information in Terms and rules

Thanks, Kevin Wayne regarding RLM02. It seems to be a very elusive shade to pin down. I have some colour reference shots from books of Bf109E cockpits and within a range of shots of the same interior, the colour changes completely - some looking a light blue-grey, others almost like RAF interior green. Does anyone have any opinion as to whether Tamiya XF22 is close?

Woody, good luck with your next project.
 
Hi Gerry,
I once posessed a piece of a 109 cockpit. I gave it to the Fliegermuseum in Hannover Germany years ago. I think the Tamiya color is a good rendition of the original color. But colors change with time and environment so you can't say this or that color brand is the right choice. Many small firms produced the ccolors specially late in war. They all differt!! It's fruitless to argue about the right color hue of model paints. Make your choice by guessing. :p
 
Thanks, Michael. At least I can use the Tamiya FX22 as a starting point and lighten it for scale effect.
 
Hey Gerry i use polly scale RLM02 it seems to look really close but thats my eyesight i will spray something and post if you would like.
 
Woody, thanks for that very generous offer but I really don't want to put you to that trouble. If you had anything on scan or digital that you could post to the thread easily, I'd be really interested in seeing it. I may not even be able to source PolyScale paints here. I try to work with what's available 'over-the-counter' here in Dublin. That's pretty much: Tamiya, Humbrol, Revell and in a limited range of colours from Vallejo Model Colors and Citadel figure paints. Anything else I would have to go on to the internet for, with delivery delays and 'minimum order' conditions. In fact, my preferred hobby supplier, Hannants in the UK, no longer ships paints or solvents to overseas destinations, which I would be categorised as. So for simplicity, probably best to stick to what I can source locally.

Wayne, thanks for your suggestion and to everyone who contributed to the great RLM 02 conundrum. Have all those colours and will see what it looks like on my next mix.

I'm in the process of pulling together a post of progress to date which I should get out later today.
 
Here's the (little) progress made to date. Let me say at this stage everything is still at dry-fit stage - nothing committed yet. Photo 1. I drilled out the fronts of the exhaust covers - still need tidying and sanding. Photo 2. The rudder adjustment panels drilled out and an adjustment screw added inside.

Then I started to fit the Aries cockpit set. This is designed to fit with the Eduard Bf109 so needed a lot of adjusting to fit the Matchbox kit. In particular the floor needs lifting to meet the sidewalls. This caused much head-scratching and forehead slapping. Just as well I'm not running a swear box!!**±!

Photo 3. is the basic starboard wall after some trimming at the front and back to fit the angle of the slanted back wall. The white strips are plasticard shims I had to introduce to make the shelf behind the pilots seat fit to the sidewall. The piece of plasticard in the rear fuselage is to close off the oil point (courtesy of Airframes, BoB 'White 6' build). The piece in the red ellipse is my solution to the floor height. A piece of resin, which was just the right height to lift the floor into contact with the side wall has been glued into place on both sides, to provide a support beam. This should give me a position to correctly attach the floor to one sidewall when the fuselage is separated and still match the other sidewall, when the fuselage is glued in final position. Photo 4. Basic port wall, as above. Photos 5 6. Cockpit floor resting in position on supports. I'm now happy that they will marry well together when cemented.

Photos 7 8. The cockpit closed from both port starboard. the white shims are just visible either side of the back shelf. The head panel with the stowage compartment still needs more work to fit the fuselage. It's too narrow on the sides and will probably need some filling to match the fuselage curve. This is a concern to me, as I don't want to damage the detail on the panel, which is right on the edge. Any tips? I'm also unsure at what point I can position this. My thinking, at this point, is not until the fuselage is together. (Note to myself: don't drop it into the assembled fuselage!). This is probably not the place to reopen the RLM 02 debate, but look at the variant in the colour in these two shots. Photo 7 is taken by flash (instant daylight) and is close to what I believe the true colour is. Photo 8 taken in interior light (overhead and spot lamp). You'd think they were two different colours!

Photos 9. Damaged the rear cockpit wall when separating it from the carrier resin. Hope some sanding and primer will disguise the repair.Ditto the seat belt opening in the pilot's seat. Photo 10. I started experimenting with introducing a seat-back cushion. What do you think, with or without? I also have a question about the tank-like object in the photos. This is indicated in the Aries instructions (Photo 11) to fit onto the bracket in front of the joystick. My problem with this is that, in all the build diaries I've raided for hints on my build and indeed, photos of actual cockpits, I've not been able to confirm it's presence in an E4. To be fair, it probably won't be visible in the finished cockpit, as it's located under the machine gun mount and behind the instruments panel. I'm wondering if it's part of the central cannon housing from an earlier 109 mark or indeed should be part of the E4?

Finally, Photo 12. everything's been given a coat of Tamiya plastic primer. The next stage is a basic coat of RLM 02 and assembly with all the PE parts and some extra oxygen piping. Then the instrument panel and detailed painting. More anon.
 
...and again...
 

Attachments

  • Drilled exhaust covers.jpg
    Drilled exhaust covers.jpg
    43.9 KB · Views: 172
  • Drilled rudder adjustment panels.jpg
    Drilled rudder adjustment panels.jpg
    44.3 KB · Views: 176
  • Cockpit wall starbooard.jpg
    Cockpit wall starbooard.jpg
    46.8 KB · Views: 216
  • Cockpit wall port.jpg
    Cockpit wall port.jpg
    46.3 KB · Views: 156
  • Cockpit Starboard.jpg
    Cockpit Starboard.jpg
    47.2 KB · Views: 241
2nd lot
 

Attachments

  • Seat cushion.jpg
    Seat cushion.jpg
    38.7 KB · Views: 178
  • Bare seat.jpg
    Bare seat.jpg
    39.8 KB · Views: 228
  • Closed cockpit 1.jpg
    Closed cockpit 1.jpg
    47.1 KB · Views: 249
  • Closed cockpit 2.jpg
    Closed cockpit 2.jpg
    51.2 KB · Views: 173
  • Cockpit port.jpg
    Cockpit port.jpg
    43.9 KB · Views: 226
And for my next trick...
 

Attachments

  • Cockpit instructions.jpg
    Cockpit instructions.jpg
    65.2 KB · Views: 241
  • Cockpit, grey primer .jpg
    Cockpit, grey primer .jpg
    61 KB · Views: 160
Gerry some fantastic work, i havent used any resin stuff yet iam scared to if it takes super glue :laughing3: 
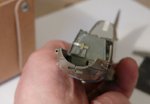
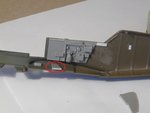
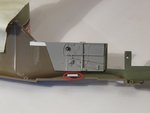
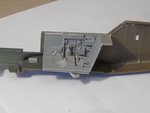
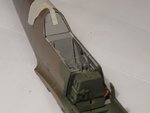
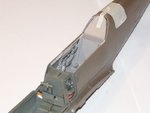
but anyways i sprayed Tamiya XF 22 and polly scale which the colors are a bit differnt but the ModelMaster color was way differnt so its anybody guess here is a pic.

SANY3992.jpg
 
Thanks, Wurger and Terry. Woody thanks for the shots. Yes, I can see the difference. The Polly Scale seems to have a tad more khaki/brown in it. Resin, I found to be very brittle and unforgiving of mistakes. However, the level and delicacy of detail is amazing. As for superglue, it's actually my preferred adhesive in most cases, provided you're fairly positive in positioning. Even then, even with liquid superglue, there's still a window of a couple of seconds for nudging.
 

Users who are viewing this thread

Back