Navigation
Install the app
How to install the app on iOS
Follow along with the video below to see how to install our site as a web app on your home screen.
Note: This feature may not be available in some browsers.
More options
You are using an out of date browser. It may not display this or other websites correctly.
You should upgrade or use an alternative browser.
You should upgrade or use an alternative browser.
GB-56 1/48 P-38 F/G - Thunderbolts and Lightnings
- Thread starter dneid
- Start date
Ad: This forum contains affiliate links to products on Amazon and eBay. More information in Terms and rules
More options
Who Replied?- Thread starter
- #82
dneid
Staff Sergeant
I finished up the first boom assembly. Again, this kit is stunning beyond words. Tamiya has certainly raised the bar here. I had one minor seam issue on the bottom just in front of the main gear bay. But, some Mr. Surfacer 500 and glass file and some very fine polishing sanding sticks cleared that up easily. The fit between the boom halves was amazing. I could barely feel a seam with my fingertip.
Again, I have read and watched a few videos of this kit being built. I know it is a great kit, but actually experiencing the joy of building this kit I am left speechless on this kit.
Again, I have read and watched a few videos of this kit being built. I know it is a great kit, but actually experiencing the joy of building this kit I am left speechless on this kit.
Attachments
Crimea_River
Marshal
Looking good Dale.
Vic Balshaw
Major General
Nicely done, looking good. 
Donivanp
Lieutenant Colonel
With all above
fubar57
General
Well and turbo look great
Nice work so far!
- Thread starter
- #89
dneid
Staff Sergeant
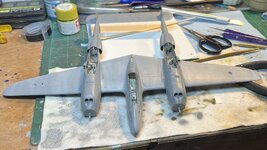
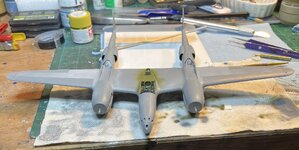
Ok, more progress last night. I have both booms on the bird and the horizontal stab in place. Again, the fit is breath taking. I MAY have a bit of seam filling to do, but I need to look much closer and decide. To say Tamiya has the raised a new bar in kit engineering is an understatement. I was told the build time is much less than I was expecting and I agree! What a beautiful kit.
Attachments
Vic Balshaw
Major General
Excellent stuff.
Donivanp
Lieutenant Colonel
Yeah it's a bit of kitgasum
Crimea_River
Marshal
Real nice Dale.
- Thread starter
- #94
dneid
Staff Sergeant
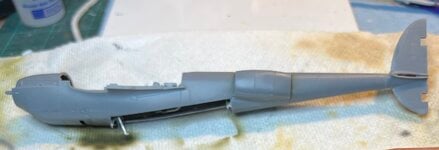
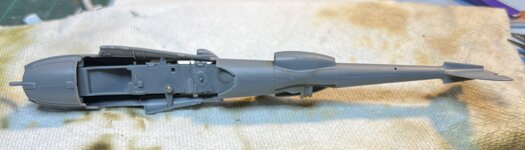
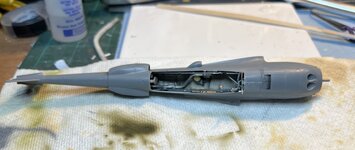
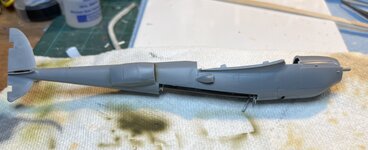
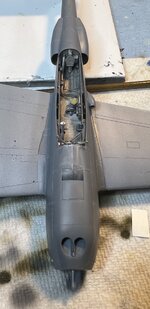
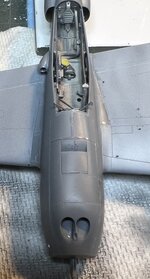
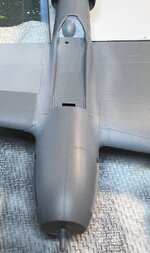
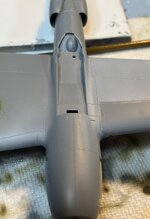
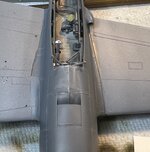
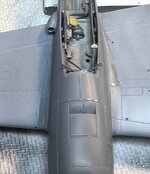
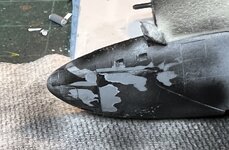
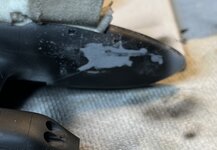
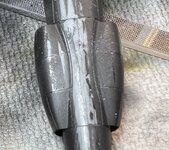
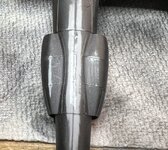
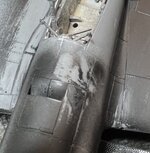
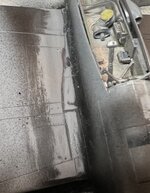
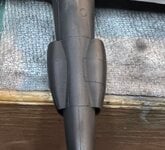
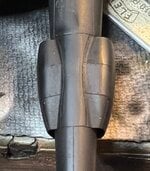
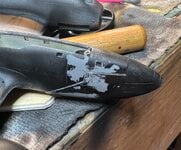
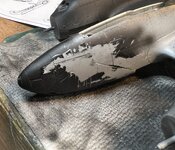
I found a few seams that I felt I needed to deal with. Nothing horrible, just a bit looser than I cared for. I found the previously mentioned gun bays seams, then we include the boom / wing seams then the back of the radiators on each boom (first 2 pictures). I also dealt with the seam between the boom radiators to remove that seam as well.
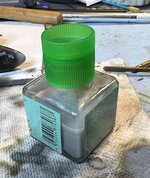
I used my homemade "sprue goo". This stuff is just some left over Tamiya thin cement with bits of cut up Tamiya spurs. Picture 3.
I simply added some goo to each seam that concerned me, let it set up and start drying. I then used my glass files to remove the excess goo. The remaining pictures show the seams filled in.
Next steps will be to apply Mr Surfacer 1500 black and double check the seams. I will cut in new seams as needed (gun bay doors for sure). I plan on the next 2-3 days of finishing up dealing with these seams.
Attachments
-
 Boom Wing Seam Before.jpg187.6 KB · Views: 38
 -
 Boom Wing Seam 2 Before.jpg193.7 KB · Views: 41
 -
 Sprue Goo.jpg588.3 KB · Views: 41
 -
 Gun Bay 2.jpg166.8 KB · Views: 42
 -
 Gun Door 1.jpg90.2 KB · Views: 44
 -
 Boom Seam 2.jpg226.9 KB · Views: 38
 -
 Boom Seam Fill 1.jpg436.4 KB · Views: 40
 -
 Boom Wing Seam 1.jpg224.5 KB · Views: 40
 -
 Boom Wing Seam 2.jpg259.4 KB · Views: 47
Last edited:
Donivanp
Lieutenant Colonel
Got it goin' on there Dale
SaparotRob
Unter Gemeine Geschwader Murmeltier XIII
Trademark "sprue goo". Also "sproo goo".I found a few seams that I felt I needed to deal with. Nothing horrible, just a bit looser than I cared for. I found the previously mentioned gun bays seams, then we include the boom / wing seams then the back of the radiators on each boom (first 2 pictures). I also dealt with the seam between the boom radiators to remove that seam as well.
I used my homemade "sprue goo". This stuff is just some left over Tamiya thin cement with bits of cut up Tamiya spurs. Picture 3.
I simply added some goo to each seam that concerned me, let it set up and start drying. I then used my glass files to remove the excess goo. The remaining pictures show the seams filled in.
Next steps will be to apply Mr Surfacer 1500 black and double check the seams. I will cut in new seams as needed (gun bay doors for sure). I plan on the next 2-3 days of finishing up dealing with these seams.
Vic Balshaw
Major General
Lots going on here but it looks like you've got it all under control.
- Thread starter
- #99
dneid
Staff Sergeant
I have been working on the seams I called out in post #94. I am very happy with the boom seams between the coolers. I think the gun bay seams are almost there. I want to dbl check a few things under the magnifying lamp and if they look good, then a fresh coat of primer and one last dbl check or a little more touch up / primer.
Thanks for stopping by.
Thanks for stopping by.
Attachments
le_steph40
Chief Master Sergeant
nice work 
Users who are viewing this thread
Total: 1 (members: 0, guests: 1)