I am repairing the Kelly Gang Halifax for a friend.

Ad: This forum contains affiliate links to products on Amazon and eBay. More information in Terms and rules

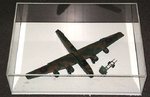
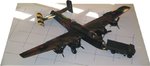
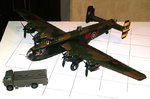
I am still picking at the Gang. Have masks for the code and will try and paint them this weekend. I have been remiss in working in this one because I have been looking for a fresh sheet of decals for the code and serial, but not having any luck. But I have done something to protect the ship from future damage. I've gone and made a case for the Gang. 3mm sides and a 4.5mm top piece and 20mm PVC base with a recess on the sides for the clear to rest 5mm from the bottom. This way I can put a stainless screw in the middle of each side, and the PVC won't scratch any table top. The little truck is a Bedford with canvas top and seats each side and down the middle for crew transport. This has been a bit of a hold up as well as I wanted to provide this for protection.

My wife suggested wheel chocks, who would have guessed. She does listen to what I am saying.

I want to do a bit of a diorama on the base. Pieces of thin sheet PVC in rectangles painted and stained like concrete to form the taxiway and parking pad. I would like to put grass at the side of the concrete and have seen Woodland grass in sheets. Anybody ever worked with this stuff???
 

Attachments

  • KG9 dio case.jpg
    KG9 dio case.jpg
    69.5 KB · Views: 83
Good plan Bill.
One tip - the concrete base can be made from ordinary card, the type used on model kit boxes, cut to the size of the average RAF airfield concrete 'slabs', which ranged from approx 8x8 to 12 x12 feet. Glue these to a base, probably made from MDF, then paint in situ, using household 'emulsion' paint. Before the paint dries, it can be 'textured' with a stiff brush, by stippeling, and/or, pressed with a length of card or similar to give the appearance of 'boarded' concrete (where there are lines across the slabs). Any weathering can be done later.
For the grass, in this scale probably best to use 'hairy mat' grass sheets, cut and placed/glued, after the main 'concrete' area is done. These rolls of 'grass' are available in most good model shops, or, if no luck, from model railway outlets.
These in turn can be turned from a 'lawn' into what one would normally see on an airfield in Yorkshire (the main area where Halifax squadrons were based).
Have a look at some of the dioramas I did in the 'Heavy Hitters' GB, and also at part one of the diorama guide I posted some time ago, which might help.
If you need/want accurate info on what the dispersal areas were like on the airfield specific to your model, let me know, and I'll get some stuff together. ( there were different types of dispersals, depending on the airfields).
It's a lot easier for bases to use the KISS principal, and saves a lot of 'over engineering', as well as being a lot easier (with some thought beforehand) than one would imagine.

Brilliant. Exactly what I needed to know. I will look in Hobbyco, they also have a big train section. The card stuff I will have to take a look at what you posted to understand that part. Cheers, Bill
 
You're welcome Bill. Just shout if you want more info. BTW, the Squadron was based at Driffield between June 1944, and September 1945, and the dispersals here were mainly the 'frying pan' type, with some 'loop' dispersals.
 
Well,
Peter called me yesterday, said his son, who is into his grandfathers service history, is flying in from France on Thursday, 7 days. I guess I just needed a poke in the butt to get off it and paint the code letters. I did use a mask, computer cut actually. Took a side view picture into Corel and traced it, made an EPS file and took it to work and cut it on a plotter, I work in a sign shop. I was a little hesitant to use the mask as it melted from acrylics. I used Tamiya lacquer spray cans and just dove in. I am tickled with the results.

I may have something to show by Thursday.

Then I can get the serial numbers on and start gluing the whole thing back together.
 

Attachments

  • KG10 code.jpg
    KG10 code.jpg
    82.4 KB · Views: 64
Yesterday morning before leaving for work I forged ahead and painted the other side code. Last night before hitting the sack I stuck the tail feathers on, they have been ready for a while. I just didn't want to contend with them trying to mask the code letters. Really just have to assemble the turrets. Just thinking, if this is the front of the display, I may rotate it to the the other direction, cuz that's where the nose art is. The little Bedford truck adds something too!

Now I gotta do something with the concrete. and a little grass corner!
 

Attachments

  • KG11 semi assy.jpg
    KG11 semi assy.jpg
    34.9 KB · Views: 87
Just another view. Didn't realize how close I was to finishing the plane.
Checked my kit boxes, no gray left!!!!!!
Only thing left will be the base.
I think they will be a little surprised at the final product. I am pleased, and it's been a pleasure.
 

Attachments

  • KG12 another view.jpg
    KG12 another view.jpg
    97.3 KB · Views: 76
Good stuff Bill. Are you going to paint the canopy frames ?

I was attempting to mask the bloody things........ Attempting!
I may look for some Ed masks, but it is something I want to do as Peters dad had them painted, by hand!

Thanks for the positive comments!
 

Users who are viewing this thread

Back