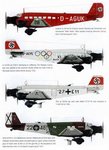
Italeri 1/72 scale JU-52 Minesweeper from Minensuch-Gruppe; France 1943

Ad: This forum contains affiliate links to products on Amazon and eBay. More information in Terms and rules

another side note a couple pics of crews flying this crate that have 150 to 200 missions flown successfully.

pretty impressive flying such a slow thing and not being fighter fodder
 
Hi guys

here we are again with the next installment of the JU52 M build. Tonight we attached the wings which gave it the look of... well of an airplane. :lol:

One.jpg


ModelPhotos001.jpg


Ju52006.jpg


Ju52009.jpg


Ju52010.jpg


Ju52007.jpg


And lastly we have some bits and pieces.
Ju52011copy.jpg


Till next time. Thanks for looking
 
Sure is. Where the wheel spats fitted to that type? They aren't normally seen on Luftwaffe transport version of the Ju52, although the civilian ones had them of course.
 
This is coming along nicely, keep the pics coming Dirk
:=D>:

Sure is. Where the wheel spats fitted to that type? They aren't normally seen on Luftwaffe transport version of the Ju52, although the civilian ones had them of course.

True enough Terry, my Ju52 Transporter has spats only for the Spanish version.
:hotsun: :hotsun:
 
Sure is. Where the wheel spats fitted to that type? They aren't normally seen on Luftwaffe transport version of the Ju52, although the civilian ones had them of course.

Ahh, I knew someone would catch that. Wheel spats were NOT common to the JU-52 MS birds like you said but in my reference book in the MS section they have a picture of one WITH the spats. The comments for the photo states just what you said Airframes. But they went on to state that planes were pulled from all different places to make the MS's squadrons so its not impossible for some to actually have them.

Seeing how this build is not representing a real live specific aircraft I took creative liberties and am placing them on just because 1) it was rare and 2) because I can. :lol::lol:
 
Spats, no spats, what the heck mate, it's your prerogative your model and a nice one at that.
:hotsun: :hotsun:
 
your call Dirk but if it were mine I would say no the % is too high of the units involved that did not use them - photos

That's what makes me want to put them on even more. I'll see if I can scan the photo and post it. Problem is I have a feed scanner not a table scanner and I'm not about to tear out the page to post. :lol:
 
Dirk is the unit ID'd in your pic ? MSG 1 is : PI + ??

MSGr 1 (PD+KH) Budaors airfield near Budapest Hungary.

Is that what you're looking for?

In the case of the aircraft in the picture, it was formally a Ju52/3m g7e Transport converted for MS duty.
 
Last edited:
Looking good. Have you tried Microscale Micro Krystal Klear.Nothing like it. Its a white liquid latex.Use a small pointed object to apply and wait.Dries crystal clear.You won't believe the results. I haven.'t used clear plastic windows for years. It will fill to about 3/8 inch.Perfect for that landing light.
Ed
 
Hi guys

PaintandCamoTime.jpg


I know it's been awhile but I've been busy doing chores around the house, camping, baseball and soccer for the boy, etc and doing my favorite part of modeling on several different models... FILLING :evil: SANDING!

Well I finally felt I can start moving forward with this and start the paint job.

Once I was comfortable with the prep work I broke out the Badger 172 and away we went. I started by painting the underside of the aircraft with Light Ghost Gray.

Ju52PaintandCamo022.jpg


Next I taped off the bottom to protect from unwanted over spray, blocked off the cargo doors and put the roof in place temporarily.

Next I mixed up some Dark Euro Green and sprayed.

Ju52PaintandCamo001.jpg


The paint seemed to go on fine but spraying all this corrugation takes up more time and a lot more paint. In the picture below you can see the spots missed aft of the cargo door opening

Ju52PaintandCamo003.jpg


Ju52PaintandCamo002.jpg


After the base coat was dry I brought out some more tape and started the masking for the camo.

Ju52PaintandCamo015.jpg


Using RLM 71 I applied the camo.

Ju52PaintandCamo017.jpg


Remove the tape and "voila!" My first ever German Camo paint job.

Ju52PaintandCamo019.jpg


Ju52PaintandCamo020.jpg


To be honest with all the corrugation I expected to have to do a lot more touch ups due to paint running the lines but I had hardly any..

Till next time. Thanks for looking.
 
Last edited:

Users who are viewing this thread

Back