Airframes
Benevolens Magister
North American / Sud Aviation T-28S 'Fennec' of E.A.L.A. 3/5, Armee de l'Air, Mecheria, Algeria, 1962.
As many of you know, I haven't done any modelling for some time, due to 'flare up' of the arthritis (in my hands and wrists this time), plus various other ailments. This has been more than frustrating, as I have some long overdue commissions to attend to, as well as a longer list of projects I want to complete before I become totally knackered!
So, in an effort to get 'back in the swing', and rather than possibly ruin a model intended for someone else, I thought I'd have a bash at this one.
The T-28 is a type I've wanted to model for some time, and I've been contemplating various colour schemes, but after seeing two 'Fennecs' at the Duxford air show in September, I felt I'd finally found something a little different, compared to most 'Trojan' models, more of which later.
The Kit.
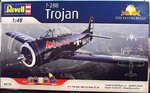
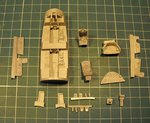
Rather than fork out for the relatively new Roden kit, at an average price of £28 ($45 US) plus delivery, I decided to pay the princely sum of £8 (about $12 US) for the old Revell/Monogram T-28B kit, on 'special offer', and once again released in yet another guise as the 'Red Bull' example, and also purchase the reasonably-priced 'True Details' resin cockpit set, and the 'Aires' resin wheels set, both designed for the Roden kits. (Pics 1 and 2)
The total cost of this 'package' is still considerably less than the aforementioned Roden kit, but, of course, it will mean quite a lot of extra work. But then, if I wanted 'Instant Trojan', I'd buy a bl**dy die-cast!!!
The Revell kit dates back to 1956, and this shows in the surface detail, the toy-like retractable landing gear, and a few other areas which will be shown as the build progresses, but, with the addition of the detail parts, some scratch-building and a few modifications, I believe it will produce a nice replica of the 'Frenchified' T-28, and, when first released 57 years ago this was, for the time, a very advanced and detailed kit.
I had intended to completely scratch-build the cockpit area, using the kit parts as a basis, but, as will be shown later, not much could be used convincingly and, considering the relatively low cost of the resin cockpit set at less than £7 (about $10 US), I thought it easier to use this, and add some extra scratch-built bits and pieces instead.
Background.
During the Algerian war of 1954 to 1962, the French Armee de l'Air were heavily committed, mainly with transport, recce, and in support of ground forces. The latter role, particularly COIN operations, was undertaken originally by the armed AT-6 aircraft of the 13 Escadrilles d'Aviation Legere d'Appui (light attack squadrons), or E.A.L.A., stationed at various bases across the north of the country. By the end of the 1950's, these converted trainers were supplemented by four squadrons equipped with the T-28S, a 're-built' and modified version of the original North American T-28A 'Trojan'.
The French government of the day, realising the need for a more capable counter-insurgency aircraft, looked to N.A. with a view to purchasing the T-28B, to be equipped for ground-attack duties. However, due to the needs of the US Navy, and the required production facilities, and time, to meet those needs, the 'B' version was not available at that time. Consequently, the French purchased 128 surplus T-28A airframes, at a unit cost of $4,000 US each, with the intention of fitting up-rated engines, armament hard-points and systems, and other modifications needed to meet the French service requirements.
The initial conversion work was carried out on the first airframe by Pacific Automotive, of Burbank, California, who designed the installation and conversion kits to enable the fitting of the more powerful Wright Cyclone R-1820-76A engine, producing 1,425 hp, via a Hamilton Standard 3 blade prop. Engine cores were sourced from former B-17 power plants, as were all subsequent installations, which were undertaken by Sud Aviation at their St. Nazaire plant in France. The conversion work also included the fitting of French avionics and instrumentation, armour, weapons hard points and control systems, the distinctive cockpit cooling air scoop ahead of the windscreen, and the reversal of throttle and engine controls to match French standards and practice. It is believed that the unit cost of each conversion was $100,000 - for an aircraft originally costing $4,000 !!
The aircraft were given the designation T-28S, and named 'Fennec', after a type of desert fox (appropriate for me!!), and were deployed to bases in Algeria by 1960, where they operated in the ground support role, armed with a variety of weapons, ranging from twin 12.7mm machine gun pods, of French design, to HVAR-type rockets, bombs, and SNEB rocket pods. Although heavily involved in the conflict, the operational service of Fennec units was relatively brief as, with the end of the war in Algeria, they returned to mainland France at the end of 1962.
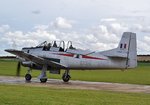
The 'Fennecs' serving in Algeria were all in bare metal finish, and carried French roundels on the wings, with the unit badge on the fuselage, and the French tricolour on the fin, along with the individual serial number and the build number (example - Fennec 57). The Duxford-based example in Photo 3 is typical of the appearance of these aircraft whilst in Algeria, although somewhat cleaner and more shiny than the desert-based Fennecs!
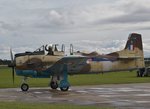
This information was a slight disappointment for me, as I had intended to finish my model in the colour scheme shown in Photo 4, which turns out to be a representative scheme, a composite of all units using the type in mainland France, and not a finish seen in Algeria during the conflict.
But, no problem, as it will allow me to attempt to replicate the worn, faded-metal look of the originals which, with the application of some home-made decals and decals from the spares file will (hopefully) provide something different for the display cabinets, portraying an aircraft based at the airfield at Mecheria, on the edge of the Algerian desert, at the base of the Atlas mountains. (Google Mecheria, and the current civil airport is clearly visible, south of the now much larger city, surrounded by an apparently barren landscape.)
The Build.
As seems the norm with most of my builds, it's a case of 'destruction before construction', with what is going to be a lengthy process of preparation before any meaningful construction can begin.
As with any build, the first stage involves research and thorough checking of details and what will be required. This not only includes the specific details needed for the 'Fennec', but close study of the kit instruction sheet, how and where the kit parts fit, and, more importantly, what will need to be modified/altered/butchered to allow the fitment of the resin parts, whilst maintaining the integrity of the kit parts and allowing for the requirements of construction and painting stages further down the line. Consequently, considerable time has been spent, so far, on planning the build sequence, test fitting and initial preparation. (novice modellers note this - it saves a lot of heartache in the long term!).
The first thing to establish was whether or not the resin cockpit tub would actually fit, and much juggling and fumbling showed that it would, although this involves the removal of substantial amounts of plastic on the fuselage interior.
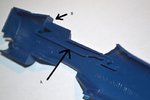
Photo 5 shows the internal locating ribs for the kit cockpit tub, and the 'runners' for the rear, sliding canopy section, as well as the front 'instrument panel' (arrows, A and B), onto which a decal should be placed, if building as per instructions.
All of these have to be removed, along with the lower section of the front canopy, moulded as part of the fuselage, and this was achieved with the aid of a modelling chisel, a scalpel, razor saw, and lots of filing.
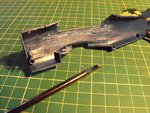
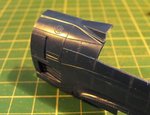
Photos 6 and 7 show the result, ready for sanding down.
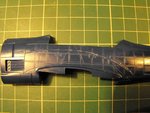
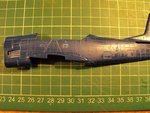
Having established, by test-fitting, that the resin parts will now fit properly, and the fuselage halves will join properly, the next step is to prepare the exterior of the fuselage, by 'toning down' the 1950's style rivet detail, and adding panel lines, hatches, and new rivet detail. This task is undertaken before any interior construction, as it allows for easier working, and avoids the possibility/probability of damage to delicate interior fittings.
So, after this relatively long initial post, this will be shown in the next 'installment' - once my hands have recovered from the effort of shaving plastic !!
My thanks to Geo (Fubar 57) for providing the extremely useful T-28 manuals, and to Wojtek, for the links to additional detail photos.
As many of you know, I haven't done any modelling for some time, due to 'flare up' of the arthritis (in my hands and wrists this time), plus various other ailments. This has been more than frustrating, as I have some long overdue commissions to attend to, as well as a longer list of projects I want to complete before I become totally knackered!
So, in an effort to get 'back in the swing', and rather than possibly ruin a model intended for someone else, I thought I'd have a bash at this one.
The T-28 is a type I've wanted to model for some time, and I've been contemplating various colour schemes, but after seeing two 'Fennecs' at the Duxford air show in September, I felt I'd finally found something a little different, compared to most 'Trojan' models, more of which later.
The Kit.
Rather than fork out for the relatively new Roden kit, at an average price of £28 ($45 US) plus delivery, I decided to pay the princely sum of £8 (about $12 US) for the old Revell/Monogram T-28B kit, on 'special offer', and once again released in yet another guise as the 'Red Bull' example, and also purchase the reasonably-priced 'True Details' resin cockpit set, and the 'Aires' resin wheels set, both designed for the Roden kits. (Pics 1 and 2)
The total cost of this 'package' is still considerably less than the aforementioned Roden kit, but, of course, it will mean quite a lot of extra work. But then, if I wanted 'Instant Trojan', I'd buy a bl**dy die-cast!!!
The Revell kit dates back to 1956, and this shows in the surface detail, the toy-like retractable landing gear, and a few other areas which will be shown as the build progresses, but, with the addition of the detail parts, some scratch-building and a few modifications, I believe it will produce a nice replica of the 'Frenchified' T-28, and, when first released 57 years ago this was, for the time, a very advanced and detailed kit.
I had intended to completely scratch-build the cockpit area, using the kit parts as a basis, but, as will be shown later, not much could be used convincingly and, considering the relatively low cost of the resin cockpit set at less than £7 (about $10 US), I thought it easier to use this, and add some extra scratch-built bits and pieces instead.
Background.
During the Algerian war of 1954 to 1962, the French Armee de l'Air were heavily committed, mainly with transport, recce, and in support of ground forces. The latter role, particularly COIN operations, was undertaken originally by the armed AT-6 aircraft of the 13 Escadrilles d'Aviation Legere d'Appui (light attack squadrons), or E.A.L.A., stationed at various bases across the north of the country. By the end of the 1950's, these converted trainers were supplemented by four squadrons equipped with the T-28S, a 're-built' and modified version of the original North American T-28A 'Trojan'.
The French government of the day, realising the need for a more capable counter-insurgency aircraft, looked to N.A. with a view to purchasing the T-28B, to be equipped for ground-attack duties. However, due to the needs of the US Navy, and the required production facilities, and time, to meet those needs, the 'B' version was not available at that time. Consequently, the French purchased 128 surplus T-28A airframes, at a unit cost of $4,000 US each, with the intention of fitting up-rated engines, armament hard-points and systems, and other modifications needed to meet the French service requirements.
The initial conversion work was carried out on the first airframe by Pacific Automotive, of Burbank, California, who designed the installation and conversion kits to enable the fitting of the more powerful Wright Cyclone R-1820-76A engine, producing 1,425 hp, via a Hamilton Standard 3 blade prop. Engine cores were sourced from former B-17 power plants, as were all subsequent installations, which were undertaken by Sud Aviation at their St. Nazaire plant in France. The conversion work also included the fitting of French avionics and instrumentation, armour, weapons hard points and control systems, the distinctive cockpit cooling air scoop ahead of the windscreen, and the reversal of throttle and engine controls to match French standards and practice. It is believed that the unit cost of each conversion was $100,000 - for an aircraft originally costing $4,000 !!
The aircraft were given the designation T-28S, and named 'Fennec', after a type of desert fox (appropriate for me!!), and were deployed to bases in Algeria by 1960, where they operated in the ground support role, armed with a variety of weapons, ranging from twin 12.7mm machine gun pods, of French design, to HVAR-type rockets, bombs, and SNEB rocket pods. Although heavily involved in the conflict, the operational service of Fennec units was relatively brief as, with the end of the war in Algeria, they returned to mainland France at the end of 1962.
The 'Fennecs' serving in Algeria were all in bare metal finish, and carried French roundels on the wings, with the unit badge on the fuselage, and the French tricolour on the fin, along with the individual serial number and the build number (example - Fennec 57). The Duxford-based example in Photo 3 is typical of the appearance of these aircraft whilst in Algeria, although somewhat cleaner and more shiny than the desert-based Fennecs!
This information was a slight disappointment for me, as I had intended to finish my model in the colour scheme shown in Photo 4, which turns out to be a representative scheme, a composite of all units using the type in mainland France, and not a finish seen in Algeria during the conflict.
But, no problem, as it will allow me to attempt to replicate the worn, faded-metal look of the originals which, with the application of some home-made decals and decals from the spares file will (hopefully) provide something different for the display cabinets, portraying an aircraft based at the airfield at Mecheria, on the edge of the Algerian desert, at the base of the Atlas mountains. (Google Mecheria, and the current civil airport is clearly visible, south of the now much larger city, surrounded by an apparently barren landscape.)
The Build.
As seems the norm with most of my builds, it's a case of 'destruction before construction', with what is going to be a lengthy process of preparation before any meaningful construction can begin.
As with any build, the first stage involves research and thorough checking of details and what will be required. This not only includes the specific details needed for the 'Fennec', but close study of the kit instruction sheet, how and where the kit parts fit, and, more importantly, what will need to be modified/altered/butchered to allow the fitment of the resin parts, whilst maintaining the integrity of the kit parts and allowing for the requirements of construction and painting stages further down the line. Consequently, considerable time has been spent, so far, on planning the build sequence, test fitting and initial preparation. (novice modellers note this - it saves a lot of heartache in the long term!).
The first thing to establish was whether or not the resin cockpit tub would actually fit, and much juggling and fumbling showed that it would, although this involves the removal of substantial amounts of plastic on the fuselage interior.
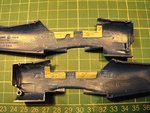
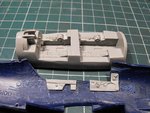
Photo 5 shows the internal locating ribs for the kit cockpit tub, and the 'runners' for the rear, sliding canopy section, as well as the front 'instrument panel' (arrows, A and B), onto which a decal should be placed, if building as per instructions.
All of these have to be removed, along with the lower section of the front canopy, moulded as part of the fuselage, and this was achieved with the aid of a modelling chisel, a scalpel, razor saw, and lots of filing.
Photos 6 and 7 show the result, ready for sanding down.
Having established, by test-fitting, that the resin parts will now fit properly, and the fuselage halves will join properly, the next step is to prepare the exterior of the fuselage, by 'toning down' the 1950's style rivet detail, and adding panel lines, hatches, and new rivet detail. This task is undertaken before any interior construction, as it allows for easier working, and avoids the possibility/probability of damage to delicate interior fittings.
So, after this relatively long initial post, this will be shown in the next 'installment' - once my hands have recovered from the effort of shaving plastic !!
My thanks to Geo (Fubar 57) for providing the extremely useful T-28 manuals, and to Wojtek, for the links to additional detail photos.
Attachments
-
 Buys 277.jpg132 KB · Views: 197
 -
 Fennec build 031.jpg117.8 KB · Views: 186
 -
 Duxford show Sept 13 988.jpg151.6 KB · Views: 174
 -
 Duxford show Sept 13 993.jpg124.4 KB · Views: 178
 -
 Fennec build 013.jpg67.3 KB · Views: 199
 -
 Fennec build 017.jpg137.7 KB · Views: 176
 -
 Fennec build 022.jpg76.7 KB · Views: 210
Last edited: