Very Good work so far Matt!! Well done mate...
Navigation
Install the app
How to install the app on iOS
Follow along with the video below to see how to install our site as a web app on your home screen.
Note: This feature may not be available in some browsers.
More options
You are using an out of date browser. It may not display this or other websites correctly.
You should upgrade or use an alternative browser.
You should upgrade or use an alternative browser.
Revell 1/72nd Supermarine Walrus Mk.1
- Thread starter Matt308
- Start date
Ad: This forum contains affiliate links to products on Amazon and eBay. More information in Terms and rules
More options
Who Replied?Wildcat
Major
Nice work Matt. You're definately blitzing through this build!
- Thread starter
- #64
Matt308
Glock Perfection
Matt, first pic in post 55, is that a brush on the desk?
No, it's a ball shaped drill bit. It's what I used to remove plastic between the Vickers stock butt and wire frame.
- Thread starter
- #65
Matt308
Glock Perfection
Nice work Matt. You're definately blitzing through this build!
Yeah.
Catch22
Major
Very fast indeed!
Excellent work!
Excellent work!
- Thread starter
- #68
Matt308
Glock Perfection
It seems fast guys, but I started almost two weeks ago.
Thanks for the positive encouragement. But I'm worried about lower wing, engine mounts, struts and upper wing alignment. Been contemplating my best approach as that is looming.
And I won't mention the dang rigging. That's gonna be fun. I definitely need to get different superglue. The Loctite Gel that I currently have has such a long initial adhesion time, that working with such small parts my hand shaking makes gluing a real trial. I had to hold my hand still for the exhausts for at least 30sec before I could get any sort of adhesion to occur. Not acceptable for rigging.
Besides. I still need front and rear sites on my Vickers.
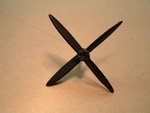
Completed the propeller. All sources I show indicate that the propeller on the Mk.1 Pacific Fleet was a solid black with very little wear. Other modellers have made what appears to be a mistake of painting the propeller hub bare metal and the propeller tips yellow. But I can't find any evidence of this.
So black it is with only some minor wear and the hub bolts bare metal. Additional wear will be added once she's virtually finished. On another note, my dry fitting indicates the propeller diameter is too big. So once the wings are glued on, I'll need to assess the amount of shaping I may need to accomplish. I have my fingers crossed that it will be none, but if I was a betting man...
Attachments
- Thread starter
- #69
Matt308
Glock Perfection
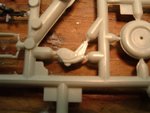
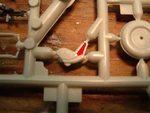
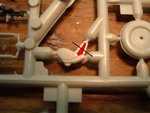
Now for the next problem. The tail wheel/rudder assembly.
The molded version is wrong. It is molded as a solid piece. The area in red needs to be removed.
And I crushed it. Gonna have to figure out what I'm going to do here. Probably will have to scratch build the two struts dangit.
The molded version is wrong. It is molded as a solid piece. The area in red needs to be removed.
And I crushed it. Gonna have to figure out what I'm going to do here. Probably will have to scratch build the two struts dangit.

Attachments
- Thread starter
- #71
Matt308
Glock Perfection
- Thread starter
- #72
Matt308
Glock Perfection
You guys aren't going to give me a Forum intervention are you? 
Airframes
Benevolens Magister
Got some work on there Matt!
It's a long, long time since I built a biplane, and I never liked the part where top wing and bottom wing had to be joined! The only thing I can suggest, is to make a box-jig from stiff card. That way, with a bit of luck, you should be able to align the wings for a test fit, and support the upper wing whilst the cement is setting on the struts etc. It will probably mean a bit of trial and error to achieve the correct shape for the jig, due to the positionof the engine nacelle etc., but at least it should go some way to making life easier.
It's a long, long time since I built a biplane, and I never liked the part where top wing and bottom wing had to be joined! The only thing I can suggest, is to make a box-jig from stiff card. That way, with a bit of luck, you should be able to align the wings for a test fit, and support the upper wing whilst the cement is setting on the struts etc. It will probably mean a bit of trial and error to achieve the correct shape for the jig, due to the positionof the engine nacelle etc., but at least it should go some way to making life easier.
- Thread starter
- #76
Matt308
Glock Perfection
Too much beer, you donkeys! That's what caused my wheel/rudder to become "less than ideal". 
Nobody is reading my posts.
Brush up. Exams for all of you tomorrow.
Nobody is reading my posts.
Brush up. Exams for all of you tomorrow.
Airframes
Benevolens Magister
Forum intervention..... sounds like the latest car from Detroit!
Heinz
Captain
Keep it up Matt 
C'mon Matt less beer less breakage.....you don't want to be seeing double next do you!

Heinz
Captain
Well there are already two wings Wayne...things could get interesting 
Users who are viewing this thread
Total: 1 (members: 0, guests: 1)


