Navigation
Install the app
How to install the app on iOS
Follow along with the video below to see how to install our site as a web app on your home screen.
Note: This feature may not be available in some browsers.
More options
You are using an out of date browser. It may not display this or other websites correctly.
You should upgrade or use an alternative browser.
You should upgrade or use an alternative browser.
Revell 1/72nd Supermarine Walrus Mk.1
- Thread starter Matt308
- Start date
Ad: This forum contains affiliate links to products on Amazon and eBay. More information in Terms and rules
More options
Who Replied?- Thread starter
- #42
Matt308
Glock Perfection
Liking the progress!
I assume you're doing it in Pacific Fleet markings and not European?
Yep. It's back on the first page. HMS Victorious, Japan 1945.
And thanks for all the kind comments, guys.
")
109ROAMING
2nd Lieutenant
Nice progress Matt
Airframes
Benevolens Magister
Agree, nice work. the engines are looking very good.
you're right about the Revell 'merger', this took place I think at least two years ago, with magazines often refering to Revell/Monogram. There's still Revell as you know it in the U.S.A. (Revell/Monogram), and Revell GmBh in Germany, generally refered to as Revell(Germany), each producing their own kits, with some cross-marketing. Many kits now produced by R/M are from moulds from other manufacturers, for example Hasegawa and Matchbox. I'm virtually certain that the Walrus is the old Matchbox kit, dating from the '70's. Good news that this is happening, as the Matchbox range was vast and comprehensive, in 72nd 32nd and some 48th scale.
Looking forward to the next stage Matt.
Catch22
Major
Yep. It's back on the first page. HMS Victorious, Japan 1945.
And thanks for all the kind comments, guys.
Don't mind me...
Thanks for the clarification hah.
- Thread starter
- #46
Matt308
Glock Perfection
No worries! 
- Thread starter
- #47
Matt308
Glock Perfection
- Thread starter
- #48
Matt308
Glock Perfection
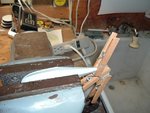
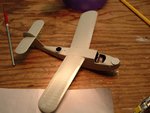
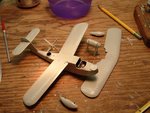
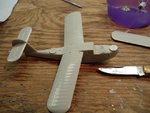
Next up, the Walrus Mk.1 begins to take shape.
1st Pic - Wings, stabilizers, seats and forward hatch are installed.
2nd Pic - Major assemblies are completed (minus details)
3rd Pic - Masking cockpit and rear hatch
1st Pic - Wings, stabilizers, seats and forward hatch are installed.
2nd Pic - Major assemblies are completed (minus details)
3rd Pic - Masking cockpit and rear hatch
Attachments
- Thread starter
- #49
Matt308
Glock Perfection
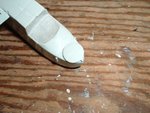
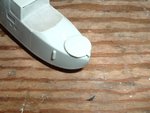
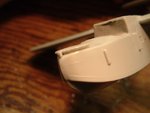
The front observer/gunner hatch is entirely too thick for scale. The kit hatch is thick enough for a Panzer MkIV front mantlet. So some sanding is in order. The first pic has some rounding that is corrected in the second pic.
The third and fourth pics are poorly showing the newly scribed hatch lines. Unfortunately they did not come through. Had to be careful with the scribed lines and hinges, because the hatch to scale is now probably less than 1/64in thick.
The third and fourth pics are poorly showing the newly scribed hatch lines. Unfortunately they did not come through. Had to be careful with the scribed lines and hinges, because the hatch to scale is now probably less than 1/64in thick.
Attachments

- Thread starter
- #50
Matt308
Glock Perfection
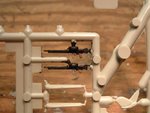
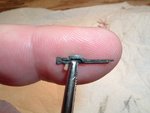
Okay... next the Vickers machine gun.
I really wanted to provide some realism here, as this is where most peoples eyes are drawn (i.e., to the weapons).
So first up a base paint job. War expedient weapons from Britain were black, with wood 'furniture'. The mounts were grey to preven corrosion.
I really wanted to provide some realism here, as this is where most peoples eyes are drawn (i.e., to the weapons).
So first up a base paint job. War expedient weapons from Britain were black, with wood 'furniture'. The mounts were grey to preven corrosion.
Attachments
- Thread starter
- #51
Matt308
Glock Perfection
Heinz
Captain
Wow Matt great work there mate
- Thread starter
- #53
Matt308
Glock Perfection
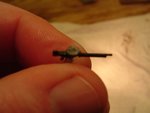
Sorry for blurry pics, but even with the macro setting is REALLY small.
The next process was to paint the 97rd drum magazine. Painting steel/grey over the top and side first. Second, using a razor knife, score the sides and symetrically over the top, revealing the black underneath in the scores.
The next process was to paint the 97rd drum magazine. Painting steel/grey over the top and side first. Second, using a razor knife, score the sides and symetrically over the top, revealing the black underneath in the scores.
Attachments
Airframes
Benevolens Magister
The 'Shagbat' takes shape! Looking great Matt. I like the work you've done on the hatch and the VGO M.G.'s; dedication in that scale, and well done.
- Thread starter
- #55
Matt308
Glock Perfection
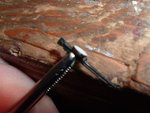
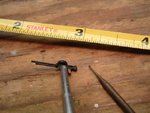
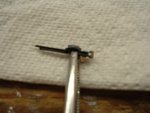
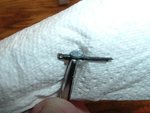
The Vickers had a vertical straight handle of wood framed with metal.
So an extremely small Dremel bit (1/64th) was used to rout out the handle material.
Finally, the barrel was cut at a 30 degree angle to represent the compensator for muzzle rise. Can't let those Zekes get by because we failed to include the muzzle rise compensator, now can we.
So an extremely small Dremel bit (1/64th) was used to rout out the handle material.
Finally, the barrel was cut at a 30 degree angle to represent the compensator for muzzle rise. Can't let those Zekes get by because we failed to include the muzzle rise compensator, now can we.
Attachments
- Thread starter
- #56
Matt308
Glock Perfection
The 'Shagbat' takes shape! Looking great Matt. I like the work you've done on the hatch and the VGO M.G.'s; dedication in that scale, and well done.
Thanks, Airframes.
wow great attention to detail matt and very well done
Screaming Eagle
Senior Master Sergeant
very nice matt! Don't you just love time off work? I almost completed a P-47 in three days because of that
109ROAMING
2nd Lieutenant
Nice progress Matt
Looking good!
Looking good!
Users who are viewing this thread
Total: 1 (members: 0, guests: 1)