Looks great so far Darryl!
Navigation
Install the app
How to install the app on iOS
Follow along with the video below to see how to install our site as a web app on your home screen.
Note: This feature may not be available in some browsers.
More options
You are using an out of date browser. It may not display this or other websites correctly.
You should upgrade or use an alternative browser.
You should upgrade or use an alternative browser.
1:1 Spitfire K9817 Cockpit Build
- Thread starter Tony Hill
- Start date
Ad: This forum contains affiliate links to products on Amazon and eBay. More information in Terms and rules
More options
Who Replied?- Thread starter
- #1,102
Tony Hill
Tech Sergeant
Thanks Guys! (Luis, I will get some photos up again as I go)
Ross does simply brilliant work!
Ross does simply brilliant work!
- Thread starter
- #1,103
Tony Hill
Tech Sergeant
And here is the result of all Ross's hard work!
Now i just have to wait for them to arrive so I can drool over them in person")
Now i just have to wait for them to arrive so I can drool over them in person
Attachments
fubar57
General
Looks great
Excellent work!!
- Thread starter
- #1,106
Tony Hill
Tech Sergeant
Thanks Geo and Hugh,
Everybody on the project except ME seems to be getting things done. Work has been hell lately and I haven't even been able to catch up on the posts I follow here! Frame 8 is still exactly as it was about 4 months ago!
I DID manage to get the drilling and riveting done on the fuelcock bell cranks last weekend ... late at night, which I am sure, if there hadn't been a raging storm, would have annoyed the neighbours
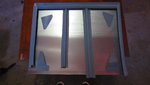
The 2mm stainless levers will warp slightly as you pull them up to "ON" but then lock against the top notches and must be physically pushed sideways to disengage the notch and turn the fuel taps "OFF" , just as in the real aircraft
You can also see the four new, black, custom made washers (from ABS Auto plastic) These were made to pretty tight specifications, so that the levers fit snuggly into the guide tracks.
One of the taper pins has been loose fitted, as I still need to fit the axle into the frame. Once that is done the taper will be hammered home, holding firmly and requiring punching or drilling out to change anything.The holes in the axle are 3mm at the top and 2. 5 at the bottom. The taper pins are ever so slightly bigger and reduce over the 19mm distance across the axle. I'm a big fan of tapers now! A simply brilliant way of fixing.
The bellcranks are 3mm steel and are set at different angles to accommodate the pushrods going (up) to the top tank and (down) to the bottom. The top tank feeds into the bottom tank in any case and the tap arrangement was later simplified to a single tap on the bottom tank.
Finally, I have found a way to fit my (overly long) countersink depth gauge into my milling machine, so the countersinks on the new, 4BA screw, version of the faceplate should be smooth and even, unlike the current ones which had to be done by hand!


Everybody on the project except ME seems to be getting things done. Work has been hell lately and I haven't even been able to catch up on the posts I follow here! Frame 8 is still exactly as it was about 4 months ago!
I DID manage to get the drilling and riveting done on the fuelcock bell cranks last weekend ... late at night, which I am sure, if there hadn't been a raging storm, would have annoyed the neighbours
The 2mm stainless levers will warp slightly as you pull them up to "ON" but then lock against the top notches and must be physically pushed sideways to disengage the notch and turn the fuel taps "OFF" , just as in the real aircraft
You can also see the four new, black, custom made washers (from ABS Auto plastic) These were made to pretty tight specifications, so that the levers fit snuggly into the guide tracks.
One of the taper pins has been loose fitted, as I still need to fit the axle into the frame. Once that is done the taper will be hammered home, holding firmly and requiring punching or drilling out to change anything.The holes in the axle are 3mm at the top and 2. 5 at the bottom. The taper pins are ever so slightly bigger and reduce over the 19mm distance across the axle. I'm a big fan of tapers now! A simply brilliant way of fixing.
The bellcranks are 3mm steel and are set at different angles to accommodate the pushrods going (up) to the top tank and (down) to the bottom. The top tank feeds into the bottom tank in any case and the tap arrangement was later simplified to a single tap on the bottom tank.
Finally, I have found a way to fit my (overly long) countersink depth gauge into my milling machine, so the countersinks on the new, 4BA screw, version of the faceplate should be smooth and even, unlike the current ones which had to be done by hand!
Last edited:
- Thread starter
- #1,107
Tony Hill
Tech Sergeant
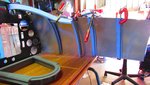
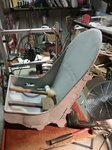
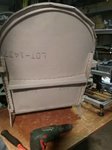
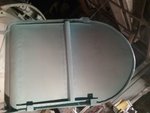
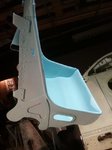
Seat update from Ross. Looking great and he has saved me some expensive tooling and one off skills!


fubar57
General
That is very cool, awaiting the final product
Great work so far!
- Thread starter
- #1,110
Tony Hill
Tech Sergeant
Thanks guys! yes, Ross is a true craftsman!
WOW..!!
- Thread starter
- #1,113
Tony Hill
Tech Sergeant
Thanks Wojtek and Wayne,
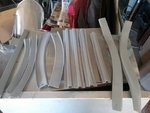
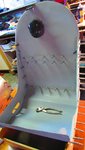
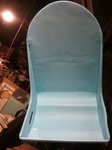
I had a bit of bad luck and burned myself quite badly, then just when I was ready to get back in the workshop, I was bitten by a redback and laid low..so progress has been non-existent at my end. Ross did however finish the upper cockpit stiffeners and the seat.
The seat is a suitably (and deliberately) jumbled combination of features. It represents an early seat but with the right thigh strap hole having been added but no handhold hole. It also has the seat armour brakets in place from its time as a fighter but the armour itself has been removed to lighten the airframe for PRU duties. I will probably paint it black, as were a few early ones, to provide further interesting variation.
Attachments
-
 20431692_10212234676495998_5511880668935509615_n.jpg61 KB · Views: 83
 -
 22014565_10212680435079684_1371349757_n.jpg70.8 KB · Views: 65
 -
 22014647_10212680434839678_1850184049_n.jpg38.7 KB · Views: 76
 -
 21151203_10212478954362792_3884242510439598442_n.jpg68.1 KB · Views: 81
 -
 22054447_10212687342892375_2087224493_n.jpg31 KB · Views: 81
 -
 22016895_10212687343692395_505288846_o.jpg294.4 KB · Views: 69
 -
 22014784_10212687344412413_1566515005_n.jpg33.5 KB · Views: 98
Last edited:
that's a real spot of bad luck, Take care of yourself man.....
- Thread starter
- #1,115
Tony Hill
Tech Sergeant
IThanks Wayne...n less politically correct times mate, I would have said i must have walked over a ***naman
Not too bad but she was obviously big enough to give me a very bad weekend. That is the LAST time I help the wife cook!!
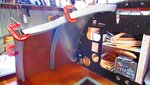
Anyhow to more interesting things. I'm pulling apart the fuse boxes and mountings. For anyone who is interested in what the inside of Spitfire fuse boxes looks like..knock yourself out!! And a small tip from the modellerin me... Vallejo German Cam Black Brown is SPOT ON for Bakelite.


Not too bad but she was obviously big enough to give me a very bad weekend. That is the LAST time I help the wife cook!!
Anyhow to more interesting things. I'm pulling apart the fuse boxes and mountings. For anyone who is interested in what the inside of Spitfire fuse boxes looks like..knock yourself out!! And a small tip from the modellerin me... Vallejo German Cam Black Brown is SPOT ON for Bakelite.
Robert Porter
Senior Master Sergeant
Ouch! (What the heck is a redback?) Sorry to hear your troubles but very glad you seem to be in full recovery. Interesting bit of kit that fuse block! Did Spitfires ever switch to circuit breakers?
Crimea_River
Marshal
Hope you mend quickly Daryl. Seat looks fantastic.
T Bolt
Colonel
That seat is beautiful Daryl
- Thread starter
- #1,120
Tony Hill
Tech Sergeant
Thanks guys!!
Robert, this is a redback...vicious bitch of a thing about and inch (and somethimes up to an inch and a half) across.
It was under a cupboard near the stove. I have been bitten once before, by a juvenile, on an ear whilst cleaning up, which was unpleasant but not to much of a drama. This one bowled me over for a whole weekend. The moral of the story is DON'T do household chores
Users who are viewing this thread
Total: 1 (members: 0, guests: 1)