TBD Devestator Torpedo Bomber 1/33 scale

Ad: This forum contains affiliate links to products on Amazon and eBay. More information in Terms and rules

deckape

Staff Sergeant
769
63
Jul 26, 2011
Moraine Ohio U.S.A.
Ahoy
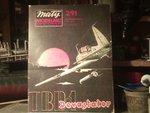
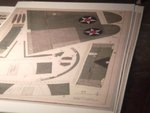
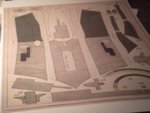
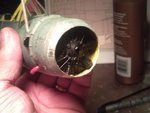
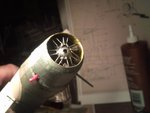
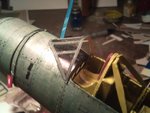
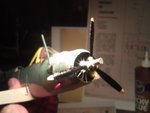
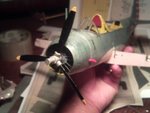
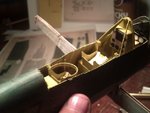
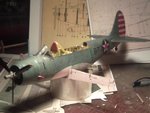
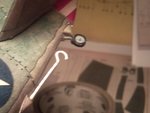
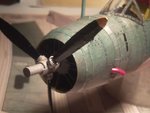
Here is a build log of the card kit of the infamous TBD Devastor Torpedo bomber the failure of Midway. a lot of the fellas never seen card kits before and how they are built so I decided to build this here. The four pix below show how the kit is presented. Next postings will be the construction phase and their desription.

Boats:D:D:D:D
 

Attachments

  • PICT0001.JPG
    PICT0001.JPG
    55.2 KB · Views: 184
  • PICT0002.JPG
    PICT0002.JPG
    41.6 KB · Views: 199
  • PICT0003.JPG
    PICT0003.JPG
    47.7 KB · Views: 188
  • PICT0004.JPG
    PICT0004.JPG
    38.1 KB · Views: 270
Fuselage Construction
Ahoy
The Build begins, the following photos show the construction of the fuselage along with skins and formers. for those who are not aquainted with card models this build will give you an Idean what your up against. card modeling is not to difficult it has its own method of constructions useing cones bends and forming the parts befire they are glues. The glue you use is aleens Tacky glue or you can use school glue like elmers. The first photo shows the forward section of the fuselage without the engine placement detail which in turn tommorow they will be built in and touched up with color. all fuselage skins are in position up to former and skin 3, tommorow before I begin I will burnish all seams to smooth them out and touch up with color. Boats
PICT0005.jpg

PICT0006.jpg

PICT0007.jpg

PICT0008.jpg

PICT0014.jpg

PICT0015.jpg
 
Cockpit assembly
Ahoy
Here in the foloowing pictures you will see the construction of the cockpit and its detail, starting with the pilots compartment the floor detail is incorporated useing thin paper strips for the frames and giveing the card a 3d effect. same is treated on the radio and gunners compartments. When these assemblies have been installed and dried I airbrushed same with Zinc Chromate green.
Boats

PICT0004-1.jpg

PICT0003-1.jpg

PICT0005-1.jpg

PICT0006-1.jpg

PICT0007-1.jpg

PICT0008-1.jpg
 
Last edited:
Good stuff so far, although some of the posts have been repeated.
Ahoy Airframes.
thanks for the reply sir, yep I dont know what happened i didn,t meant to repeat the same post i must have double clicked the mouse. My computor is acting up as well. some times my computor dont take commands at the first click of the mouse. When I click again this is prabaly what happened I will have to watch it.
Boats
 
I have deleted these repeated posts. Now it should be OK.

I have the issue of the Mały Modelarz in my stash. Looking like you used a xerocopy of the card model. Not too bad at all. Keep working. :thumbright:
 
I have deleted these repeated posts. Now it should be OK.

I have the issue of the Mały Modelarz in my stash. Looking like you used a xerocopy of the card model. Not too bad at all. Keep working. :thumbright:
Ahoy Wurger
thanks for the reply and thank you for getting rid of those repeats it wasn,t intentional between my stubby fingers and my computor. Yes I tried to get this kit from the paper model store they emailed me and said they no longer make this kit anymore once in a while they stumble across the kit and place them on the out of print kits. I went through the internet and found the files and copied them and i placed them on a cd so i can buildd as many as I wish. On www.papermodlers.com they will not let me start a build thread on the kit they say its a pirated kit. as far as I ,m concerned i paid for the kit it cost me $14.00 twice as much as the kit was sold for. I can see takeing a card kit like this having them copied and selling them to make a profit this called infringment and just stealing. I am building the kit for my own pleasure and to share it here to all of the great fellas here on this wonderfull forum. Thanks very much for your help and replie i will post one more update for the night.
Boats
 
Closeing of the fuselage and tail feathers
Ahoy
Here is the last update for the night update for the night is the closeing the fuselage and the tail feathers. After the fuselage was all finished I constructed the tail feathers, there are two spars for the stabilizer and rudder cutting out the tail feathers and forming first before you cement together. I positioned the two spars and installed the rudder and stabilizer after the unit has dried I burnished the intire fuselage assembly with my burnishing tool. This kit is a copy I obtained through the internet I couldn,t get the kit from the store they dont make this anymore so I went ahead and made a copy of the kit a lot of the true colors were faded out the way the kit was scanned, so I restored the blue gray color useing pastells blending in the blue gray the end result is that it looks fairly weathered as they were, Here is the update. Boats
PICT0001-2.jpg

PICT0002-2.jpg

PICT0003-2.jpg

PICT0004-2.jpg

PICT0005-3.jpg

PICT0006-2.jpg

PICT0008-3.jpg
 
Looking good.:thumbright:

Back to these repeats. I think the problem is with a way you upload pictures. You have to click the Manage Attachemnts button. Then click the Add Files. The next step is to click the Select Files button and set the correct patch to a file (picture) you want to attach. If a file ( pic) is selected ( mostly with Open button or just double click on a file icon with left mouse button in the window of selection) you have to click Upload Files button to attach the file to your post. But please , have a close up look at the small window where you can see a file just chosen. There appeared two additional buttons ( totally there are three ones there). So you have there the Select Files button, Upload Files one and Clear List key. If you click the Upload Files button, the previousely selected file will be attached to your post and the uplading procedure can be finished by clicking either the Done button or the Insert Line one in the Manage Attachments window. But if you click the Select Files button once again you will start the procedure of uploading for another file (picture) without closing of the Add File window. The way of uploading lets to attach 5 files at once. Just you have to follow the procedure five times. If these 5 images (files) are selected ( these are listed in the Add Files window ) you can click the Done button or the Insert Line at the bottom of the Manage Attachments window. All of these 5 images will be attached to the post. If you want more than these 5 files to attach you have to click the Manage Attachments button once again and follow the depicted above procedure again and again for adding of more than 10 files. However I suggest uploading of 5 or 6 pictures to one post maximally. It is the best way for quicker watching them on a screen and its scrolling etc... So you have to devide all images into a couple of posts you can send one by one. The end of the entire uploading procedure is whan you click the Submit Replay button at the bottom of the Repaly to Thread window. It is enough to click once on each of these mentioned here buttons to start their actions. Clicking more than once can cause double posting. So be patient as different computers and Windows/Vista can run slower than you can click. I hope it will help you to stop these repeats.
 
Last edited:
Completeing the fuselage
Ahoy
Here is a update of the build as it continues, Starting at the enghine working aft of the fuselage I took a a piece of dowling chucked it up to tyhe my lathe and turned 7 cylinder heads to simulate the engine itself. Push rods were added along with the governor ring.when dry painted and high lighted useing aluminum paint. The fron windscreen was added, to give the affect of plexi glass and old trick I learned for those who want to venture into card planes and want a realistic plexi glass use packing tape on the inside and outside use plastic cement to join this to card. Next up date will be the propeller tail hoof and tail wheel assembly, Boats
 

Attachments

  • PICT0001.JPG
    PICT0001.JPG
    43.9 KB · Views: 160
  • PICT0002.JPG
    PICT0002.JPG
    33.8 KB · Views: 174
  • PICT0003.JPG
    PICT0003.JPG
    49.8 KB · Views: 184
Ahoy Fellas
I would love to thank everyone for your wonderfull replies to my Devestator, To say the least its comeing along nicely got loads of work to do on her Now you all can see how I turn paper into a airplane when finished know body will believe its paper. I have one more update to post for the night and I will save some work tommorow. I figure I have another 14 to 16 more hours left on the fuselage every time I review what I have done I find more work I can add to her. Thanks fellas I am Honered.
Boats
 
Ahoy
Here is the update for the night The propeller assembly was made from 14 pieces I used toothpicks for reinforcements to the blades they in turn add additional strength after the assembly has dried I airbrushed satin black and left the spinner unpainted left it the color that on the printing of the kit. When this is drying i went ahead and construct the tail wheel unit the tail wheel is made from turned wood dowl with a hole drilled in the center of the wheel this will except the tasilwheel yoke. the arestor hook is made from music wire formed to shape painted white with red bands. Tommorow finishing up the canopy and cockpit details. Boats
 

Attachments

  • PICT0004.JPG
    PICT0004.JPG
    31.7 KB · Views: 147
  • PICT0005.JPG
    PICT0005.JPG
    39.9 KB · Views: 156
  • PICT0006.JPG
    PICT0006.JPG
    45.5 KB · Views: 155
  • PICT0007.JPG
    PICT0007.JPG
    50.2 KB · Views: 150
  • PICT0008.JPG
    PICT0008.JPG
    37 KB · Views: 177
  • PICT0009.JPG
    PICT0009.JPG
    40.2 KB · Views: 149

Users who are viewing this thread

Back