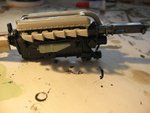
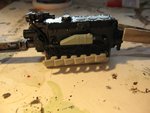
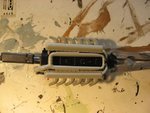
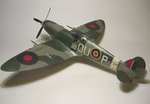
Trumpeter 1/24 BF109g-2

Ad: This forum contains affiliate links to products on Amazon and eBay. More information in Terms and rules

Well the gluing of the engine is mostly complete. Just a bit of tiding up and I guess it is off to the paint shop. I find the plastic soft and easy to sand.Unlike some other kits,a little sanding with the Trump stuff goes a long way. BTW since these pics were taken I put that hose behind the supercharger.
 

Attachments

  • me109 002.JPG
    me109 002.JPG
    49.1 KB · Views: 110
  • me109 003.JPG
    me109 003.JPG
    51.3 KB · Views: 100
  • me109 004.JPG
    me109 004.JPG
    52.8 KB · Views: 137
  • me109 005.JPG
    me109 005.JPG
    55.2 KB · Views: 104
  • me109 006.JPG
    me109 006.JPG
    58 KB · Views: 106
Last edited:
Looking good. Just a tip for future... if it is possible, painting of all additional parts and details should be done before final attaching. Unless thase are of the same colour that the main part is.
 
In which case, see if you can leave out the engine and associated bits, and make a separate display of them. There should be a way to attach the prop and cowling guns without having to use the engine. Shame to hide it all away if the model is going to be in flying pose.
 
This is always the main topic that has been debating for years. Put inside details that won't be seen or not. I think it doesn't matter. But the main idea of the tip above is to make the assembling process easier. Let's see .. for example... the main engine body is already painted. Then a couple of details has to be added to that. So.. either these could be attached before the engine was painted ( because these should be of the black as well ) or these could be coloured separately and attach at the end. Anyway painting them separately can be easier because of easier operating on. Also we can avoid making other parts "dirty" with different colours when painting these additional details attached.
 
Your right. I should have painted the parts 1st,then put it together.Now i will have to see how steady my hands are:idea: Won't be making that mistake on the pit. Paint part separately,then assemble :D
 
Yep.. if it is possible of course. There are always details that have to be put together firstly and then painting. Also remember about leaving some area unpainted e.g. set pins. A paint is a great preservative against a glue.
 
I really need to get an airbrush for such a large scale kit.If not, I am afraid of leaving brush marks. eg. uneven paint and brush strokes. Model master paint seems thin enough that you don't need to thin it,but it leaves brush lines nonetheless. Any solutions until I can afford my airbrush? I don't want to just build an ok kit
 
You can paint the model with a brush. Stir the MM paint before applying. Use a brush of a soft bristle. For the scale , a brush of sable bristle no.6 - no.8 either flat or rounded should be good. Try to apply the paint on not too huge area but always at the same direction and going to edges ( e.g wing trailing or leading edge). It is nice if the next painted area is next to the previous one keeping the surface continuity. Don't try to correct already applied and fresh coat. Use a clear gloss spray in a can for making the surface smooth for decal markings. And use the same kind of spray for decal protection. For the final touch use the matt clear dope in spray. Both gloss and matt coats will make the model surfaces smooth without brushing traces noticable.
I hope it can help.
 
Here you are a few examples of brushing and finishing models in the way I depicted above. No brush traces seen....

63925.jpg


63924.jpg


63927.jpg


40080.jpg


40082.jpg


43733.jpg


43732.jpg


43721.jpg


40597.jpg


40514.jpg
 
And a couple more, in 1/32nd scale (and they need a clean!).
See the 'Basic Guide to Brush Painting' posted in the 'sticky' threads.
 

Attachments

  • Gallery models 005.jpg
    Gallery models 005.jpg
    38.6 KB · Views: 85
  • Gallery models 030.jpg
    Gallery models 030.jpg
    37.6 KB · Views: 85
  • Gallery models 116.jpg
    Gallery models 116.jpg
    26 KB · Views: 81
Hard to say it'll be any good as there's no brand name or info on it. Chances are it's be fine though. Keep it clean, REALLY clean, don't bend the tip and you should be fine.
 

Users who are viewing this thread

Back