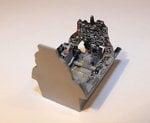
cheers guy's just noticed need to paint the radio black !
Navigation
Install the app
How to install the app on iOS
Follow along with the video below to see how to install our site as a web app on your home screen.
Note: This feature may not be available in some browsers.
More options
You are using an out of date browser. It may not display this or other websites correctly.
You should upgrade or use an alternative browser.
You should upgrade or use an alternative browser.
What's on The Workbench (1 Viewer)
- Thread starter Heinz
- Start date
Ad: This forum contains affiliate links to products on Amazon and eBay. More information in Terms and rules
More options
Who Replied?very cool!
Airframes
Benevolens Magister
Looking good there Evan. I like the subtle mottling on the'262, very nicely done.
Catch22
Major
Yeah, that 262's looking great.
Looking great karl.
Rob, why not try to add a thin, black outline to the letters? You can possibly do this in Corel or Photoshop, by importing the whole design, and using the draw and vector tools.
I don't think I'll do that. the GA planes I've seen with their registration merged into their cheatlines like this never had black outlines. It just wouldn't be realistic. it's definitely not finished, yet. but it's getting there. And does anyone have an idea on how I can create a decal for the top of the cowling?
Airframes
Benevolens Magister
Ah, OK Rob. I thought maybe it had a black outline where the letters run through the white between the cheat lines. What type and shape of decal for the cowling?
A4K
Brigadier General
Cheers guys!
A question for yas... glossed and flat coated the models and they now look like shite - way too flat. After more than a few choice words (...) decided to put them aside and ask your sage advice to remedy...
And another thing. Fricken dust got in without my noticing. Light sand and regloss?? And is it possible to mix a semi-gloss mixture from Model Master gloss and matt cotes?
Eager to hear what yas have to say...
Progress pics, warts 'n all:
1. 'The uglies'
2-7. F-51D:
-detail on reinforced drop tank pegs made from thick solder, being a toy for a mate's son needs to be robust...
-detail on quick bomb-sways made from thin solder.
-general shots after gloss and matt coats. Thinking to mask the black and lightly regloss rest to retore sheen, unless yas have a better idea...?
Last edited:
A4K
Brigadier General
...and the Me 262.


N4521U
Plastic Pirate
I like the little wires for the bomb-sway thing...... something I been battling with what to do with.... the over all plane looks the Biz mate!
The camo on the 262 looks so sweet. Great result.
For the semi-gloss. Tamiya makes a semi-gloss spray in a rattle can, number is TS79. Only thing is, on this island it's 11.50 AU! It does have a nice neutral sheen and I used it on my 1/48th Merlin's Magic. Only one caution, Do Not touch it for about 4 hours as it does soften the paint under.
Having said that, I am sure you will have success if you were to mix flat with gloss. But you would need to add the smallest amount of flat or it will probably go too flat to suit you. Do a couple of tests with amounts. Drops at a time.
Airframes
Benevolens Magister
Shame about the dust problem Evan. Give it a light rub-over a few times with tissue - if the dust is just in the clear coat, it should remove it. If it doesn't, then very carefully rub over with very fine, worn out wet n' dry, used wet. Dry off, inspect, lightly polish off, and re clear coat if required.
Matt and gloss varnishes can be mixed, although it will take some testing to achieve the desired amount of sheen. Also, with varnishes, particularly enamels, the viscosity will increase, therefore giving a 'thicker' coating.
I 'binned' normal clear coats a few years ago, apart from the odd gloss finishing coat, and now use Future mixed with Tamiya Flat Base, to produce anything from dead matt, through semi-matt, semi-gloss and so on.
It only needs a small amount of the Flat Base, mixed with the equivalent of a cap-full of Future, and again, trial and error will provide the desired result. Test on a piece of scrap - it only takes around 15 minutes, maybe 30 minutes at most, for the 'mix' to be dry enough to asses the finish.
Note though, the Flat Base will need thorough stirring before adding to the Future, and will need to be stirred again to thoroughly mix in with the Future. Once you've found a 'mix' you're happy with, you can then prepare bottles of the various 'sheens' for use when needed. I use the empty Tamiya paint jars for storage, labelled accordingly.
Just thought though, can you get Future where you are? If so, it saves a heck of a lot of money on small, expensive bottles of different varnishes, and a bottle of Future literally lasts years. Gives a great finish too!
Airframes
Benevolens Magister
Some of you may have noticed I haven't been very active on the modelling front lately. I haven't done any modelling, apart from a token effort on a 1/32nd scale Bf109, since November !
This has been mainly due to the arthritis playing up over the extended winter here in the UK, and partly through frustration and / or lethargy; when I've had the enthusiasm, I've been too stiff to handle small parts (or even large parts!), and when my hands have been working slightly, I've been too tired or lethargic.
I have a commission build I need to get back to, and two models to build for museums, so, in an effort to break the deadlock and get back to the bench, I've decided to do a 'quick build', purely out of the box (apart from a couple of small additions), even down to the decals, in order to get back 'in the flow' without having to cut, saw, hack and modify things.
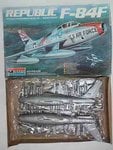
Inspired by Glenn's F-84 Thunderflash, in the GB at the moment, I decided to break open the recently, and cheaply acquired 1/48th scale Monogram F-84F Thunderstreak, which, luckily, has decals for a UK-based aircraft, which is exactly what I wanted to do.
Rather than do a complete start to finish thread, I thought I'd just chuck in the odd photo as the build progresses, as I might have to 'dive off' to get back to the other projects as this goes along.
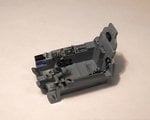
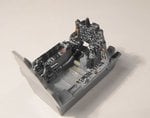
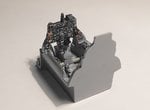
Anyway, here's what's been done so far, with the main part of the cockpit assembled and painted, and the details picked out. There's a bit of re-touching yet to be done, and I'll be adding a throttle lever and, of course, the seat.
More to come soon - I hope!
Attachments
N4521U
Plastic Pirate
Good grief Charlie Brown. That looks terrrrrrific. Are you applying decals or prints to the faces of the instruments?
I feel for you and what you are going thru in the cold. My daughter had JRA when she was about four in her hips and legs. She had to sleep in long johns and do morning exercises. We discovered later it was effecting her hearing and eyes, as it does. Drs prescribed two adult aspirin three times a day! Can you imagine what that would have done to her stomach lining!!!! We took to an alternate healing. She's a cop, and runs half marathons 33 years later.
Stay warm mate.
Airframes
Benevolens Magister
Thanks Bill. The instruments and switches etc are painted.
Lookin' good Terry! But why waste your time and talent on such a butt ugly plane? And this coming from a guy who lives and works near the site of the old Republic factory! 
A4K
Brigadier General
That cockpit looks sweet Terry! Great to see you back into the modelmaking.
Cheers Bill and Terry for the advice, much appreciated!
We can't get Future or anything similar here, and an attempt to order some from Scotland resulted in the posties destroying the package, without telling myself or the shop who sent it. (Who were great btw - Wonderland models - they refunded my money, so the 2 bottles and postage cost came out of their pocket in the end...)
Will stall the handover yet again, and try and get the problem sorted following your advice.
Btw, just to make my joy complete, the decals now appear to have silvered in places aswell, something that was a little apparent on some of the 262 decals (too light gloss undercoat I think), but not at all apparent on the Mustang, till now...
Pin pricks and Mr. softer? Or is there a better method??
Cheers again!
Evan
tigerdriver
Staff Sergeant
thats one fab looking cockpit terry, glad you are back in the game
meatloaf109
1st Lieutenant
Evan, that is what I would do.
Terry, great looking 'pit!
Terry, great looking 'pit!
A4K
Brigadier General
Cheers Paul! Was hoping there is a better method as have done this before and the pin holes were noticable (damn 1:72...)
Semi-glossed the F-51D with a homebrew gloss/ matt / thinner mixture in 6: 2: 2 ratio. Still not happy with the effect, and suspect the basic colour I used (Model Master Aluminuim metalizer) was not the best choice - or is it meant to be buffed like some other brands???
Have Tamiya Al sprays which are fantastic - but stink the flat out, which does not impress SWMBO... no go there.
Latest progress: your opinions on the sheen? (photographed in overcast conditions)
Last edited:
Users who are viewing this thread
Total: 2 (members: 0, guests: 2)

