What's on The Workbench (2 Viewers)

Ad: This forum contains affiliate links to products on Amazon and eBay. More information in Terms and rules

Thanks chaps, and Jim, the F-84F is attractive in an ugly sort of way, more rugged, bulky and brutal, like the P-47. Plus, I vaguely remember them as a kid, in the late 1950s, and it fits in well with my 50s to 70s jet theme.
Evan, I hadn't fully realised the clear coat was for the metallic paint. Any clear coat will effect the appearance of metallics, as it magnifies the grain, and totally alters the look. With an enamel-based clear coat, the grain can actually be disturbed, and partially migrate into the clear coat, giving yet another totally different look.
Whenever possible, it's best to lightly buff the paint, then apply decals (surface should now be smooth and receptive), then clear coat the decals only, just overlapping the edges to seal them. I normally leave metallics as they are - no clear coat, unless required on other shades, such as 'burnt' metals, steel etc.
 
Cheers Terry, will just wash the control surfaces, air inlets and drop tank details then, and give her a polish to finish. The next will be better!
 
No problem Evan, and it looks fine to me. Getting a realistic metal finish can be a long process, and not always easy - let's face it, modellers, and paint manufacturers have been trying for decades to get something that works! Various tones of foil work well, but are very time consuming and fiddly, and the tones need to be correct for the scale involved.
No doubt I'll have fun using my method when this F-84 is ready for finishing, which won't be long now.
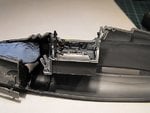
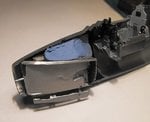
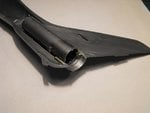
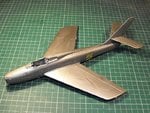
Got the cockpit in, and the nose trunking, along with some chunks of roofing lead held in place with 'Plasticine'. The jet pipe is in, fuselage joined, wings and 'stabilators' on, and all joints sanded, polished, and filled (where needed) with PVA, although as this dries clear it can't be seen in the photos.
Next step is preparation for painting the non-metallic colours, followed by masking, polishing with powder, and spraying in various tones of metal.
More soon.
 

Attachments

  • F-84F Build 018.jpg
    F-84F Build 018.jpg
    57.8 KB · Views: 54
  • F-84F Build 019.jpg
    F-84F Build 019.jpg
    46.3 KB · Views: 61
  • F-84F Build 020.jpg
    F-84F Build 020.jpg
    35.9 KB · Views: 58
  • F-84F Build 024.jpg
    F-84F Build 024.jpg
    144.9 KB · Views: 55
I'm lovin' it, Terry! I'm wanting to do a similar cold war jet, myself! F-86 Sabre in 1/48, of course. lol but I dunno which one is better?
 
I just read that Revell has one out. and they usually have good quality stuff. does anyone know how Revell's '86 compares to Academy's?
 
Thanks chaps.
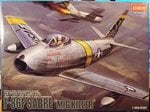
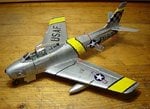
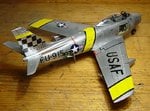
Rob, the Academy 'Mig Killer' F-86 kit (not the other F-86 kit they have) is superb, possibly the best on the market in this scale, and a reasonable price.
The Revell kit is the old Monogram kit, with raised panel lines, and a 'solid' air trunking after the intake. It's not bad, but dated and nowhere near as good as the Academy. The Hasegawa kit is passable, although inaccurate in parts, and far too overpriced, as are all their kits.
Here's the box art for the Academy kit - (note both kits have similar artwork - look for the 'Mig Killer', as the other kit is the earlier Minicraft item, and not so detailed.)
And a couple of pics of my example, not quite finished yet.
EDIT: Crossing posts - that's a brilliant model Karl - it looks so real!!
 

Attachments

  • Can Jan 697.jpg
    Can Jan 697.jpg
    133.3 KB · Views: 53
  • Sabre build 127.jpg
    Sabre build 127.jpg
    84.2 KB · Views: 57
  • Sabre build 135.jpg
    Sabre build 135.jpg
    82.9 KB · Views: 55
Last edited:
Nice! Rob, try googling the kit and add the word 'review'. Usually comes up with atleast one or two build reviews. I usually do this before buying kits now to save nasty surprises!

Karl...! :lol:

Cheers Wayne re the Mustang, cutting my losses and calling her 'Done'! (first fully completed build in 6 years!!!)
Finished off by subtly washing control surface recessses, etc, and lightly buffing exterior. (Pics 2-5 pre drop tank wash...)

Summary:

Goal: to make a complete kit from spare parts and decals, as practice for me, and as a present for a mate's son. He chose the paint scheme (for it's shark teeth) :)

Subject: North American F-51D Mustang, FF-943 'WAS THAT TOO FAST?', bu.no. 412943, 12th FBS, 18th FBG, Korea.
Scale: 1:72
Kits: Airfix '70s tooling P-51D, '90s boxing (major components); Academy P-51D prop and spinner
Decals: Tamiya F-51D unit/ personal/ detail markings; Italeri F-51D stars and bars.
Mods: widened fuselage, fictitious rear fuselage beacon removed, some basic scratchbuilt details and reshaping in places. Reinforced drop tank pins.
Note: pitot tube deliberately left off for robustness! Antenna mast almost left off aswell, but looked 'wrong' without it!

Ironically, have seen box art for one version of the new tool Airfix kits -same bird :)


STA52203.JPG


STA52204.JPG


STA52205.JPG


STA52207.JPG


STA52208.JPG
 
Last edited:
Oooo, nice F-86. If I ever finish doing All the planes on my list, I had a hankerin to do Bob Love's F-86 from Korea, Bernie's Bo.

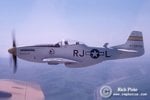
He lived in the Livermore area and had a P-51 with this name, and his wingmans "Jolley Roger", Clifford D. Jolley, and CDJ on the opposite side. I was fortunate enough to ride in this several times with a friend who owned it after Bob passed away. Had an idea to do this one in 48th. May still do it, I'll have to get another Tamiya kit and have decals made.

***You made me do it....... I just ordered a Tamiya 1/48th Mustang for Bernie's Bo..... I'm so easy!
 

Attachments

  • AV01_02_07.jpg
    AV01_02_07.jpg
    30.8 KB · Views: 57
Last edited:
Last edited:
As an Amazon Associate we earn from qualifying purchases.

Users who are viewing this thread

Back