Navigation
Install the app
How to install the app on iOS
Follow along with the video below to see how to install our site as a web app on your home screen.
Note: This feature may not be available in some browsers.
More options
You are using an out of date browser. It may not display this or other websites correctly.
You should upgrade or use an alternative browser.
You should upgrade or use an alternative browser.
1/32nd Scale 'Revegawa' Spitfire MkXIVc
- Thread starter Airframes
- Start date
Ad: This forum contains affiliate links to products on Amazon and eBay. More information in Terms and rules
More options
Who Replied?- Thread starter
- #122
Airframes
Benevolens Magister
Yep - I'd already searched through my spares box for something suitable! As I never do anything smaller than 1/48th scale normally, I didn't have anything small enough, so I carved a master from balsa wood, and moulded a pair of blisters. As they are only approximately 10mm x 2mm, and about 1.5mm high, I used very thin plastic sheet, and they moulded beautifully. Problems occured after they'd been glued in place, when the thin plastic, made even thinner due to the stretching of heat moulding, deformed and melted at the edges around the joint with the wing!
I just couldn't be a***d moulding them again in thicker plastic, which might not have worked, so I just moulded some direct onto the wing with Milliput! Hopefully, they'll look passable once carved and sanded.
BTW, thanks for the kind words guys!!
I just couldn't be a***d moulding them again in thicker plastic, which might not have worked, so I just moulded some direct onto the wing with Milliput! Hopefully, they'll look passable once carved and sanded.
BTW, thanks for the kind words guys!!
lesofprimus
Brigadier General
Great work so far Terry, way beyond anything I could do with a saw...
A4K
Brigadier General
What do you heat the plastic with to do your mouldings Terry - normal hairdryer like Lucas did with the Avenger canopies?
I've never tried it yet, but need to for a few things -if you could describe the process sometime I'd appreciate it!
I've never tried it yet, but need to for a few things -if you could describe the process sometime I'd appreciate it!
Bad luck on the blisters Terry....sometimes a good idea just bites you on the butt...don't it!
- Thread starter
- #126
Airframes
Benevolens Magister
Yep, still got the teeth marks!
Evan, I use the electric grill on my cooker! It's better if you've got a gas cooker, and can do it over the hob though.
Igor and someone else asked me about moulding canopies, so I'll put something together fairly soon, and post it as a PDF.
Evan, I use the electric grill on my cooker! It's better if you've got a gas cooker, and can do it over the hob though.
Igor and someone else asked me about moulding canopies, so I'll put something together fairly soon, and post it as a PDF.
Lucky13
Forum Mascot
I say old boy! Smashing, totally smashing! Splendid work old chap, care for a snifter before moving on?
great work as usual Terry
A4K
Brigadier General
Evan, I use the electric grill on my cooker! It's better if you've got a gas cooker, and can do it over the hob though.
Igor and someone else asked me about moulding canopies, so I'll put something together fairly soon, and post it as a PDF.
Cheers Terry, that would be great if you can!
Thanks for the info.- Thread starter
- #130
Airframes
Benevolens Magister
Well, a lot more hours have been spent working on the model, and again, not much to show for it. But it's now very close to the painting and fitting out stages!
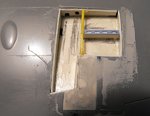
PIC 1. The gun bay has had the main frame work and bracing added, from various sizes of plastic strip, cut and drilled as required. The gaps in the walls will be filled after any wiring or pipework has been added, and the cannon, ammo box, ammo belts etc will be fitted after painting.
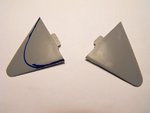
PIC 2. This was the bug-bear! I had been told that the Hasegawa MkVI Spit kit, being the MkV with 'additions', still included the normal-span wing tips.
Wrong!
So, I had a choice; either make new tips from sheet balsa, or try to cut and sand the pointed tips to the original profile. I opted for the latter, and used an existing Hasegawa model to obtain the correct profile, which was marked on to one of the parts. Once cut and shaped, this would be used as the template in order to match the other tip. As you can see, it's a bit 'tight'.
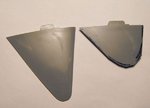
PIC 3. Shows the first stage, with the tip roughly cut to shape.
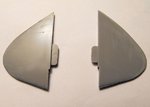
PIC 4. Both tips are cut and sanded to shape. Final sanding took place on the model, in order to match the curves of the wing, and obtain the correct aerofoil section and washout. I'm not 100% happy with the end result, as to obtain the true shape would mean that the tip wouldn't completely match the wing profile. As I've been able to find the (apparently discontinued) MkV kit now, and at a good price, I hope to (eventually) obtain one, to build as a clipped - wing MkVb, parts for which are included in the kit, and use the full-span tips on the MkXIV at a later date. This should be relatively easy, as the joint is fairly weak anyway, and the biggest task will be matching the paintwork! It'll also make a change, as I've now used four of the Hasegawa kits over the past 20 or so years, all of which have been for conversions, and not as the MkV.
PIC 5. The cannon fairings from the Revell Mk22 were adapted and fitted to the Hasegawa wing, and faired-in with Milliput. Whilst this, and other areas of filler were setting, work commenced on the undercariage.
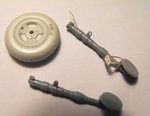
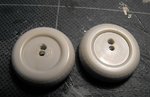
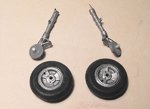
The Mk.XIV employed the slightly larger, 3 spoke wheel, and the gear legs were raked forward slightly more than previous marks. The Revell kit provided the wheels, but the gear legs, although more or less the correct length, looked a little too thin and 'spindly', and were very weak in detail. I therefore decided to mate the Revell wheels to the Hasegawa legs, which entails a bit of surgery in order to provide an axle to align the wheel at the correct height to match the gear leg cover, and simulate the longer leg of the Mk.XIV. Although the Hasgawa legs have the correct appearance, there are no torque links, and the locking lugs are moulded as solid protrusions. These were drilled-out, and the torque 'scissors' links were scratch-built, using drilled plastic card and stretched sprue, and the brake pipes were added, again from stretched sprue. The pic shows the before and after appearance of the legs, and the Revell wheel, which has had the tyre tread slighly enhanced, and the hole for the tyre valve drilled, and a valve added from stretched sprue. The makers' name has also been tentavively engraved on the tyre wall - whether I'll retain it is still under consideration!
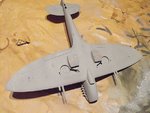
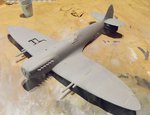
PICS 6 and 7. This is how the model looks to date, with the wing tips fitted, as well as the cannon fairings and the stub fairings. All filling amd sanding is complete, with the exception of a small amount around the cannon fairings, and the main sanding marks and sratches have been polished out with 'T-Cut'.
Once the final sanding and polishing is completed, the rear section of the canopy will be fitted, along with a scratch-built frame brace under the glazing, and the cockpit will be masked, ready for sprayingthe entire model in a light-coloured primer. Thsi is not so much as a base for the paint, but to check for any flaws, and to provide an even surface over the multitude of differing materials used so far. Given that all goes well, the gyro gun sight will be scratch-built, painted, and fitted, followed by the windscreen. The rudder will be fitted properly, along with its actuator rod, and the model prepared for painting. Meanwhile, in order to let the primer fully cure, in case further sanding is required, work will continue on the undercart, gunsight and the detail parts required for the open gun bay.
Thanks agian for your interest, and, with a bit of luck, there'll be more pics soon.
Terry Sore Hands!
PIC 1. The gun bay has had the main frame work and bracing added, from various sizes of plastic strip, cut and drilled as required. The gaps in the walls will be filled after any wiring or pipework has been added, and the cannon, ammo box, ammo belts etc will be fitted after painting.
PIC 2. This was the bug-bear! I had been told that the Hasegawa MkVI Spit kit, being the MkV with 'additions', still included the normal-span wing tips.
Wrong!
So, I had a choice; either make new tips from sheet balsa, or try to cut and sand the pointed tips to the original profile. I opted for the latter, and used an existing Hasegawa model to obtain the correct profile, which was marked on to one of the parts. Once cut and shaped, this would be used as the template in order to match the other tip. As you can see, it's a bit 'tight'.
PIC 3. Shows the first stage, with the tip roughly cut to shape.
PIC 4. Both tips are cut and sanded to shape. Final sanding took place on the model, in order to match the curves of the wing, and obtain the correct aerofoil section and washout. I'm not 100% happy with the end result, as to obtain the true shape would mean that the tip wouldn't completely match the wing profile. As I've been able to find the (apparently discontinued) MkV kit now, and at a good price, I hope to (eventually) obtain one, to build as a clipped - wing MkVb, parts for which are included in the kit, and use the full-span tips on the MkXIV at a later date. This should be relatively easy, as the joint is fairly weak anyway, and the biggest task will be matching the paintwork! It'll also make a change, as I've now used four of the Hasegawa kits over the past 20 or so years, all of which have been for conversions, and not as the MkV.
PIC 5. The cannon fairings from the Revell Mk22 were adapted and fitted to the Hasegawa wing, and faired-in with Milliput. Whilst this, and other areas of filler were setting, work commenced on the undercariage.
The Mk.XIV employed the slightly larger, 3 spoke wheel, and the gear legs were raked forward slightly more than previous marks. The Revell kit provided the wheels, but the gear legs, although more or less the correct length, looked a little too thin and 'spindly', and were very weak in detail. I therefore decided to mate the Revell wheels to the Hasegawa legs, which entails a bit of surgery in order to provide an axle to align the wheel at the correct height to match the gear leg cover, and simulate the longer leg of the Mk.XIV. Although the Hasgawa legs have the correct appearance, there are no torque links, and the locking lugs are moulded as solid protrusions. These were drilled-out, and the torque 'scissors' links were scratch-built, using drilled plastic card and stretched sprue, and the brake pipes were added, again from stretched sprue. The pic shows the before and after appearance of the legs, and the Revell wheel, which has had the tyre tread slighly enhanced, and the hole for the tyre valve drilled, and a valve added from stretched sprue. The makers' name has also been tentavively engraved on the tyre wall - whether I'll retain it is still under consideration!
PICS 6 and 7. This is how the model looks to date, with the wing tips fitted, as well as the cannon fairings and the stub fairings. All filling amd sanding is complete, with the exception of a small amount around the cannon fairings, and the main sanding marks and sratches have been polished out with 'T-Cut'.
Once the final sanding and polishing is completed, the rear section of the canopy will be fitted, along with a scratch-built frame brace under the glazing, and the cockpit will be masked, ready for sprayingthe entire model in a light-coloured primer. Thsi is not so much as a base for the paint, but to check for any flaws, and to provide an even surface over the multitude of differing materials used so far. Given that all goes well, the gyro gun sight will be scratch-built, painted, and fitted, followed by the windscreen. The rudder will be fitted properly, along with its actuator rod, and the model prepared for painting. Meanwhile, in order to let the primer fully cure, in case further sanding is required, work will continue on the undercart, gunsight and the detail parts required for the open gun bay.
Thanks agian for your interest, and, with a bit of luck, there'll be more pics soon.
Terry Sore Hands!
Attachments
-
 Spit XIV Build 217.jpg40.4 KB · Views: 132
 -
 Spit XIV Build 225.jpg29.3 KB · Views: 126
 -
 Spit XIV Build 230.jpg21.3 KB · Views: 137
 -
 Spit XIV Build 233.jpg21.9 KB · Views: 133
 -
 Spit XIV Build 234.jpg28.2 KB · Views: 138
 -
 Spit XIV Build 239.jpg25.9 KB · Views: 123
 -
 Spit XIV Build 241.jpg25 KB · Views: 130
Lucky13
Forum Mascot
Splendid craftmanship old chap!
Tally Ho!
Tally Ho!
imalko
Chief Master Sergeant
I can only agree with Jan here... And would just like to add... 8)
Last edited:
A4K
Brigadier General
Lovely work Terry!
- Thread starter
- #134
Airframes
Benevolens Magister
Thanks very much guys, it really is appreciated!
Heinz
Captain
Looking great Terry.
Also noticed your nice touch of adding 'avon' to the tyres 8)
Also noticed your nice touch of adding 'avon' to the tyres 8)
Excellent Terry!8)
- Thread starter
- #138
Airframes
Benevolens Magister
Thanks very much guys, your kind comments have spurred me on!
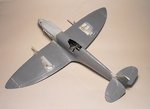
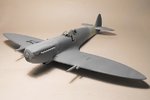
The model has been primed to check for any flaws in the joints or filling, using a light grey which, mixed from Humbrol No.23 'Sky' (more or less!) with a spot of matt black, accidentally provided a good match for RLM76 ! The shade isn't too apparent in the pics though.
PICS 1 and 2 Show the primed model, with the small wing blisters and the mounting for the Beam Approach antenna, at the trailing edge of the port wing root, just discernible in the shot of the underside.
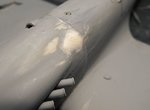
PIC 3. The primer showed that a small amount of filler was required around the upper cowling to fuselage joint, as there was a slight depression in this area, where the differing shapes of the Revell and Hasegawa parts meet. This was treated with my 'porridge' of varnish and talcum powder, this time mixed to a thick paste, and is partly sanded here.
PIC 4 The area has been sanded to blend-in with the cowling profile, and has been given a thin coat of primer, just to smooth it out. The area will be lightly sanded and polished before painting begins.
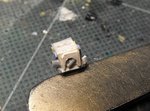
PIC 5. The Mk.XIV was fitted with the Mk.2 Gyro Gunsight, and here it is being scratch-built from plastic card and stretched sprue, and is yet to be trimmed and cleaned- up. This piece measures 4mm x 4mm x 4mm and, with my hands, was a little tricky to build!
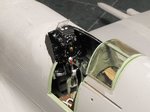
PIC 6. The gusight painted and installed, with the drilled-out graticule projector lenses glazed with Micro 'Kristal Klear', and the reflector screen made from clear plastic sheet. The ranging and wingspan graduations, around the central selector switch, were scratched into the matt dark grey paint, allowing the white plastic to show through, and the whole unit was lightly dry-brushed to highlight the detail. Not a brilliant piece of scratch-building, but good enough, once partly hidden beneath the windscreen!
PIC 7. As the larger wheels required longer undercarriage legs, and the Hasegawa kit legs were the shorter, Mk.V items, some way had to be found to simulate the longer legs, in order that the top of the torque links would just be visible above the tyre, but with the leg doors in the correct place. The simplest solution was to drill new off-centre holes for the axles, with their centres 2mm above the centres or the original holes. When the legs are fitted to the model, and angled forward slightly, the wheels can then be adjusted accordingly, hopefully providing the correct angle and stance.
PIC 8 Shows the undercarriage legs after final painting, and the wheels and tyres also painted, with the first stages of highlighting to the enhanced tyre treads. This will be completed once the surface of the base has been determined, i.e. grass, concrete etc. and the treads 'weathered' accordingly.
PIC 9. The model has been lightly polished, to eradicate any 'lumps and bumps', and the windscreen has been fitted, after the internal framework was painted Cockpit Green. The area where the tail I.D. band will be has been sprayed in 'Sky', again using Humbrol No.23 'Sky', but with a very slight touch of yellow added, as I thought the Humbrol shade was a liitle too blue. This will be masked to obtain the Sky tail band, and the cockpit, gun bay, radiators and supercharger intake will be masked, ready for the first stage of painting. This will be the underside colour of Medium Sea Grey which, when dry, will be masked ready for the application of the disruptive pattern of Dark Green and Ocean Grey.
Thanks again for your continued interst and encouragement, and i'll get some more pics posted soon.
Terry.
The model has been primed to check for any flaws in the joints or filling, using a light grey which, mixed from Humbrol No.23 'Sky' (more or less!) with a spot of matt black, accidentally provided a good match for RLM76 ! The shade isn't too apparent in the pics though.
PICS 1 and 2 Show the primed model, with the small wing blisters and the mounting for the Beam Approach antenna, at the trailing edge of the port wing root, just discernible in the shot of the underside.
PIC 3. The primer showed that a small amount of filler was required around the upper cowling to fuselage joint, as there was a slight depression in this area, where the differing shapes of the Revell and Hasegawa parts meet. This was treated with my 'porridge' of varnish and talcum powder, this time mixed to a thick paste, and is partly sanded here.
PIC 4 The area has been sanded to blend-in with the cowling profile, and has been given a thin coat of primer, just to smooth it out. The area will be lightly sanded and polished before painting begins.
PIC 5. The Mk.XIV was fitted with the Mk.2 Gyro Gunsight, and here it is being scratch-built from plastic card and stretched sprue, and is yet to be trimmed and cleaned- up. This piece measures 4mm x 4mm x 4mm and, with my hands, was a little tricky to build!
PIC 6. The gusight painted and installed, with the drilled-out graticule projector lenses glazed with Micro 'Kristal Klear', and the reflector screen made from clear plastic sheet. The ranging and wingspan graduations, around the central selector switch, were scratched into the matt dark grey paint, allowing the white plastic to show through, and the whole unit was lightly dry-brushed to highlight the detail. Not a brilliant piece of scratch-building, but good enough, once partly hidden beneath the windscreen!
PIC 7. As the larger wheels required longer undercarriage legs, and the Hasegawa kit legs were the shorter, Mk.V items, some way had to be found to simulate the longer legs, in order that the top of the torque links would just be visible above the tyre, but with the leg doors in the correct place. The simplest solution was to drill new off-centre holes for the axles, with their centres 2mm above the centres or the original holes. When the legs are fitted to the model, and angled forward slightly, the wheels can then be adjusted accordingly, hopefully providing the correct angle and stance.
PIC 8 Shows the undercarriage legs after final painting, and the wheels and tyres also painted, with the first stages of highlighting to the enhanced tyre treads. This will be completed once the surface of the base has been determined, i.e. grass, concrete etc. and the treads 'weathered' accordingly.
PIC 9. The model has been lightly polished, to eradicate any 'lumps and bumps', and the windscreen has been fitted, after the internal framework was painted Cockpit Green. The area where the tail I.D. band will be has been sprayed in 'Sky', again using Humbrol No.23 'Sky', but with a very slight touch of yellow added, as I thought the Humbrol shade was a liitle too blue. This will be masked to obtain the Sky tail band, and the cockpit, gun bay, radiators and supercharger intake will be masked, ready for the first stage of painting. This will be the underside colour of Medium Sea Grey which, when dry, will be masked ready for the application of the disruptive pattern of Dark Green and Ocean Grey.
Thanks again for your continued interst and encouragement, and i'll get some more pics posted soon.
Terry.
Attachments
-
 Spit XIV Build 258.jpg40.2 KB · Views: 155
 -
 Spit XIV Build 272.jpg24.9 KB · Views: 152
 -
 Spit XIV Build 266.jpg20.7 KB · Views: 162
 -
 Spit XIV Build 252.jpg57 KB · Views: 155
 -
 Spit XIV Build 246.jpg49.3 KB · Views: 151
 -
 Spit XIV Build 280.jpg39.4 KB · Views: 160
 -
 Spit XIV Build 264.jpg40.6 KB · Views: 157
 -
 Spit XIV Build 288.jpg35.7 KB · Views: 151
 -
 Spit XIV Build 290.jpg20.5 KB · Views: 142
Tony Hill
Tech Sergeant
Not a brilliant piece of scratch-building, but good enough, once partly hidden beneath the windscreen!
Terry.
Oh come on....you're killing me........
Looks pretty damned good to me Terry!!!
(they have a working one of those at Bullcreek, makes a weird noise I can tell you,
GREAT STUFF mate!!!
Darryl
Users who are viewing this thread
Total: 1 (members: 0, guests: 1)