Doing ok there Don!
Navigation
Install the app
How to install the app on iOS
Follow along with the video below to see how to install our site as a web app on your home screen.
Note: This feature may not be available in some browsers.
More options
You are using an out of date browser. It may not display this or other websites correctly.
You should upgrade or use an alternative browser.
You should upgrade or use an alternative browser.
1/48 HS Buccaneer - The Jet Age.
Ad: This forum contains affiliate links to products on Amazon and eBay. More information in Terms and rules
More options
Who Replied?Catch22
Major
Yes you are.
JKim
Senior Master Sergeant
Lots of hard work going into this one! I would echo Andy's suggestion of adding lead via a hole vs sawing the cone off altogether.
- Thread starter
- #105
Donivanp
Major
I hear y'all but that foil on top there is the lead.
So... cut it into small pieces with the pliers for instance. These pieces of the lead have to be of the dimensions that can allow you put them into the cone through the hole. Of course you may add some of adhesive to inside the cone. I would suggest a glue for wood. Here in Poland it is named WIKOL that is an emulsion adhesive consisting of the aqueous dispersion of polyvinyl acetate, a mineral filler and modifiers. Initially it is white like milk then it gets clear when hardened. The kind of adhesive doesn't get any reaction with plastic but sticks very good. It will help with keeping these lead pieces together without their moving inside the cone.
Last edited:
Airframes
Benevolens Magister
I agree about the method of adding the nose weight.
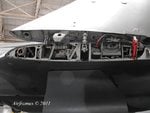
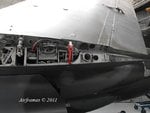
Wings normally folded when parked, and air brake normally deployed also. Here's a couple of shots of the wing fold - note that the red 'bar' is a ground safety lock, removed before 'unfolding' the wings. Here's some shots showing the wing fold detail - note that the red 'bar' is a ground safety lock, removed before deploying the wings.
Wings normally folded when parked, and air brake normally deployed also. Here's a couple of shots of the wing fold - note that the red 'bar' is a ground safety lock, removed before 'unfolding' the wings. Here's some shots showing the wing fold detail - note that the red 'bar' is a ground safety lock, removed before deploying the wings.
Attachments

Last edited:
- Thread starter
- #108
Donivanp
Major
Cool, thanks nice.
- Thread starter
- #109
Donivanp
Major
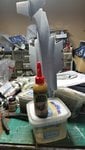
OK OK I get it don't **** the nose off, as it turns out, no need, I pulled of the taped on tail, UH Dummy me, duh. and the lead goes all the way down. Gorilla glue and we shall see, that stuff stinks and expands and takes a while to dry, oh did I mention it can be a mess, if it works right though, that lead ain't going anywhere
Attachments
Last edited:
Crimea_River
Marshal
Sounds like you have a fix.
Good stuff!
Saved a bit of effort, well done Don
- Thread starter
- #114
Donivanp
Major
Nice work so far!
- Thread starter
- #116
Donivanp
Major
Need some help, British Desert Pink. I need it in acrylic but I need a good color splotch to match to or a good preexisting color.
- Thread starter
- #117
Donivanp
Major
OK asked and answered, I found the kit calls for Humbrel 250, AV USA Sand FS30313 is a dead on match.
- Thread starter
- #118
Donivanp
Major
OK last weekend I went up to Austin to Dales. Left just int he nick of time to and the storms came crashing in. Tornadoes, flooding, blinding rain. I left that to get the same some 5 hours after I got home. Anyway I did not get much done this week till today.
Word to the wise, while I have not had the issues Terry had when he built his, there are a couple of things to keep and eye out for. The speed brake I decided to close. I could not find any open in Desert Storm so I went for the closed. This is a very bad Idea. The speed brake is like it comes form a 60's era kit. raised detail and the fit is a mess and it is very difficult to get attached to the fuselage.
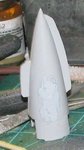
I received the new kit last Friday and am setting up the two windscreens to make molds of them. I am not a wood carver by anyone's standard and we ain't even going there. I believe I can make the clear resin replacements but if not, you told me so. Also go the first coat of paint on. The vallejos Sand it just the right color. a perfect match of humbrell's 250.
Word to the wise, while I have not had the issues Terry had when he built his, there are a couple of things to keep and eye out for. The speed brake I decided to close. I could not find any open in Desert Storm so I went for the closed. This is a very bad Idea. The speed brake is like it comes form a 60's era kit. raised detail and the fit is a mess and it is very difficult to get attached to the fuselage.
I received the new kit last Friday and am setting up the two windscreens to make molds of them. I am not a wood carver by anyone's standard and we ain't even going there. I believe I can make the clear resin replacements but if not, you told me so. Also go the first coat of paint on. The vallejos Sand it just the right color. a perfect match of humbrell's 250.
Attachments
- Thread starter
- #119
Donivanp
Major
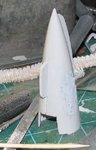
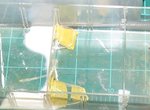
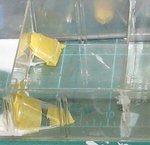
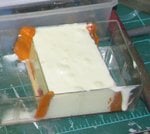
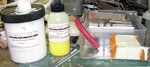
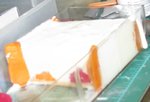
Cleaned up the brake and set it aside for now. poured the molding for the wind screens. first filled them with modeling clay and then poured the mold. I'm really hoping to use the cast to be able to do a vac form from clear but we will see.
Attachments
JKim
Senior Master Sergeant
My decision to leave my Flogger brakes open was mainly due to not having to deal with the fit issues of them in the closed position. Probably the same thing with my canopy.
That looks like some intense work with the canopy molds! I'm crossing my fingers for ya!
That looks like some intense work with the canopy molds! I'm crossing my fingers for ya!
Users who are viewing this thread
Total: 1 (members: 0, guests: 1)