1/48 HS Buccaneer - The Jet Age. (1 Viewer)

Ad: This forum contains affiliate links to products on Amazon and eBay. More information in Terms and rules

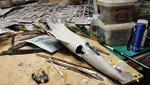
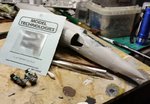
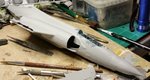
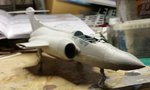
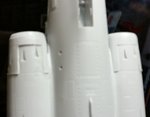
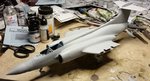
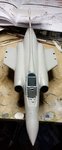
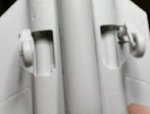
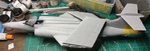
OK so NASA did come back and the fuselage can be handled with time and ProWeld. Taking a section at a time sloooooooooooooooooooooooooooooooooooooooooooooooooooooooooooolwy the Proweld did it's number. I only worked back to the leading wing edge but it is holding. (so fare). Having won the bid ($39.95 is damn good for one of these breast) I am proceeding. I got in some Modeltech seat belt buckles so I am redoing the seat belts, more per Terry, and I think it will be great. I am doing what I think I can until the replacement kit gets here.
 

Attachments

  • buc20.jpg
    buc20.jpg
    87.6 KB · Views: 119
  • buc22.jpg
    buc22.jpg
    69 KB · Views: 108
  • buc23.jpg
    buc23.jpg
    59.1 KB · Views: 127
Now look, I ain't say'n Terry has issues, err, I don't think that came out right, err the kit don't have issues with Terry, err, not right again maybe. Well anywho. It's a really screwed up feselage. The plastic is not very stiff and the ailing pins are not really "aligning ". But I used PeoWeld from Ambroid and took it slow. I did have a couple sections come apart but they were easily reglued.
 
Now look, I ain't say'n Terry has issues, err, I don't think that came out right, err the kit don't have issues with Terry, err, not right again maybe. Well anywho. It's a really screwed up feselage. The plastic is not very stiff and the ailing pins are not really "aligning ". But I used PeoWeld from Ambroid and took it slow. I did have a couple sections come apart but they were easily reglued.

I still have some of that laying around. Hmmm...regardless, have to finish the F4U!
 
I've done a little more this morning. There are definitely some fit problems. trying to align the intakes and the exhaust was a challenge and will require a lot of filler and work. The gear wells are extremely devoid os any semblance of detail, I would have thought that Airfix would have done something on this level, though I don't recall seeing replacement gear wells for the kit either.

I know I will run out sometime and sooner then later, but I've done my best to stock up on ProWeld as well.
 

Attachments

  • buc25.jpg
    buc25.jpg
    43.4 KB · Views: 108
  • buc26.jpg
    buc26.jpg
    33.4 KB · Views: 97
  • buc27.jpg
    buc27.jpg
    29.3 KB · Views: 92
  • buc29.jpg
    buc29.jpg
    69.6 KB · Views: 74
  • buc28.jpg
    buc28.jpg
    39.5 KB · Views: 74
  • PW1.jpg
    PW1.jpg
    52.3 KB · Views: 102
  • buc30.jpg
    buc30.jpg
    34.9 KB · Views: 90
Last edited:
Good work there Don, and now that the halves are joined, they should sand-down OK, although it takes a lot of time, as one half of the fuselage is made from very hard material.
The main gear wells on the real aircraft are surprisingly devoid of much detail, as the jet intakes pass through them.
If moulding canopies, you don't use clear resin - make balsa 'male moulds slightly smaller than the required finished canopy, cut a 'female' mould from balsa sheet, and firmly fix clear plastic sheet over this. Heat under a cooker grill or similar heat source, then plunge the male mould through the now 'floppy' plastic over the aperture in the female mould. Allow to cool, then trim the part from the remainder of the clear sheet.
It'll probably take a few attempts )though you can be lucky and get it right first time), and the balsa 'male' mould needs to have the grain fully sealed and have a glass-like surface finish.
See my thread on the 1/32nd scale Mosquiti FBVI conversion from a couple of years gao, somewhere in the 'Start to Finish' threads, where the process is illustrated.
 
Ok so I now have questions of all you (Terry) Buck fans. I am doing this in RAF Gulf War, how often would they, did they fold the wings? What is the normal ground deployment of the speed brake, open or closed. I think I want to flod the wings, but that is a near non-reversible situation. Therefore I need a bit more info before I jump all the way.

I did get ahead of my self and forget to put weight in the nose. it looks like I may pull out the razor saw and cut the nose off to instill weight. The plane was fine until I added the speed brake and the wings. still not a lot of weight and I may be able to do with out the nose cut but the lines are an easy clean cut so I'll most likely do that.

I did a lot of putty work, so this is done to Macho Man,

Bondo, Bondo Man
I want to be a Bondo Man
Bondo, Bondo Man
I want to be a Bondo man,

sorry that all I can deal with. Anyway the lower intakes and exhaust were really bad fits. way off alignment. It was a case of align as much as you can and get the file out. It's sound bad but I've had much worse, (we all remember the Revell 1/48 P-38 Lighting), so all in all it's not been bad, since I have another one we can all get one and do a Buccaneer GB, (oh come on you know you want to). (laughter subsides) I had to file the seem down the side of the plane and apply ample amount of Tamiya Grey.

I tried Mr. Surfacer 500 before and did not like it mostly due to the extreme odor, It is really bad and my wife can't deal with much much less myself. That being said. This is going to want it really bad. The plastic is the rough (very lightly pitted feel to it). so I will be using it on this plane.

There is a big airshow in Waco on June 6th and I was all set and primed to go with Dale, then some small voice in the back of my head said NNNOOOOOOO, something happened on June 6th. I said to myself, self, D-Day is no reason not to go. and self said something else. So I said,
It was the Dark of the moon on the 6th of June in a Kenworth hauling logs
and a cab over Pete with a reffer on and Jimmy hauling hogs.

And self said SHUT-UP YOU IDIOT, I don't want to here "Convoy" by CW McCall it's something else.
Oh I says, I'ts my wife's anniversary, damn that was go good save, so I have to be here for her anniversary (she married me you know), so No air show, (DARN, DARN, DARN, I just can't have no fun can I) (I hape she can't read this).

Oh and Terry, both the top and bottom were made of the same light flimsily plastic. It was wrapped a bit but working front to back slowly it went together with out much of a hitch. This might explain why you had such a terrible time with yours. No hard plastic at all.
 

Attachments

  • buc31.jpg
    buc31.jpg
    39.4 KB · Views: 102
  • buc32.jpg
    buc32.jpg
    37.9 KB · Views: 118
Last edited:
Don, instead of cutting the nose off, have you thought about drilling a hole just big enough to drop in some lead shot, add a little CA glue to solidify the mass, then plug the hole?
 

Users who are viewing this thread

Back