Navigation
Install the app
How to install the app on iOS
Follow along with the video below to see how to install our site as a web app on your home screen.
Note: This feature may not be available in some browsers.
More options
You are using an out of date browser. It may not display this or other websites correctly.
You should upgrade or use an alternative browser.
You should upgrade or use an alternative browser.
1/72 Scale S2G Tracker 816 squadron
- Thread starter parsifal
- Start date
Ad: This forum contains affiliate links to products on Amazon and eBay. More information in Terms and rules
More options
Who Replied?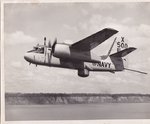
Matt308
Glock Perfection
Very cool pic
Wildcat
Major
Parsifal, I found some youtube clips that you'll find interesting
View: https://www.youtube.com/watch?v=zqxKIXnGxZE
View: https://www.youtube.com/watch?v=y1fa4IhKU28
View: https://www.youtube.com/watch?v=RynT3HlEvZk
View: https://www.youtube.com/watch?v=zqxKIXnGxZE
View: https://www.youtube.com/watch?v=y1fa4IhKU28
View: https://www.youtube.com/watch?v=RynT3HlEvZk
vikingBerserker
Lieutenant General
Dam Matt, that's pretty impressive!
- Thread starter
- #25
parsifal
Colonel
Hi wildcat
I cannot see any evidence of the top array in any of those vids.
Luv the sound of the grumman as she is powering up. And the Melbourne was just tiny when operating these aircraft
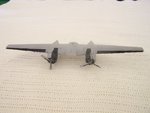
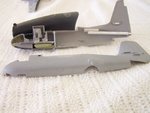
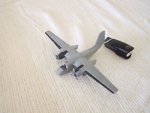
Anyway, here are some further progress shots. I have only dry fitted the fuselage at this stage, and the thing was covered in dust at the time i took the shots, because I had some trouble fitting the wing assembly onto the fuselage. i think the rear firewall might have spread the fuseage a little. it will fit, but I am up for some putty work I think
Am still trying to perfect the control columns. will post them at another time, once I have something a little more decent.
I cannot see any evidence of the top array in any of those vids.
Luv the sound of the grumman as she is powering up. And the Melbourne was just tiny when operating these aircraft
Anyway, here are some further progress shots. I have only dry fitted the fuselage at this stage, and the thing was covered in dust at the time i took the shots, because I had some trouble fitting the wing assembly onto the fuselage. i think the rear firewall might have spread the fuseage a little. it will fit, but I am up for some putty work I think
Am still trying to perfect the control columns. will post them at another time, once I have something a little more decent.
Attachments
- Thread starter
- #26
parsifal
Colonel
B-17engineer
Colonel
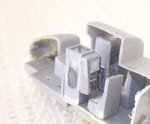
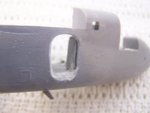
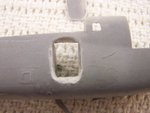
Just curious in your last post, around the doorway is that just left over from sanding? Or is that something that needs sanding?
- Thread starter
- #28
parsifal
Colonel
Its something that still needs to be finished off Harrison. There is about 0.5 mm left to do. I will do the final bits just before gluing the two hlves of the fuselage together.
How is your P-40 coming along?
How is your P-40 coming along?
Tony Hill
Tech Sergeant
Interesting build mate..can't wait to see more progress. It is always nice to see a break from Bf109s, Mustangs, Hurricanes, Corsairs, FW190 and all the other common makes (except of course Spitfires!!") ).
).
Good luck mastering the new skills you want to learn.
Darryl
).Good luck mastering the new skills you want to learn.
Darryl
Vic Balshaw
Major General
That's a nice little machine your putting together there parsifal, I love the scratch built detail.

8) doin' great so far!
lesofprimus
Brigadier General
Hell yea, he's doin great so far....
Matt308
Glock Perfection
Sure is. I hope you are only staging your landing gear and props. Those are some fragile bits to have hanging around at this stage. Love your aft cabin work!!!!
Note you can also drill out your side cooling venturies for the radar electronics. Easy to do and a nice touch.
Note you can also drill out your side cooling venturies for the radar electronics. Easy to do and a nice touch.
B-17engineer
Colonel
Its something that still needs to be finished off Harrison. There is about 0.5 mm left to do. I will do the final bits just before gluing the two hlves of the fuselage together.
How is your P-40 coming along?
Very nicely! Wojtek is a huge help!
You building a P-40 Harrison????
Yes, I am!
- Thread starter
- #36
parsifal
Colonel
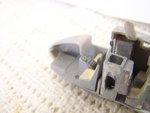
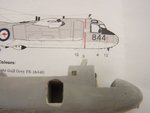
well, I am heading into unknown territory now. I have cut the rear hatchway and fabricated a replacement hatch. Seems to fit okay. I needed to undertake some puttying behind the door, to fill some gaps in the sctrachbuilt decking and firewall that have put in. This cutting open of the hatch will be necessary if any level of visibility is to be achieved. Matt is right....it will otherwise be a total waste of time because of the limited visibility from the cockpit glazing
The question for me now is is there any way to swing this hatch on some sort of hinge system, to make it adjustable, or do I just glue it open and be done with it. Anyone got any suggestions of opinions. Or have I just ruined $30 worth of kit????
Anyway here are the shots
The question for me now is is there any way to swing this hatch on some sort of hinge system, to make it adjustable, or do I just glue it open and be done with it. Anyone got any suggestions of opinions. Or have I just ruined $30 worth of kit????
Anyway here are the shots
Attachments

Matt308
Glock Perfection
You haven't ruined it whatsoever. But a hinge mechanism is likely never to look right to scale. Open her up and glue 'er in place. Well done.
- Thread starter
- #38
parsifal
Colonel
Yeah thats the logical thing to do i think.
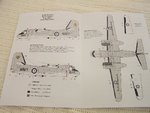
You mentioned something about the radar array, wich i did not quite follow. Any chance of a clarification.
Also, I am still unsure about whether the Aussie E/G models carried the aradar above the cockpit. I still have not been able to confirm. Does anyone know if the E/G models actually carried this array??? It does appear in any of the photos i have located. i cannot recall it ever being visible. A simplified schematic might help solve the issue.......
I am going to have another go at the control sticks tonite. I am still not happy with the result i am achieving...
Matt308
Glock Perfection
- Thread starter
- #40
parsifal
Colonel
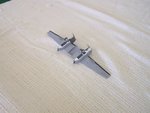
some further progress shots.
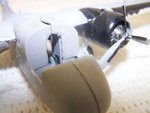
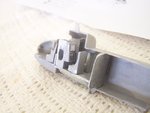
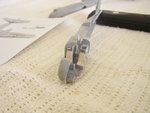
Have been busy for the last couple of days, so not a lot to report. I have just about finished the cockpit detail and the underside dome array. I have finished the shaping of the control columns, and the stinger array, but I havent painted it just yet. Received the decal sheets. I have put the interior furniture in for the last time, and started to putty around the engine cowlings.
I did a really poor job on the turbinlite ....had some glue on my fingers that I didnt know was there, and messed things up in a big way as a result....best left to the imagination how i reacted to this...
I am just about ready to join the two halves before painting the underside.
Visibility of the interior is still very limited, and one thing I am considering is to put a small fibreoptic light up through the display case to the interior to the model. This will light up the interior and make it easier to see things in the interior. The light needs to be ultra small, I am currently sussing out availability. Hopefully I will find something suitable.
Generally happy with progress, though my skills are still below par. I am achieving all that I set out to do, but the final product is still not as good as I hoped
Anyway, here are some progress shots....
Attachments
Last edited:
Users who are viewing this thread
Total: 1 (members: 0, guests: 1)