352nd Fighter Group "Blue Nosed Bastards of Bodney" Build

Ad: This forum contains affiliate links to products on Amazon and eBay. More information in Terms and rules

Which kits are you thinking? I want to build Old Crow as well since I have a signed picture by Bud Anderson and it'd be nice to display under it.

The next in line for this thread are

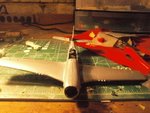
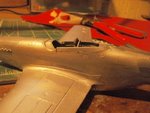
Cripes A Mighty P-51B
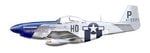
Petie 2nd P-51D flown by Col. John Meyer.
P-51B (Only sharkmouth p-51B in the 352nd sqd.) flown by John Bennett

Then I start buying the Eaglestrike decals...there's a 6 part series by them....:D
 
Ohh sounds good! Just spent a bit on the masks. I did normal tape with the the forward screen. But the curved on the side I used Maskol. We'll see how it went when it dries.
 
Ok so basically I've been working on the canopy. Not the prettiest but its covering what it should. I used micro mask and those are the darker areas. I just need a bit more sanding etc. and smoothing out some joints. Also will add the propeller and hub soon and fix any joint issues there. Then I'm ready for paint.
 

Attachments

  • P7070197.JPG
    P7070197.JPG
    78.6 KB · Views: 94
  • P7070199.JPG
    P7070199.JPG
    78.3 KB · Views: 89
  • P7070200.JPG
    P7070200.JPG
    71.3 KB · Views: 86
  • P7070202.JPG
    P7070202.JPG
    57.2 KB · Views: 92
  • P7070203.JPG
    P7070203.JPG
    64.4 KB · Views: 91
  • P7070215.JPG
    P7070215.JPG
    65.9 KB · Views: 88
  • P7070209.JPG
    P7070209.JPG
    85.7 KB · Views: 83
  • P7070208.JPG
    P7070208.JPG
    75.5 KB · Views: 91
  • P7070207.JPG
    P7070207.JPG
    64.3 KB · Views: 94
  • P7070204.JPG
    P7070204.JPG
    78.6 KB · Views: 95
  • P7070216.JPG
    P7070216.JPG
    65 KB · Views: 89
Don't know if it's too late to fix Harrison but from the looks of the last pic the exhaust stubs are on upside-down the shroud should be at the top so they are either in backwards or on the wrong side.
Otherwise looking good and kudos on the research.
 
Tougher than I thought. I'm leaving it. Sorry to dissapoint guys. SUper glued in and not much room to work with.
 
Added prop tonight. Will do final sanding and polishing tommorow. I was hoping to get more work done tonight but the tailwheel need to dry completely.
 
Coming on nicely H. For future reference, on most Mustang kits, the exhausts and prop can be fitted after painting, which makes life a lot easier. Also, always check your reference pics to see which style of exhaust is on the actual aircraft being modelled, as shrouded, and un-shrouded ones were used.
In the first two pics, it looks like the canopy brace is fitted to the fuselage, inside the cockpit. This should be attached to the inside edges of the lower canopy frame, and there should be small notches where it locates.
Make sure you pay a lot of attention to all the seams and joints, as, being a bare metal finish, they will really stand out under the silver paint. The time and effort expended will be well worth it, especially as you're building a collection of P51s from this Fighter Group.
Finally, only use 'Superglue' where it's really needed !!!

Grrrr well, the prop, last time I built one I was told I should fit it cause if there is a gap I'll need to fix and respray. The blue has a 'thick' look to it and to respray would be suicide :lol: ANd this is the correct exhaust just not the right way...

I'll take some closeups of the rail. It's not fitted to the inside. I realize that it was to far to one side after the pictures and moved it. It looks fine now. Today is the first time I've actually said to someone I'm going to work on my model...don't bother me..
 

Attachments

  • P-51.26.jpg
    P-51.26.jpg
    15.4 KB · Views: 67
Was hoping to do quite a bit of sanding and what not today but my friend just called and wanted to take some shots on me in goal.....helps him since he's attack helps me since I'm goalie. Will do some work before I leave and after.

My Ts-44, Ts-17 and Interior Green are here....yay!!!!!!!!!!!!!!!!!!!!!!!!!!!!!!
 
And he's off! H is galloping nicely now, well in the lead on this first painting furlong, closely followed by 'What about your homework', with 'And tidy your room' bringing up the rear. And he's approaching the first hurdle, the 'Oh sh*t it's natural metal' fence....but he should manage this, being trained by Wojtek, by Wayne out of Monogram.......
 
Jeez :lol:

No I'm not painting today and maybe later tommorow get the first aluminum on to check seams.
 
Whites a pain in the a$$ to spray...even on the scrap plastic i'm trying. But now I need more white paint.....fudge....

The bird looks like S*it since I wiped it down with thinner soaked rag in preperation for the first coat of white......crossing fingers and holding breath...
 
Ohhhh so proud with my white spray......came out realllll nice. Will share with you guys later.


I just bought my white paint and used nearly all of it.....a bit PO'd about that....:evil:
 
Yes , applying of the white,yellow and red colours is always a pain in the rear low part of our body... :lol:
But the solution is an undercoat. It can be a very light grey paint.Also these paints should be applied as the first one.
 
Yes I was speaking with Terry and he said the white for the invasion stripes should be done and the blue nose should be painted before the aluminum goes on.

The hard part is not masking the blue nose but masking it off so I can do the aluminum.
 

Users who are viewing this thread

Back