
Navigation
Install the app
How to install the app on iOS
Follow along with the video below to see how to install our site as a web app on your home screen.
Note: This feature may not be available in some browsers.
More options
You are using an out of date browser. It may not display this or other websites correctly.
You should upgrade or use an alternative browser.
You should upgrade or use an alternative browser.
Budget Bf109G Build.
- Thread starter Airframes
- Start date
Ad: This forum contains affiliate links to products on Amazon and eBay. More information in Terms and rules
More options
Who Replied?Screaming Eagle
Senior Master Sergeant
great progress so far terry!
Lucky13
Forum Mascot
- Thread starter
- #84
Airframes
Benevolens Magister
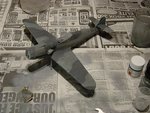
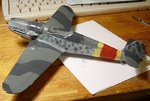
After tidying up the first spray of colours, the darker grey, 74, was sprayed free-hand. There was a bit of streaking and spotting evident, and this is shown in PICTURE 1.
I've tried allsorts to stop this strange phenomena, from altering the thinning ratio, to changing airbrushes, and I can't seem to cure it. However, it is sporadic, so I put it down to my minimal experience in spraying acrylics; I've never had the problem with enamels, and thinner or water sprays fine, without pulsing or spattering, when using the new compressor.
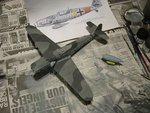
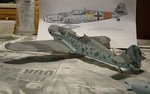
Having decided to represent 'Yellow 13', one of the aircraft of JG300, for which Wayne very kindly provided pics and a profile, the top decking finish was altered to suit, and at the same time, the two upper-surface greys were darkened slightly and another coat applied.
PICTURE 2 Shows the model after a little re-touching. and with the first stages of the darker mottle applied. Note the drop tank and U/C doors have been sprayed in Weissblau/Hellgrau 76.
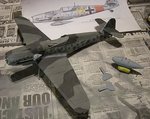
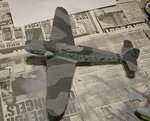
PICTURES 3 and 4 show the Gustav after a little more retouching, and the profile Wayne sent me is in the background for comparison.
PICTURE 5 is a general 3/4 rear view, and shows that the rudder trim tabs have been removed. This was done as the model will now be a late G6. I noticed, in the photo, that the lower trim tab needs a touch more shaved off, which won't be a problem. It's a pity I forgot to thin the trailing edge of the rudder before I commenced painting!
The next step is to spray the entire model in a coat of Johnson's 'Klear' (Future) BEFORE masking the area where the red Reich Defence band will be painted. This is to eliminate any risk of the paint picking-off once the masking tape is removed. Normally, I would have painted the red JG300 band first, but, when I first started the airbrushing, I still had not decided exactly which aircraft would be represented. Once that's done, it'll be time to attend to the detail painting, and some very light weathering preparation, before spraying another coat of clear, ready for decalling.
I had hoped to show some pics of the detail work on the wheels, exhausts and home-made seat harness, but, due to the paint problems, I haven't got around to them yet!
Although I can appreciate the merits in using acrylic paints, I do find them to be a lot more tempremental when used with the airbrush; the main problem seemed to be consistency of spraying, and a tendancy to clog easily if there was the slightest break in spraying. However, I do accept that a lot of this will be down to my lack of experience with these paints; 46 years of using enamels brings it's own share of techniques and short-cuts! That said, I think it will be some time before I try acrylics again, I'll stick to enamels for now. Better the devil you know, and all that.
I hope to be able to bring you the next stage, and some more pics, in a couple of days.
I've tried allsorts to stop this strange phenomena, from altering the thinning ratio, to changing airbrushes, and I can't seem to cure it. However, it is sporadic, so I put it down to my minimal experience in spraying acrylics; I've never had the problem with enamels, and thinner or water sprays fine, without pulsing or spattering, when using the new compressor.
Having decided to represent 'Yellow 13', one of the aircraft of JG300, for which Wayne very kindly provided pics and a profile, the top decking finish was altered to suit, and at the same time, the two upper-surface greys were darkened slightly and another coat applied.
PICTURE 2 Shows the model after a little re-touching. and with the first stages of the darker mottle applied. Note the drop tank and U/C doors have been sprayed in Weissblau/Hellgrau 76.
PICTURES 3 and 4 show the Gustav after a little more retouching, and the profile Wayne sent me is in the background for comparison.
PICTURE 5 is a general 3/4 rear view, and shows that the rudder trim tabs have been removed. This was done as the model will now be a late G6. I noticed, in the photo, that the lower trim tab needs a touch more shaved off, which won't be a problem. It's a pity I forgot to thin the trailing edge of the rudder before I commenced painting!
The next step is to spray the entire model in a coat of Johnson's 'Klear' (Future) BEFORE masking the area where the red Reich Defence band will be painted. This is to eliminate any risk of the paint picking-off once the masking tape is removed. Normally, I would have painted the red JG300 band first, but, when I first started the airbrushing, I still had not decided exactly which aircraft would be represented. Once that's done, it'll be time to attend to the detail painting, and some very light weathering preparation, before spraying another coat of clear, ready for decalling.
I had hoped to show some pics of the detail work on the wheels, exhausts and home-made seat harness, but, due to the paint problems, I haven't got around to them yet!
Although I can appreciate the merits in using acrylic paints, I do find them to be a lot more tempremental when used with the airbrush; the main problem seemed to be consistency of spraying, and a tendancy to clog easily if there was the slightest break in spraying. However, I do accept that a lot of this will be down to my lack of experience with these paints; 46 years of using enamels brings it's own share of techniques and short-cuts! That said, I think it will be some time before I try acrylics again, I'll stick to enamels for now. Better the devil you know, and all that.
I hope to be able to bring you the next stage, and some more pics, in a couple of days.
Attachments
Heinz
Captain
Looking great Terry
109ROAMING
2nd Lieutenant
Nice Terry,Looking Good!
Screaming Eagle
Senior Master Sergeant
ditto alex and daniel terry!
Lucky13
Forum Mascot
Jolly good show there old boy....carry on! Toodle pip!
Not too shabby at all Mate!......Looks good Terry!
......Looks good Terry!Matt308
Glock Perfection
Excellent! How long do you wait for the Future to dry? A full 48hrs? And what do you use to cover your subject, an old bowl or something?
great job terry
ccheese
Member In Perpetuity
I've been watching this build front the git-go, but because of my very limited
knowledge on plastic/scale, I have refrained from commenting. However, the
construction, thus far, looks great. The finished product should speak for
itself, because of the care taken in the build. Really looks good.
Charles
knowledge on plastic/scale, I have refrained from commenting. However, the
construction, thus far, looks great. The finished product should speak for
itself, because of the care taken in the build. Really looks good.
Charles
- Thread starter
- #94
Airframes
Benevolens Magister
Thank you very much for the compliments, Charles and Wojtek.
It's taking it's time, slowly, but there's no rush. I'm finding the R.A. in my hands is having it's effect on dexterity, which has caused a couple of b***s ups here and there, but, so far, so good.
Terry.
It's taking it's time, slowly, but there's no rush. I'm finding the R.A. in my hands is having it's effect on dexterity, which has caused a couple of b***s ups here and there, but, so far, so good.
Terry.
- Thread starter
- #95
Airframes
Benevolens Magister
Just seen your question, Matt. Normally, if brushed, the Klear (Future) should be touch-dry within about ten to fifteen minutes, and fully hardened within one hour. It's adviseable to leave it 6 to 12 hours before doing any further paint work, just in case! If sprayed, the varnish dries within about half an hour, and is 'safe' soon after, with painting being possible in under 12 hours.
If you do experience a run or damage, just absorb the run with the edge of kitchen towel (tissue), and go over very lightly with a dampened brush. The next coat of Future, even if only 'local', should repair the area, making the flaw invisible.
As for dust, if you can cover with a big enough bowl, or box, fine; as long as there is a gap for air to enter, to accelerate the drying without fogging or patches, which is very rare. I didn't cover this model, as it was drying virtually as I sprayed it, and the finish is fine. Only one tiny speck of dust, or something, which picked off and was repaired as above. More pics soon.
Terry.
Matt308
Glock Perfection
Just seen your question, Matt. Normally, if brushed, the Klear (Future) should be touch-dry within about ten to fifteen minutes, and fully hardened within one hour. It's adviseable to leave it 6 to 12 hours before doing any further paint work, just in case! If sprayed, the varnish dries within about half an hour, and is 'safe' soon after, with painting being possible in under 12 hours.
If you do experience a run or damage, just absorb the run with the edge of kitchen towel (tissue), and go over very lightly with a dampened brush. The next coat of Future, even if only 'local', should repair the area, making the flaw invisible.
As for dust, if you can cover with a big enough bowl, or box, fine; as long as there is a gap for air to enter, to accelerate the drying without fogging or patches, which is very rare. I didn't cover this model, as it was drying virtually as I sprayed it, and the finish is fine. Only one tiny speck of dust, or something, which picked off and was repaired as above. More pics soon.
Terry.
Thanks Airframes. I'm 'experimenting' tonight. Fingers crossed. Look forward to you next update, mate.
- Thread starter
- #97
Airframes
Benevolens Magister
And here it is!
Just a quick couple of shots in between stages.
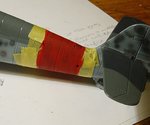
PICTURE 1 shows the Gustav after the first coat of Klear (Future) has been sprayed on, and the area of the Reichs Defence band masked and painted.
I always like this stage, as the gloss varnish evens out the paint, making it 'come alive'.
PICTURE 2 is a close up of the first coat of red for the band. Notice how the mottle is showing through. With the second coat, which will be slightly thinner, I hope to retain just a hint of the 'show through', in order to simulate the real thing. These bands were applied in the field, over the 'factory finish' camouflage, and there is evidence in the pics and profile that Wayne provided, that the mottle, and what I take to be a III Gruppe bar, is faintly visible under the red paint. Once the second coat is thoroughly dry, and the masking tape removed, the model will be given a further coat of Klear, just to even out the finish, before the decals are applied. Incidentally, the small hole near the tail, on the top of the spine, is where the antenna cable from the main cable will attach.; this is simply a depression made with the tip of a scalpel blade.
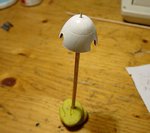
PICTURE 3 shows the first coat of white undercoat on the spinner, still wet!Any air bubbles, dust or other blemishes will be lightly sanded off, before a gloss coat is applied. The spinner will then be masked so that the black 'Burbleschnauz' spirral can be hand painted. I don't fancy tackling the decal, not with my hands! When finished, it will get a coat of clear semi matt.
PICTURE 4 is a rather poor shot of one of the exhaust stacks. These have been given a coat of Xtracolour 'Oily Steel'. The first pipe will be left this colour, with just a hint of 'blueing' at the outlet, whilst the others will be given a burnt and worn look.
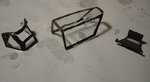
PICTURE 5. The canopy frame was painted, free hand, in a dark grey enamel primer, in order to allow me to see where the mould lines are! The curved top frame on the openeing section is difficult to see due to the extreme clarity of the part, enhanced by being dipped in Klear. These will then be masked, and the frames painted in the relevant camouflage colours, with acrylic paint, brushed on. The tabs on the bottom of the windscreen will be removed, as the fit will be excellent without them, and they would intrude into the cockpit otherwise. Once the armour head panel has been fitted, support stays will be added from strip plastic, and a locking latch and 'check' wire added to the canopy, again, scratch-built, from plastic strip and stretched sprue.
The next stage will involve the decals, and I just hope that I can obtain the Eagle Cals sheet for the number '13', or that Muller can help. If not, then I'll have to hand paint the numbers! I could always do the Stab aircraft, as I have some spare 'Winkels', but I'd prefer 'Yellow 13'.
Hopefully, I'll get the harness and other small details made and photographed in the next couple of days, and post them for your comments.
Considering this is a very cheap kit, unlike the type of kits we're used to, it's progressing very well, and is starting to 'look the part'.
Terry.
Just a quick couple of shots in between stages.
PICTURE 1 shows the Gustav after the first coat of Klear (Future) has been sprayed on, and the area of the Reichs Defence band masked and painted.
I always like this stage, as the gloss varnish evens out the paint, making it 'come alive'.
PICTURE 2 is a close up of the first coat of red for the band. Notice how the mottle is showing through. With the second coat, which will be slightly thinner, I hope to retain just a hint of the 'show through', in order to simulate the real thing. These bands were applied in the field, over the 'factory finish' camouflage, and there is evidence in the pics and profile that Wayne provided, that the mottle, and what I take to be a III Gruppe bar, is faintly visible under the red paint. Once the second coat is thoroughly dry, and the masking tape removed, the model will be given a further coat of Klear, just to even out the finish, before the decals are applied. Incidentally, the small hole near the tail, on the top of the spine, is where the antenna cable from the main cable will attach.; this is simply a depression made with the tip of a scalpel blade.
PICTURE 3 shows the first coat of white undercoat on the spinner, still wet!Any air bubbles, dust or other blemishes will be lightly sanded off, before a gloss coat is applied. The spinner will then be masked so that the black 'Burbleschnauz' spirral can be hand painted. I don't fancy tackling the decal, not with my hands! When finished, it will get a coat of clear semi matt.
PICTURE 4 is a rather poor shot of one of the exhaust stacks. These have been given a coat of Xtracolour 'Oily Steel'. The first pipe will be left this colour, with just a hint of 'blueing' at the outlet, whilst the others will be given a burnt and worn look.
PICTURE 5. The canopy frame was painted, free hand, in a dark grey enamel primer, in order to allow me to see where the mould lines are! The curved top frame on the openeing section is difficult to see due to the extreme clarity of the part, enhanced by being dipped in Klear. These will then be masked, and the frames painted in the relevant camouflage colours, with acrylic paint, brushed on. The tabs on the bottom of the windscreen will be removed, as the fit will be excellent without them, and they would intrude into the cockpit otherwise. Once the armour head panel has been fitted, support stays will be added from strip plastic, and a locking latch and 'check' wire added to the canopy, again, scratch-built, from plastic strip and stretched sprue.
The next stage will involve the decals, and I just hope that I can obtain the Eagle Cals sheet for the number '13', or that Muller can help. If not, then I'll have to hand paint the numbers! I could always do the Stab aircraft, as I have some spare 'Winkels', but I'd prefer 'Yellow 13'.
Hopefully, I'll get the harness and other small details made and photographed in the next couple of days, and post them for your comments.
Considering this is a very cheap kit, unlike the type of kits we're used to, it's progressing very well, and is starting to 'look the part'.
Terry.
Attachments
Heinz
Captain
Nice work mate.
109ROAMING
2nd Lieutenant
Nice Work Terry
This "klear coat" I assume you apply with an airbrush ,just wandering what you clean it with after use? Thinners? can you treat it like acrylic paint? or enamel?
This "klear coat" I assume you apply with an airbrush ,just wandering what you clean it with after use? Thinners? can you treat it like acrylic paint? or enamel?
Users who are viewing this thread
Total: 1 (members: 0, guests: 1)