Navigation
Install the app
How to install the app on iOS
Follow along with the video below to see how to install our site as a web app on your home screen.
Note: This feature may not be available in some browsers.
More options
You are using an out of date browser. It may not display this or other websites correctly.
You should upgrade or use an alternative browser.
You should upgrade or use an alternative browser.
****DONE: 1/32nd scale Beaufighter VIF, 46 Sqn RAF, Egypt 1943 Group Build
- Thread starter Airframes
- Start date
Ad: This forum contains affiliate links to products on Amazon and eBay. More information in Terms and rules
More options
Who Replied?- Thread starter
- #442
Airframes
Benevolens Magister
Actually, I might have to find a home for it eventually! When it goes on to a base, the area is gong to be at least 24 x 24 inches (60 x 60cm), and I don't think I'll have room for permanent display without the nasty dust gremlin taking advantage. Might check to see if a museum would like it, or put it up for sale even.....maybe!
Terry you could donate it to Muller's International Modelling Museum in Leitrim, Ireland. They're always looking for exhibits 
My place is tiny Terry! I'd have nowhere to display something that big. I'm thinking of converting one of the old stone sheds behind my house into a bar, so until then most of my models are in boxes in the attic.
My place is tiny Terry! I'd have nowhere to display something that big. I'm thinking of converting one of the old stone sheds behind my house into a bar, so until then most of my models are in boxes in the attic.
- Thread starter
- #444
Airframes
Benevolens Magister
Now that sounds like a brilliant idea Keith! I can just see the bar, maybe called 'The Dispersal', nicely decked out with some aviation-themed bits and pieces, pictures and models.
If/when you do it, invite me over for the 'Grand Opening', and I'll bring the model as a display feature - maybe you could use another name for the bar - ' The Beaufighter Bar' or something!!!
If/when you do it, invite me over for the 'Grand Opening', and I'll bring the model as a display feature - maybe you could use another name for the bar - ' The Beaufighter Bar' or something!!!
Vic Balshaw
Major General
Now come on guys, we've plenty of wide open spaces down here, no worries. Just pack it in a box, ship it out and we'll take care of it……


Last edited:
Heinz
Captain
Vic has the right idea 
Sounds about right Vic!
ozhawk40
Master Sergeant
Confirmed! Oz is the best place, with the most space. Did I say that Perth has the most space of all the places in Oz. 8) No? Well it does.


- Thread starter
- #449
Airframes
Benevolens Magister
Got a problem there - the Posties in my town are dyslexic, and probably would tead Oz as Zo, think it meant zoo, and well, you can see where this is going......
ozhawk40
Master Sergeant
That's quite okay Terry, my sympathies are with you - all the non-dyslexic posties in the UK emigrated to OZ in the sixties. They could find the place. 


Confirmed! Oz is the best place, with the most space.
With plenty of snakes and crocodiles.
Last edited:
- Thread starter
- #453
Airframes
Benevolens Magister
Too right! I used to work above the Aussie Consulate in Manchester in the early '80's, and there were about 14 staff as I remember, 12 of which were stunning birds, mostly blondes! Thursday afternoon at 16:00 hrs was great - beer call on the Aussies, and all those Judies around getting a bit ...er...interesting, after a few!
B-17engineer
Colonel
I check in for a squiz...and we're on about Aussie Sheilas!
 ...please continue....
- Thread starter
- #457
Airframes
Benevolens Magister
That's what Tracy said.....
Matt308
Glock Perfection
Coming along very nicely, Airframes. Looking awesome!
- Thread starter
- #459
Airframes
Benevolens Magister
Thanks Matt. Got a few more of the fiddly bits and pieces done, should have some more pics soon.
- Thread starter
- #460
Airframes
Benevolens Magister
Well, the Beau is getting close to being finished. These last few stages are becoming increasingly difficult, as the size of the model makes handling awkward when adding small detail parts; I've lost count of how many times I've caught a wingtip on my desk lamp, or the edhge of the bench!
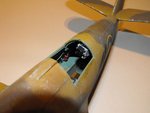
The radar set, dislodged when removing the masking from the Observer's hatch, has been re-fitted at the correct angle, and most of the smaller scratch-built items have been made and fitted, and just need painting. The very delicate radar antennas will be fitted and painted last, after the final detail painting has been completed.
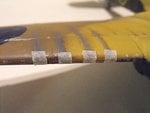
PIC 1 The 'fabric' patches over the wing gun ports have been added, roughly cut from the thin tissue that protected the decal sheet, and fixed with PVA glue. When set, these will be painted dull red, and smoke stains and ragged 'shot through' holes added.
PIC 2. The trailing aerial fairlead was made from a short length of plastic rod, and has yet to be painted. The 'lead weight' on the end of the (unseen) cable was simulated by gently heating the end of the rod, and pressing into shape.
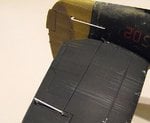
PIC 3. The rudder and elevator trim-tab actuators were made from thin plastic rod and sheet, having first removed the kit's moulded actuiators, and again await a bit of a tidy-up and painting. Holes were cut or drilled as required, so as to mount the rods and connector horns.
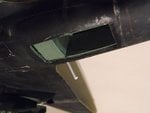
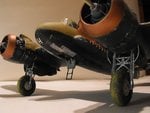
PIC 4. The scratch-built forward underbelly entrance hatch door has been painted and fitted, and the retraction rods and release catch added from stretched sprue. It wasn't until I came to fit the door that I realised I'd made the ladder a little too wide, compared to the actual ladder. Foolishly, I took the measurements from the solid, moulded- in part of the kit's lower fuselage, instead of using the scale drawing! Too late now, the bl**dy thing's staying as is!!
The cannon troughs have also had the 'fabric patches' added, and again these will be painted, stained and torn later.
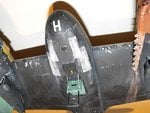
PIC 5 shows the radar monitor back in position, angled inwards from the port fuselage wall. This was a real sod to re-position and glue, and I discovered quite a number of new swear words whilst messing about for around thirty minutes trying to repair this!
Pic 6 gives a general impression of the forward area of the Beaufighter so far, and how high it stands on its beefy landing gear..
So, a few more bits and pieces, including the somewhat tricky release catches, locking bars and sun blind on the cockpit canopy hatch, then the model should be finished. I hope to be able to get it onto a suitable display base, simulating the desert airstrip at Idku, and add a groundcrew figure working on, or near, the starboard engine.
Thanks again for your interest, and i'll have some more pics soon.
Attachments
Users who are viewing this thread
Total: 1 (members: 0, guests: 1)


