- Thread starter
- #201
Navigation
Install the app
How to install the app on iOS
Follow along with the video below to see how to install our site as a web app on your home screen.
Note: This feature may not be available in some browsers.
More options
You are using an out of date browser. It may not display this or other websites correctly.
You should upgrade or use an alternative browser.
You should upgrade or use an alternative browser.
**** DONE: 1/48 Bf 109G-4/R6 "Yellow 11" of 13.(Slow)/JG 52 Eastern Front GB
- Thread starter Crimea_River
- Start date
Ad: This forum contains affiliate links to products on Amazon and eBay. More information in Terms and rules
More options
Who Replied?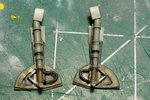
Airframes
Benevolens Magister
Nice work Andy, and good to see you've added the leather gaiters, most modellers paint the oleos, possibly basing them on restored aircraft where the gaiters are missing. As for the doors, far as I remember, the short edge of the bottom of the door should face the rear, so looks like you got them right. Try lining them up with the wheel wells - that should show if they're correct.
imalko
Chief Master Sergeant
Agree with you Andy. Looking good.
- Thread starter
- #205
Crimea_River
Marshal
..... As for the doors, far as I remember, the short edge of the bottom of the door should face the rear, so looks like you got them right. Try lining them up with the wheel wells - that should show if they're correct.
But that's just it. The brake lines were on the front of the stut and that's where the short edge is. However, I've figured this out. The issue isn't really the short edge vs long, it's the fact that the parts aren't molded with the struts centered in the circular part of the cover and they should be. I confirmed this by comparing with the covers on my unbuilt Hasegawa G-6. If I mount the tires on the hubs, one edge of the tires will protrude beyond the covers, even if I reverse them. The correct fix would be to take off material on the back round edge and add material to the front but I don't think I'm going to go there. Once the tires are on, it's less noticeable and yes, I will learn to live with it.
Did I just say that? My therapy must be working!
Airframes
Benevolens Magister
Darned good therapy, 'The Macallan' - especially after half a bottle !
- Thread starter
- #207
Crimea_River
Marshal
Ah yes, The Macallan. Oddly enough, I do have a bottle of that in the bar. One of my faves!
Airframes
Benevolens Magister
I'll be there on the 18.30 hrs flight on Friday - pick me up at the airport. (in the bar, of course!).
Oh, and no ice, that's for wooftahs - and certainly no water - they put that in it when they make it !!
Oh, and no ice, that's for wooftahs - and certainly no water - they put that in it when they make it !!
- Thread starter
- #209
Crimea_River
Marshal
You bet mate. Exactly how I like it too!
Oh, yes, the model. Coat of Future has gone on so no progress shots tonight. Nice long 4 day weekend coming up so I may get her done...I just have to sand out that finger print I left on the bottom of the wing in the wet Future. Should have done this before I had the two pails of red wine for supper tonight....Hic!!
Oh, yes, the model. Coat of Future has gone on so no progress shots tonight. Nice long 4 day weekend coming up so I may get her done...I just have to sand out that finger print I left on the bottom of the wing in the wet Future. Should have done this before I had the two pails of red wine for supper tonight....Hic!!
Vic Balshaw
Major General
Looks and sound as though you're coping Andy even with the single malt which reminds me, I've a nice bottle of 'Bowmore Islay' tucked away somewhere. You also twigged a memory, I'd seen that gaiters should go on one of my builds, would you believe it's the 190 that's all done and dusted apart from the judges pics. Too late now so I guess I'm going to have to live with it.
comin together nicely Andy!
- Thread starter
- #212
Crimea_River
Marshal
Thanks guys.
- Thread starter
- #214
Crimea_River
Marshal
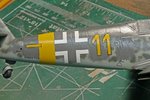
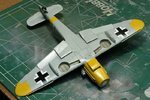
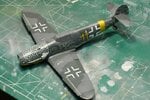
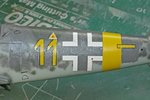
Decals are on.
Seen below are top and bottom overall shots and close-ups of the side crosses and codes. The home made yellow 11's turned out OK although the black outline decals of the 'ones' didn't turn out very crisp. I had to carefully go over a couple of areas with a very fine tip permanent marker which I'll allow to thoroughly dry before putting another coat of Future down to seal the decals. As you can see, I've also installed the tail wheel.
Thanks for stopping by.
Attachments
N4521U
Plastic Pirate
Fine job there matey...... but
on the nose......... is that what is referred to as the Pox????????
on the nose......... is that what is referred to as the Pox????????
Vic Balshaw
Major General
Beautifully done Andy, those decals and dots came out a treat.
imalko
Chief Master Sergeant
Excellent work my friend! 
Airframes
Benevolens Magister
Nice one Andy !
Users who are viewing this thread
Total: 1 (members: 0, guests: 1)