**** DONE: 1/48 Corsair IV - Pacific Theatre of Operations II

Ad: This forum contains affiliate links to products on Amazon and eBay. More information in Terms and rules

Sounds like Andy has you well and truely covered....

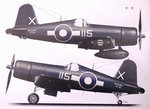
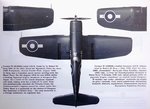
And that profile I have is in the same booklet as my Shiden-kai, will post it for you Cory as an added reference.
 
Those profile pages for you Cory.

Source Kagero Top colors Series No 6 fighters over Japan II
 

Attachments

  • Corsair_2124.jpg
    Corsair_2124.jpg
    70.2 KB · Views: 112
  • Corsair_2130.jpg
    Corsair_2130.jpg
    90.9 KB · Views: 110
Good stuff Wayne. The few pictures of 115 I've seen don't have the sloped 5's but then there's no proof the pictures are KD658 either. I'm sure Cory knows all about it. Very nice profile pics though.
 
Thanks Wayne, I appreciate it. While I agree with Andy about the numbers, overall I think that's a more accurate profile, as it's been found that KD658 would have had the non-braced canopy (meaning the photo you sent me Andy is not KD658 unfortunately). ~100 aircraft before had the change in canopy made. I believe though that the landing gear would be blue.
 
Yes, they retained them as well as gaining the two additional points on either side. Most photos I've found though have the center drop tank in Sky however.
Read somewhere during my research that the dark blue tanks were damaged in a Kamikaze attack so they went back to using the sky coloured ones
 
Last edited:
How'd this get to 7 pages before I posted any updates? Anyhow, here are some fairly minor ones.

Wings are clipped. Note to Andy, cut at the first panel line inside the wingtip. I'm paranoid about making the rounded wingtips, but that's next.

DSC_0014_zps98bc09ea.jpg


Engine is done, though the picture makes it a bit hard to see. I'll have to get another one up. I actually stole a resin engine from my Eduard Royal Class Hellcat, and that PE was a Royal PITA! I didn't get the wiring perfect, especially along the back, but I tried it inside the cowling and you won't even be able to tell.

DSC_0017_zps31a5dc41.jpg


Cockpit is also done. Used some PE. I have left off some PE levers for now, as I don't want them to bust off before I can get the cockpit inside the fuselage. I can't do that until some more resin stuff arrives from England, which includes FAA sidewalls, hence the delay. Should be soon, as stuff from there tends to beat things from the US somehow. Seat is resin.

DSC_0019_zps98461dd7.jpg


DSC_0018_zps9892bc1b.jpg


Weathering in the cockpit is minimal, as the plane was only in combat service for 20 days. That will be a general theme throughout the build. I realise it had testing and then ferrying, but still.

I need to clip my nails!
 
Nice work there Cory.
Making the clipped wing tips will be much easier than you thought. You can either mould 'Milliput' in place, shaping it almost to perfection, and then sanding and polishing once set, or 'superglue' a chunk of plastic to the ends, preferably with a 'tab' extending into the wing, and then file and sand to shape, or a combination of these methods.
You could also make the tips from balsa, again superglued and, once shaped, seal the grain with a mix of clear varnish (not acrylic) and talcum powder, sanding and polishing this after the final coat.
 

Users who are viewing this thread

Back