**** DONE: 1/48 Hawker Sea Fury FBII, 807 NAS, 1951 - Carrier Aircraft GB (2 Viewers)

Ad: This forum contains affiliate links to products on Amazon and eBay. More information in Terms and rules

1) Looks like what I found in the back of the fridge.
2) It's gonna be Tuesday tomorrow here in the states also. Not sure about Australia, probably something like "Gutillsday"
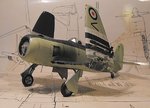
3) The wing looks way better with the ammo chutes
4) Would a touch of super to hold and epoxy for strength work? And the day after tomorrow is wednesday here too. Again, not sure about Australia,....
 
Thanks Paul. I might add a little epoxy once the wings are attached, if there is anywhere it can be added! The top of the ammo chute measures 4mm x 4mm, and the tops of the PE hinges are approximately 0.75mm x 5mm, so you can understand the problem!
The whole assembly needs the rapid setting powers of CA, in order to hold it in place at the correct angle, as there is absolutely no way the wing can be attached, glued and supported until set. It has to be done by holding in place until the glue sets enough to let go !
I've got some vague plans to add a Firefly, from the same carrier, to the collection at some point, and possibly one or two other folded-wing carrier types in the future. If I do, then there's no ****ing way I'll use a PE wing fold set again !!
 
Sorry to hear of your troubles Terry but maybe you can make a fortune selling those blooms to some big pharma outfit. I wonder whether or not the wing fold on the Firefly would be easier since the fold arrangement was very different.
 
Yes, it folded back and in, so would be easier to support whilst setting I guess - depending on the construction of the fold mechanism of course.
 
So sorry to hear of your dilemma. When ones health is off, it upsets everything you do.

Your build is just a cracker mate.
Big hug, a Man hug! from over here, and wish there was something I could do to help.

Bill
 
My mate Mick tells me that CA glue can go like that when left for some time in fluctuating temperatures. The shelf life is apparently relatively short if stored in such a way. This was the final tube from a pack of 6, bought probably at least 9 months ago, and I'd only just opened it. The two tubes used before this went 'off' very quickly after opening, and I 'binned' them.
I normally use the thinner stuff, in poly bottles, but couldn't obtain any at the time, but, whatever type, it's apparently better to put it either in the fridge, or store in a stable, cool environment.
Got some new glue now, although in tubes again unfortunately, so I hope to get the other wing on sometime today, then crack on towards finishing the model and display base.
All being well, I might have something to show tonight.
 
Might be Paul, but I've used this particular brand quite a lot, without problems until now.
But! The new stuff seems to be working, as the starboard wing is now on!
Well, sort of, anyway. It's attached, but is a bit precarious, mainly due to the lack of contact area. I've a few things to do before getting back to the model, but I'm going to try slipping a thin sliver of plastic between the front hinge and the upper wing fold plate, to create more surface area, and glue that in place. Not sure if I'll get this done tonight yet, but I'll post pics if I do.
Thanks for all the support and encouragement, and now, I'm off to take some pain killers, anti-inflammatories, a number of pints of decent ale and anything else to relive the pain and stiffness !!
 
Thanks Hugh and Geo.
And at last - some pics!
A small rectangle of thin plastic card was slipped between the forward PE hinge and the upper wing PE plate, which has sorted the problem. It also now looks more like the real assembly, as the PE parts are, by their very nature, flat, and didn't really replicate the rather substantial brackets of the real thing.
Hydraulic rams have also been added, made from short lengths of plastic rod, some wiring is in place, and the whole lot painted, apart from picking out some details.
The landing gear doors have been fitted, and hinges added from stretched sprue, the retract struts have been fitted to the main gear, and spring linkages added from sprue, and the IFF dipole fitted below the starboard centre section, again from stretched sprue.
My hands are too stiff to tackle the detail painting and other 'fiddly bits' at the moment, but I hope to attend to this within the next day or two. Meanwhile, the Tempest drop tanks need some minor modification, which is the next job.
Here's what the model looks like so far.
 

Attachments

  • Sea Fury Build 155.jpg
    Sea Fury Build 155.jpg
    55 KB · Views: 95
  • Sea Fury Build 163.jpg
    Sea Fury Build 163.jpg
    72.6 KB · Views: 74
  • Sea Fury Build 158.jpg
    Sea Fury Build 158.jpg
    78.3 KB · Views: 73
  • Sea Fury Build 169.jpg
    Sea Fury Build 169.jpg
    61.1 KB · Views: 83
Great work on the wing fold!!
 

Users who are viewing this thread

Back