lookin' good! 
Navigation
Install the app
How to install the app on iOS
Follow along with the video below to see how to install our site as a web app on your home screen.
Note: This feature may not be available in some browsers.
More options
You are using an out of date browser. It may not display this or other websites correctly.
You should upgrade or use an alternative browser.
You should upgrade or use an alternative browser.
**** DONE: 1/48 Hawker Sea Fury FBII, 807 NAS, 1951 - Carrier Aircraft GB
- Thread starter Airframes
- Start date
Ad: This forum contains affiliate links to products on Amazon and eBay. More information in Terms and rules
More options
Who Replied?- Thread starter
- #42
Airframes
Benevolens Magister
Thanks chaps. It's now had the metallic exhaust panels painted, and is all masked ready for painting, which I hope to get done over the weekend - if the bl**dy Humbrol paint behaves!
meatloaf109
1st Lieutenant
What is "T-Cut"? I would like to try the clear lights thing.
- Thread starter
- #45
Airframes
Benevolens Magister
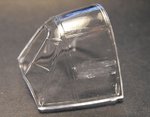
Paul, 'T-Cut' is a brand name of a car body colour restorer - the milky stuff used to remove grime and bring the paint work 'back to life'. Metal polish works just as well, but on some clear plastics used for canopies and other transparent parts, it can turn the plastic brittle. The 'T-Cut' type of stuff is not as harsh, being basically a thin 'cutting paste', and a final polish can be done with tooth paste, followed by a soft cloth, then a coat of 'Future' to make things really clear and shiny. Also good for polishing 'solid' plastic after sanding joints, for example.
The same methods are also great for damaged canopies, or where, for example, a frame needs to be removed.
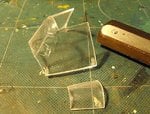
Here's an example of the latter, where I needed to alter a 1/32nd scale Beaufighter canopy. These show the scratches after removing a horizontal frame, the 'T-Cut' being polished on with a cotton bud, and the result after polishing.
The same methods are also great for damaged canopies, or where, for example, a frame needs to be removed.
Here's an example of the latter, where I needed to alter a 1/32nd scale Beaufighter canopy. These show the scratches after removing a horizontal frame, the 'T-Cut' being polished on with a cotton bud, and the result after polishing.
Attachments

I'm always perplexed as to how perfect your canopys look 
I never get those results with any products :S Brasso was about the closest thing to T-cut we have here, and it worked pretty bad
How gently do you rub it in and for how long usually?
Sorry for the hi-jacking
I never get those results with any products :S Brasso was about the closest thing to T-cut we have here, and it worked pretty bad
How gently do you rub it in and for how long usually?
Sorry for the hi-jacking
- Thread starter
- #47
Airframes
Benevolens Magister
Difficult to describe how gently - sort of gently, but not too softly, more by feel. As for how long, basically, as long as it takes to get the scratches out.
Often, it's a good idea to lightly sand the scratches first, using fine wet n' dry, used dry first, then wet. I normally use a well-worn piece for the 'wet' rub, then clean with soap and water, using the soap as a mild abrasive. All of this before using the 'T-Cut', then just keep polishing, removing the polish with a soft cloth, polishing with a clean, soft cloth, then repeating the 'T-Cut' if needed.
Sometimes the whole job can be done in a few minutes, other times it can take an hour or more.
Crimea_River
Marshal
Coming along nicely Terry.
- Thread starter
- #49
Airframes
Benevolens Magister
Thanks Andy. Just getting ready to spray the 'Sky' overall.
- Thread starter
- #50
Airframes
Benevolens Magister
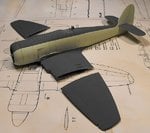
Got the 'Sky' sprayed, or at least what Humbrol now put out as the nearest to 'Sky', Number 90 'Beige Green'. Looks a tad green to me, but I need to see it in natural light. The surprising thing is, it stirred and thinned without any problem, and sprayed beautifully - had to check the tin to make sure it was Humbrol!
Can't get any pics yet, as the second coat is still drying, but, given that it looks OK in daylight, I'll go ahead and spray the grey, and hopefully post pics by Sunday. If not, the I'll have to put it on 'hold', until I can obtain some 'proper' Sky, probably Xtracolour.
Slight change of plan though.
I started to get the artwork sorted ready for printing the decals, and came across a small problem. I couldn't find a typeface with the correct shaped figure '3' for the code numbers (130), the '3' being a different style to all the other digits used by this unit, having a 'flat' top stroke, but rounded serif !
So I'm going to have to change to another aircraft from the same Squadron, and same time period, still embarked on HMS Theseus.
The model will now be finished as serial number VR938, code 118, everything else remaining the same.
meatloaf109
1st Lieutenant
Thanks, Terry! I will look for the US equivelent.
- Thread starter
- #52
Airframes
Benevolens Magister
You're welcome Paul. Most auto parts stores should have a similar product - the one I use is from Halford's, a UK auto accessory chain, and is their 'own brand'. It's one of those products where a brand name has become a generic term (T-Cut), like saying 'Hoover' when you mean vacuum cleaner!
I checked the 'Sky' in good daylight (it's not actually p*ssing down today!), and it still looked a touch too green to me, more like Eau de Nil, which would be fine on a BoB period Spit or Hurricane, but didn't look quite right on a Sea Fury. So, I mixed in a small amount of white, and a spot of yellow, sprayed another coat, and it's looking more like 'Sky' now.
I've got to nip out for a while, but I hope to maybe get the grey sprayed later, so I'll post pics then.
Be back to see them pics....
glad you got the "sky" sorted Dogsbody
fubar57
General
Lookin' good Terry. Don't know if you're aware of this site but you upload a copy of the font you're looking for and it will search a database for matches. WhatTheFont! « MyFonts.
Geo
Geo
- Thread starter
- #56
Airframes
Benevolens Magister
Thanks guys, and thanks for the link Geo. I'll have a look at that, could be useful - would help if I knew which font/typeface I was looking for I suppose!
Anyway, got the Dark Sea Grey on, and the masks removed. There's a tiny bit of re-touching to do here and there, around the usual places such as the tail plane joints and main wing roots, but nothing major. Once that's done, it'll be time to mask for the black and white theatre stripes and the gaps for code numbers and 'Royal Navy' wording. Might get some done tomorrow, cos tonight, I'm off to the pub!!
Anyway, got the Dark Sea Grey on, and the masks removed. There's a tiny bit of re-touching to do here and there, around the usual places such as the tail plane joints and main wing roots, but nothing major. Once that's done, it'll be time to mask for the black and white theatre stripes and the gaps for code numbers and 'Royal Navy' wording. Might get some done tomorrow, cos tonight, I'm off to the pub!!
Attachments

Crimea_River
Marshal
Looks great Terry. BTW, I have a bunch of detail pics of a Sea Fury in a local museum. Shout if you need any details posted.
wow that paint looks great Terry
Users who are viewing this thread
Total: 1 (members: 0, guests: 1)