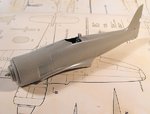
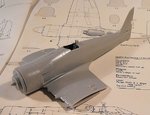
**** DONE: 1/48 Hawker Sea Fury FBII, 807 NAS, 1951 - Carrier Aircraft GB

Ad: This forum contains affiliate links to products on Amazon and eBay. More information in Terms and rules
Nice choice Terry but as Igor says, watch the kit as my experiences with Hobby Craft have usually been troublesome.
 
Last edited:
Thanks Vic. As I mentioned, this, and the other HC kits I've built, are all early releases, from 1989, and I haven't had any fit problems with any of them. But, we'll soon find out!
 
I've finally been able to make a start on the Sea Fury, one and a half months into the GB !
So far, things have gone reasonably smoothly, which makes a change, and the fit of some parts is so good, they could almost be left without adding glue!
With the benefit of many sessions of test-fitting over the twenty years I've had this kit, preparation was quick and easy, with just a few small additions being required in the cockpit area to aid construction.
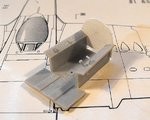
PIC 1. Short strips of plastic were cemented to each cockpit wall, to provide some support for the cockpit tub, which other wise would rely only on small areas of contact. A canopy crank was also added to the starboard wall, made from a punched disc of plastic card and a short length of stretched sprue.
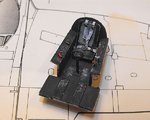
PIC 2. The entire interior has been painted in varying shades of 'scale black', to provide depth and contrast, and then dry-brushed with a lighter shade. The cockpit opening is rather small, and the use of true black would just have created a black void, as it's hard enough to see into the area anyway, even without the canopy in place.
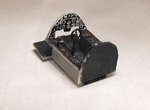
PIC 3. The cockpit tub is basic, but acceptable, straight from the box, and would probably suffice, as the canopy will probably be in the closed position. However, as I'll be using a crystal clear, vac-formed canopy, I decided to add some minimal detail, in the way of throttle and pitch levers, and a couple of other handles, and also blanked-off the open rear end with a plastic card bulkhead.
PIC 4. The cockpit tub was painted in the same way as the walls, and the details picked out. The kit seat, although reasonable, benefited from being thinned slightly around the edges, and, in order to provide some contrast in the dark interior, it was painted in true black, with some paint wear added by stippling and dry-brushing. The 'quilted' back-rest cushion was simulated by a piece of textured, thick foil from a pain-killers sachet, painted pale grey-green, and the harness was made from similar, smooth foil, with the adjusting buckles from stretched sprue, and the quick-release box from a sliver of plastic rod.
PIC 5. The kit instrument panel had raised dials and switches, but was nothing like the real thing (or any other panel I've ever seen!), so the detail was filed off, and the kit-supplied decal glued in place, still on the backing paper, with some spots of colour added. Again, this will be good enough when viewed through the canopy, as only part of the panel will be visible, once the giro gun sight and mount are made and fitted.
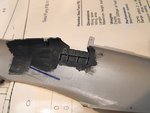
PIC 6. The cockpit assembly was fitted, along with the prop shaft and the tail wheel well 'roof' and, once set, the fuselage halves were joined. The fit was virtually perfect, and what appears to be a tiny gap on top of the nose is in fact a smear of black paint from the interior, and will be lightly sanded later, when all joints and seams will be polished and checked. Seeing how well this fitted together reminded me of how impressed I was when I first saw these relatively simple and inexpensive, but nicely engraved kits, 20+ years ago, and I can only think that any fit problems encountered today will probably be as a result of the age of the moulds.
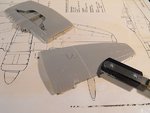
PIC 7. Cutting the wings, ready for the PE wing-fold sets, was the tricky part, as one wing had already been cut 20 years ago, with the intention then having been to make and fit my own fold mechanism - such PE sets hadn't even been thought of at the time. I had originally made the first cuts following the engraved hinge joint lines, which have a very slight 'kink' at the trailing edge. However, the 'Airwaves' PE parts are designed to fit the outer edge of the joints, and consequently a smooth, straight-line cut is required. This was simply remedied by carefully trimming the original cut line, and then making a straight cut on the un-touched wing parts, then sanding all surfaces to ensure a flat, even surface. The wing with the 'kinked' cut will have a thin plastic shim inserted, and sanded flush, once the PE part is matched up and fixed in place.
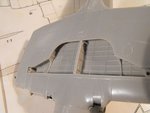
PIC 8. The one-piece main wheel bay was cemented in place, before fitting the inner wing upper surfaces. The wheel bay structural detail is quite good, especially considering the age of this kit, and only requires the addition of a small amount of scratch-built detail, as most of this area will not be seen once the model is up on its 'legs'. This detail will be added later.
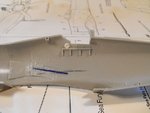
PIC 9. Once the upper wing sections had set, the complete centre section was cemented in place, and again, the fit was neat and extremely good. A tiny gap at one wing root intake requires filling, which can be done with a thin bead of 'Superglue', and this was my fault, as I hadn't clamped this area properly when the cement was drying.
Next stage is to start work on preparing the outer wing panels, and drilling holes for the scratch-built rocket rail attachments, and for landing lamps, drop tank locations and so on.
Thanks for looking in, and I'll post more progress pics soon.
 

Attachments

  • Sea Fury Build 003.jpg
    Sea Fury Build 003.jpg
    40.1 KB · Views: 124
  • Sea Fury Build 013.jpg
    Sea Fury Build 013.jpg
    47.5 KB · Views: 123
  • Sea Fury Build 007.jpg
    Sea Fury Build 007.jpg
    73.4 KB · Views: 123
  • Sea Fury Build 012.jpg
    Sea Fury Build 012.jpg
    53.8 KB · Views: 130
  • Sea Fury Build 016.jpg
    Sea Fury Build 016.jpg
    41.5 KB · Views: 123
  • Sea Fury Build 018.jpg
    Sea Fury Build 018.jpg
    51.3 KB · Views: 122
  • Sea Fury Build 017.jpg
    Sea Fury Build 017.jpg
    46.7 KB · Views: 123
  • Sea Fury Build 019.jpg
    Sea Fury Build 019.jpg
    39.7 KB · Views: 123
  • Sea Fury Build 021.jpg
    Sea Fury Build 021.jpg
    55.1 KB · Views: 132
Nice progress Terry. I'm thinking that a lot of that nice cockpit detail won't be seen even with the clear glazing due to the darkness and smallish canopy.
 
Thanks very much Guys. You're quite right Andy, not much can be seen in the cockpit, especially with the folded wings in the way. That's why I only added basic detail, and will probably have the canopy closed too - saves faffing about cutting the vac-formed part.
 
Thanks very much.
A little more progress, with the centre section and outer wings prepared.
PIC 1. Holes have been drilled in the outboard edges of the wing centre section, to accept the 'Eduard' Tempest drop tanks, after slight modification, and slots cut for the empty 20mm cases and links ejection ports. A small hole has also been drilled in the port lower wing root fillet, which will be elongated, and a scratch-built retractable step fitted later. The joints between wing and fuselage have also been sanded, but have yet to be polished.
PIC 2. A hole has been drilled for the gun camera port, between the oil cooler and cannon ports.
PIC 3. Slots have been cut in the lower wings, ready for the scratch-built rocket rail mounts, and notches cut in to the wing tips, for the navigation lamps, which will be made from shaped and polished clear sprue, drilled and filled with the appropriate coloured paint. Holes have also been made for the landing lamps, and these will have small lengths of tube and rod inserted, to represent the lamp housings. These will be painted and glazed after the model has been painted.
Next step is to fit the tail planes, rudder, engine and cowling, before preparing the model for the first painting stage.
Thanks for your interest and compliments, and I'll post more soon.
 

Attachments

  • Sea Fury Build 022.jpg
    Sea Fury Build 022.jpg
    51.8 KB · Views: 117
  • Sea Fury Build 030.jpg
    Sea Fury Build 030.jpg
    41 KB · Views: 118
  • Sea Fury Build 026.jpg
    Sea Fury Build 026.jpg
    44.5 KB · Views: 111
Thanks guys. It seems to be progressing fairly quickly so far - might get some paint on over the weekend.
 
The main construction is now complete and, after a bit of a clean-up, the model will be ready for painting.
PIC 1. Pieces of clear sprue were drilled, the holes filled with the appropriate coloured paint, and then super glued to the notches cut in the wing tips for the nav lamps.
PIC 2. Once fully set, the sprue was filed to shape, and then polished with 'T-Cut'. These will now be masked, and re-polished, and given a coat of 'Future', after the model has been painted and clear-coated.
PIC 3. Some basic detail has been added to the wheel bays, using copper wire, plastic tube and rod.This will be painted later, after the wheel bays have been painted silver.
PIC 4. The 'engine' consists of the outer ring of the cylinders, all that can be seen (just) once the huge prop spinner is fitted, and this was painted metallic grey and then given a wash of black, before cementing in to place, followed by the cowling. The tail planes were cleaned-up and fitted, and the rudder was cemented in place, after adding rudder and trim tab actuators from stretched sprue.
Next step is to test-fit the PE wing fold, before painting the model in overall 'Sky', which will then be masked, and the Dark Sea Grey sprayed on the upper surfaces. Whilst the paint is drying, items such as the gear doors and main gear legs will receive some additional detail, to be fitted later, and the PE wing folds will be cleaned-up and assembled.
Thanks again for your kind comments, and I should be able to post some more over the weekend.
 

Attachments

  • Sea Fury Build 033.jpg
    Sea Fury Build 033.jpg
    39.4 KB · Views: 95
  • Sea Fury Build 034.jpg
    Sea Fury Build 034.jpg
    41.6 KB · Views: 116
  • Sea Fury Build 032.jpg
    Sea Fury Build 032.jpg
    47.9 KB · Views: 119
  • Sea Fury Build 037.jpg
    Sea Fury Build 037.jpg
    56.1 KB · Views: 130

Users who are viewing this thread

Back