**** DONE: 1/48 ICM Spitfire Mk IX AE-B Ian Keltie of 402 SQDN RCAF Commonwealth GB

Ad: This forum contains affiliate links to products on Amazon and eBay. More information in Terms and rules

Thanks everyone. I'm pretty stoked at how the tank turned out.

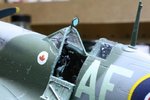
Terry, the technique you mention is, in fact, what I'm doing. The hole for the lamp was painted and then prgressively filled with layers of Testors Clear Parts Cement until the lens was flush. The hole, as you know, is fairly deep and I had to make up for the shrinkage of the glue by applying several dabs after each prvious layer had set.

Vic, I did not use heat in this bending process. First off, the card I used here was quite thin. My calipers make it out to be .25mm or so. The tight curvature was done around a Q-Tip shaft and the rest with my X-Acto knife shaft. I did not have any problem with cracking but the problem I did have was that I decided to reinforce the bottom panel by gluing srtips between the stiffener frames inside the tank with Tamiya extra-thin cement. This ended up buckling the plate slightly and I had to fill some areas although the buckling did simulate dents quite nicely.
 
A few pics of today's work.

A flat coat was applied, the canopy masks were removed, and the fiddley bits were started. When the masks were removed, I noticed that some spray had managed to get into the inside of the cockpit and fogged up the inside of the bubble canopy. This I sanded with 1200 grit, polished with toothpaste and dipped into Future to get the clarity back although the ICM clear parts weren't the best to start with. The pic below shows the model as it currently stands with the prop stuck on and some of the weathering completed. Oily wash was sparingly applied around the engine panels and gas cap and paint chipping was done with a silver artist's pencil. The exhaust stacks were drybrushed with a bit of white but black pastels have yet to be applied for exhaust and gun stains. Note that the pitot tube has been removed from its post. This will be replaced with a piece of sprue that more realistically represents the real thing than the kit part which was much too thick.

110103 Overall.jpg


Here's a close-up of the cockpit hatch. I removed the molded in pry-bar supplied with the kit and made my own from sprue. The ribs and rivets were highlighted with a lightened interior green and the shaded areas received a dark wash to highlight the details.

110103 Cockpit Hatch.jpg


The close-up of the prop below shows the added Rotol docals supplied by ICM with simulated wording that I added with a black pen.

110103 Prop.jpg


That's it for now. Thanks for looking in.
 
Last edited:
Looking great Andy ! I noticed the pitot in my kit being a bit heavy overall, I think I might scratch-build the whole lot. I also thought that the cockpit hatch moulded onto the fuselage was better defined than the separate one, especially the crow bar. Problem is, once removed, it's a bit too narrow to use in the open position.
BTW, the yellow discs on the prop are datum marks - the Rotol logo was a blue winged badge, with a shield in the centre, with the word 'Rotol' inside it, but mostly either wasn't applied, or too dull or worn to be seen.
 
Thanks Glenn and Terry. Terry, thanks also for clarifying the discs. I've seen pictures of restorations with the yellow discs with hand written data in them that also had the Rotol symbol which appears to be a dull blue or gray and almost invisible. I therefore left those off but kept the discs which can be seen in the photo in post 1. I mistakingly called these the Rotol symbols and I appreciate your correction.

Terry, if you're not at that point yet, I experienced some of the small parts easily breaking because of the apparently soft plastic used by ICM. The torque links on the landing gear struts were a major fuss to get off the trees and the latest was the canopy mirror post which broke off on me while I cleaned off the flash. I had to make a new one for the latter but it looks more to scale now anyway. Pics tomorrow.
 
Sounds like your decal sheet has the winged Rotol badges - mine only has the yellow discs!
Thanks for the warning re the torque links etc. I've been looking at them, thinking they'll either bend, snap, or go 'Ping' when I try to remove them from the sprue! I'm also undecided about the canopy mirror, as mine should have the round one, which looks a tad large to me - have to see when the time comes, and make a new one if needed.
You probably already have it in hand, but don't forget the IFF post aerial under the starboard wing, and no radio antenna wire from the mast!
 
Nope, I just had the yellow discs as well. I agree the round mirror is a tad large but I put it on anyway. See pic below. I found some left over mirrored sticky foil from an old race car model I did many years ago and made the lens from that.

Thanks for the heads up on the IFF whip - didn't think of that. If possible, I'll need to check if Keltie's rig had it. I have a pic of an early IX that still has the wires from the fuselage roundels to the tip of each tail plane but I was hoping not to do those anyway, nor the wire from the post to the fin.

Edit: Terry, I searched around a bit and feel that this rig probably still had the "cheese cutter" IFF wires. A couple of references state the MkIII IFF was introduced in early 1943. The photo in post 1 was supposedly taken in March 1943 just before the plane was shipped off to become Johnnie Johnson's mount. There's then a picture of Johnson standing in front of the starboard side of EN 398 in which the wire is evident (see detail below) and no IFF post under the wing so I'm going with the IFF wires (-but no radio wire from post to fin).
 

Attachments

  • 110104 Mirror.jpg
    110104 Mirror.jpg
    89.5 KB · Views: 100
  • JEJ Tail Detail.jpg
    JEJ Tail Detail.jpg
    202.7 KB · Views: 101
Last edited:
Thanks for the pic of the mirror Andy. It actually looks OK in place, at least for mine, as photos show it was rather large.
As for the IFF antenna - good one! It's a tricky period to model, as the post aerial was just starting to be fitted at the factory or MU, and was retrofitted later in the field, or in 'deep' servicing. Certainly by mid to late summer '43, the MkIII IFF was in use.
For future reference, if you need to make one for another model, it wasn't a whip aerial, but a tubular, aerofoil section 'post', around 12 to 16 inches long IRRC. (I can get the exact dimensions if you need them.)
 
Small update as the final bits are fiddley and time-consuming:

Shown below is one side of the IFF wire being set in place. Both wires are made from very thinly stretched clear sprue CA-glued into predrilled holes in the fuselage. A slot is cut in each tailplane and the model is held upright in a vice. Then the end of the wire is weighted (with an alligator clip in this case) and maneouvred into the slot. Once it hangs there, a tiny spot of CA is applied to hold the taught wire in place. Once set, it'll be cut.

110107 IFF Wire Attaching.jpg


Below is the modified rudder actuating link which on the original kit was just a solid blob of plastic. The was easily cut away and replaced with sprue.

110107 Rudder Link.jpg


I thought I'd have a bit of fun in trying to replicate the canopy lock, seen here circled as it's so small. It's made with two tiny pieces of card cut into teardrop shaps and glued to a small length of sprue then onto the canopy. Not yet painted in this pic. I'm surprised I didn't lose this.

110107 Canopy Lock.jpg


This one will be finished this weekend and I'll post pics then. Thanks for your interest.
 

Users who are viewing this thread

Back