Navigation
Install the app
How to install the app on iOS
Follow along with the video below to see how to install our site as a web app on your home screen.
Note: This feature may not be available in some browsers.
More options
You are using an out of date browser. It may not display this or other websites correctly.
You should upgrade or use an alternative browser.
You should upgrade or use an alternative browser.
**** DONE: 1/48 ICM Spitfire Mk IX AE-B Ian Keltie of 402 SQDN RCAF Commonwealth GB
- Thread starter Crimea_River
- Start date
Ad: This forum contains affiliate links to products on Amazon and eBay. More information in Terms and rules
More options
Who Replied?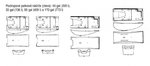
- Thread starter
- #182
Crimea_River
Marshal
Thanks everyone.
Got your e-mail Terry, thanks. Karl, that's a gem! Now I have to decide which of the two apparent 30gal tanks is the right one. Pics on the net and in books that I've studied have shown some with very pronounced rivets and some (most) without.
Got your e-mail Terry, thanks. Karl, that's a gem! Now I have to decide which of the two apparent 30gal tanks is the right one. Pics on the net and in books that I've studied have shown some with very pronounced rivets and some (most) without.
Airframes
Benevolens Magister
Great drawings Karl!
Andy, most were without, as they were refined eventually, as a pressing for the outer form, and IIRC, also as a fibre shell. (would need to check details on the latter, but not important, just makes it easier to model).
Andy, most were without, as they were refined eventually, as a pressing for the outer form, and IIRC, also as a fibre shell. (would need to check details on the latter, but not important, just makes it easier to model).
Vic Balshaw
Major General
I'm with Andy on this one Karl, it's a gem of a find, you must have a good library or have access to some good data on the net.
- Thread starter
- #185
Crimea_River
Marshal
Here's some more progress over the last couple of days:
First off, the landing gear details were completed. The eye-lugs on the struts were drilled out and the brake lines were added. Otherwise, the parts are straight from the kit. Before gluing the tires on, I'll flatten them with a file and then, with the struts glued into the wells and the wheels still wet with glue, I'll stand the model onto the flat spots and allow the glue to set with the wheels in the correct position.

Next, before applying the decals to the topside, I masked and painted the exhaust stacks with a basic colour of brown mixed with a touch of red. Heat and exhaust stains will be added later.

Next is a close-up of the nose with the "Popeye" emblem and the maple leaf commonly applied to all Canadian squadron aircraft. I mistakingly said earlier these decals were Aeromaster but, in fact, they are Eagle Cals. They did a fine job on Popeye but the maple leaf was not centered in the white circle. This forced me to carefully trim the circle so that the leaf appeared more centered.

Finally, here's the overall model with all the decals now on and another coat of Future applied and curing. Note that the outer machine guns on Kelite's plane were removed, hence the single patch over the gun opening outboard of the cannon.

While the Future is curing, I've started on scratch-building the 30 gal slipper tank, thanks to input from Terry and Karl's great scale drawing above. Pics on this likely tomorrow.
Thanks for all your help and comments so far. Getting close to finishing this one and then it's back to the Uhu.
First off, the landing gear details were completed. The eye-lugs on the struts were drilled out and the brake lines were added. Otherwise, the parts are straight from the kit. Before gluing the tires on, I'll flatten them with a file and then, with the struts glued into the wells and the wheels still wet with glue, I'll stand the model onto the flat spots and allow the glue to set with the wheels in the correct position.
Next, before applying the decals to the topside, I masked and painted the exhaust stacks with a basic colour of brown mixed with a touch of red. Heat and exhaust stains will be added later.
Next is a close-up of the nose with the "Popeye" emblem and the maple leaf commonly applied to all Canadian squadron aircraft. I mistakingly said earlier these decals were Aeromaster but, in fact, they are Eagle Cals. They did a fine job on Popeye but the maple leaf was not centered in the white circle. This forced me to carefully trim the circle so that the leaf appeared more centered.
Finally, here's the overall model with all the decals now on and another coat of Future applied and curing. Note that the outer machine guns on Kelite's plane were removed, hence the single patch over the gun opening outboard of the cannon.
While the Future is curing, I've started on scratch-building the 30 gal slipper tank, thanks to input from Terry and Karl's great scale drawing above. Pics on this likely tomorrow.
Thanks for all your help and comments so far. Getting close to finishing this one and then it's back to the Uhu.
Airframes
Benevolens Magister
Great work, and it's looking the biz Andy ! Glad I've seen the wheels painted,as I was doubtful about their appearance at first, and can't find any of the correct pattern. But they look fine painted, so I can relax !
Just been drilling-out the up locks on my gear legs, and also found I can use a prop from the spares box, with the kit spinner and back plate - saves some re-shaping and sanding of the kit blades.
Just been drilling-out the up locks on my gear legs, and also found I can use a prop from the spares box, with the kit spinner and back plate - saves some re-shaping and sanding of the kit blades.
- Thread starter
- #187
Crimea_River
Marshal
Thanks Terry. Yes, there was plenty of work shaping one prop blade so I'd hate to be looking at 4.
Night Fighter Nut
Master Sergeant
You've done a marvelous job on this Andy. That is a sweet looking plane. ")
Agree with Bill....Sweet!
looks great Andy
- Thread starter
- #192
Crimea_River
Marshal
Thanks guys. I really appreciate your comments.
As promised, here is the first part of a sequence of shots showing the 30 gallon slipper tank being scratch built. First off, using Karl's excellent find, I photoshopped the file to eliminate all but the 30 gal and 90 gal slipper tanks, then scaled the file up so that the 90 gal tank fit exactly the one provided with the kit. (By the way, if anyone wants a copy of the scale 1/48 file, PM me and I'll e-mail it to you.)

Next, using the printed file to cut a template of the sidewall, I cut the sidewalls and internal braces out of plastic card:

Next, the pieces were glued together using CA glue, making sure that the braces were perpendicular to the sides using the grid on my cutting mat:

Next, the bottom plate was formed by rolling thin card around different sized cylindrical objects I had at hand. This was checked against the drawing for shape.

The bottom plate was then glued to the sides and frame, starting form the center and working out.

The next sequence of shots will show completion of the tank. Thanks again for your kind comments.
As promised, here is the first part of a sequence of shots showing the 30 gallon slipper tank being scratch built. First off, using Karl's excellent find, I photoshopped the file to eliminate all but the 30 gal and 90 gal slipper tanks, then scaled the file up so that the 90 gal tank fit exactly the one provided with the kit. (By the way, if anyone wants a copy of the scale 1/48 file, PM me and I'll e-mail it to you.)
Next, using the printed file to cut a template of the sidewall, I cut the sidewalls and internal braces out of plastic card:
Next, the pieces were glued together using CA glue, making sure that the braces were perpendicular to the sides using the grid on my cutting mat:
Next, the bottom plate was formed by rolling thin card around different sized cylindrical objects I had at hand. This was checked against the drawing for shape.
The bottom plate was then glued to the sides and frame, starting form the center and working out.
The next sequence of shots will show completion of the tank. Thanks again for your kind comments.
Aaron Brooks Wolters
Brigadier General
Superb work Andy!! You are doing a stupendous job!
 The slipper tank is looking very good.
The slipper tank is looking very good.- Thread starter
- #195
Crimea_River
Marshal
Thanks Wojtek, Aaron.
Here is the rest of the sequence, having finished the tank today:
The tank bottom is now on and reinforced with some thickening panels on the inside. A center was marked and the cutout for the carb intake was marked and started. Some filler was needed as the reinforcing that was glued on the inside warped the bottom plate a bit. It's not yet sanded in this pic.

With the cutout completed, a couple of plugs were added from sprue and the blister on the bottom was made using a dab of carpenter's glue. This stuff tends to shrink so a couple of additional dabs were needed to keep it the right shape.

A coat of primer revealed a few areas to fix. The aforementioned dimple on the blister can be seen and the plugs need to be cleaned up. The primer dusted a bit here but no problem.

Next, the cleaned up tank was trial fitted and the location of the two hooks was marked and the attachment points cut from card and CA-glued in place. Thanks to Terry's reference, I got a detail of these hooks from which to work, tiny though as they are. Their purpose was to deflect the tank away from the fuselage when it was jettisoned.

The next pic shows the hooks glued to the attachment points. Pain in the a$$! Why does one's work always stick better to tweezers than to the place that you're trying to attach small pieces? After about a half hour, I got these glued on and dabbed some accelerator on them before they collapsed. As I was doing this, I was building up the light lens with Testors Clear Parts Cement. This requires several dabs before the lens will be flush.

Next, the underside of the model got the oily wash treatment, as did the tank, and the runs were streaked back with my airbrush blowing at full blast. After the stains wre applied to the model underside, I glued the tank on and the next two pics show a front and rear view with the completed hooks.


Thanks for your continued interest and comments. Next comes a flat coat and the fiddley bits and we're done!
Here is the rest of the sequence, having finished the tank today:
The tank bottom is now on and reinforced with some thickening panels on the inside. A center was marked and the cutout for the carb intake was marked and started. Some filler was needed as the reinforcing that was glued on the inside warped the bottom plate a bit. It's not yet sanded in this pic.
With the cutout completed, a couple of plugs were added from sprue and the blister on the bottom was made using a dab of carpenter's glue. This stuff tends to shrink so a couple of additional dabs were needed to keep it the right shape.
A coat of primer revealed a few areas to fix. The aforementioned dimple on the blister can be seen and the plugs need to be cleaned up. The primer dusted a bit here but no problem.
Next, the cleaned up tank was trial fitted and the location of the two hooks was marked and the attachment points cut from card and CA-glued in place. Thanks to Terry's reference, I got a detail of these hooks from which to work, tiny though as they are. Their purpose was to deflect the tank away from the fuselage when it was jettisoned.
The next pic shows the hooks glued to the attachment points. Pain in the a$$! Why does one's work always stick better to tweezers than to the place that you're trying to attach small pieces? After about a half hour, I got these glued on and dabbed some accelerator on them before they collapsed. As I was doing this, I was building up the light lens with Testors Clear Parts Cement. This requires several dabs before the lens will be flush.
Next, the underside of the model got the oily wash treatment, as did the tank, and the runs were streaked back with my airbrush blowing at full blast. After the stains wre applied to the model underside, I glued the tank on and the next two pics show a front and rear view with the completed hooks.
Thanks for your continued interest and comments. Next comes a flat coat and the fiddley bits and we're done!
Last edited:
Airframes
Benevolens Magister
Lovely work Andy, really looks the biz!
As I mentioned in one of Bill's thread s(NFN), instead of b*ggering about with small lamp lenses, use Micro Kristal Kleer, or even PVA, applied after painting the model, and after colouring the lamp(s) - saves a lot of hassle, and it's quick, easy and clean.
As I mentioned in one of Bill's thread s(NFN), instead of b*ggering about with small lamp lenses, use Micro Kristal Kleer, or even PVA, applied after painting the model, and after colouring the lamp(s) - saves a lot of hassle, and it's quick, easy and clean.
Vic Balshaw
Major General
Andy, this is unbelievable stuff, the Spit's looking great and the step by step detail on the slipper tank is great, I'm sure an number of folks will be wanting to save that page mark that. Question though, like you I have been rolling and heat bending plastic card but on a number of occasions, when glued it would split. Do you ever come across this problem.
Top stuff andy, done a great scratch build on the tank mate!
Andy, that is fantastic work, the tank looks very authentic
Users who are viewing this thread
Total: 1 (members: 0, guests: 1)