Sweet!
Navigation
Install the app
How to install the app on iOS
Follow along with the video below to see how to install our site as a web app on your home screen.
Note: This feature may not be available in some browsers.
More options
You are using an out of date browser. It may not display this or other websites correctly.
You should upgrade or use an alternative browser.
You should upgrade or use an alternative browser.
**** DONE: 1/48 ICM Spitfire Mk IX AE-B Ian Keltie of 402 SQDN RCAF Commonwealth GB
- Thread starter Crimea_River
- Start date
Ad: This forum contains affiliate links to products on Amazon and eBay. More information in Terms and rules
More options
Who Replied?Aaron Brooks Wolters
Brigadier General
Kudos on the sight Andy. That looks excellent. This will be a very sharp bird when done. 


- Thread starter
- #143
Crimea_River
Marshal
Thanks Aaron. Let's hope so.
I took a break tonight. Nursing a bit of flu.
I took a break tonight. Nursing a bit of flu.
tigerdriver
Staff Sergeant
reat work looking really nice, love the gun sight
Night Fighter Nut
Master Sergeant
This is coming along really well Andy. I really like the job your doing on your plane. 
T Bolt
Colonel
Excellent work Andy. what you did to the gun sight id wonderful. I'll have to remember that. In my BoB build Spit I just filed the glass thinner, then polished it. Your method worked much better.
- Thread starter
- #148
Crimea_River
Marshal
Thanks Glenn. It was fiddly work making the supports from plastic card but the result was worth it. I was a bit lucky it came out well the first try. Often these things go south on me and I have to give it several tries.
- Thread starter
- #149
Crimea_River
Marshal
Terry's catching up to me so I had to hurry up!
The past few days have been concentrating mostly on continued sanding and touch-ups here and there. I also worked on the prop and got the painting started. On to the details:
First we have the results of some ongoing work around the canopy. Both left and right sides are shown. A bit of an improvement since last time but still not quite good enough on the right side. I'm OK with the left. I added a few rivets since last time.


Next, I mentioned earlier that I had bought a resin spinner and prop blades. While drying the blades, which are extremely thin, I got the towel caught on one of the them and broke the tip off. After 3 attempts at CA glue, and another 2 with different epoxies, I decides to chuck the one resin blade and replace it with one modified from the kit. At left below is the broken blade and you can just see the broken tip out of focus. The piece on the right is an unmodified kit blade and the one in the center is the one I modified. You can see quite a difference between the kit blade, which are kinda chunky, and the resin one.

The next picture shows the blades attached to the spinner, which has now received its coat of Sky. Hard to tell the modified blade (pointing away from camera) from the resin ones.

Next, I wanted to install the slipper tank as almost all the period pics I've seen of Canadian spits have the tanks. Unfortunately, the one supplied with the kit is poorly done as the notch that receives the carb air intake duct is much too large. I set about modifying the notch and then it occurred to me that the tank is also the much larger 90 gal tank whereas every one I've seen in the period photos are the 30 gallon tanks. So I ended up not finishing the tank and am mulling over whether to shorten the kit one (not as easy as it sounds), make one from scratch, or leave it off all together.

Having moved on from the tank, I started to paint the Sky fuselage band and yellow wing edges.

After allowing the paint to dry overnight, I masked the band and yellow wing edges and proceeded to paint the undersides. The result shown below is after a few attempts at achieving the patchy effect I was looking for. The first coat of grey (Pollyscale Br. Ocean Grey) came out too dark so I lightened it with white. For the next step, I tried to post shade some of the panel lines with a darker grey using my new Iwata HP-C airbrush (thanks Santa!) but it didn't go so well. So I whipped out my old Paasche and, mixing a bit more white into the grey, I went over the post-shaded panel lines, dulling them down significantly, then also continued to highlight panel centers and high points to complete the effect shown below, which I'm pretty happy with.

That's how she looks as of today. More work tomorrow. Thanks for looking in.
The past few days have been concentrating mostly on continued sanding and touch-ups here and there. I also worked on the prop and got the painting started. On to the details:
First we have the results of some ongoing work around the canopy. Both left and right sides are shown. A bit of an improvement since last time but still not quite good enough on the right side. I'm OK with the left. I added a few rivets since last time.
Next, I mentioned earlier that I had bought a resin spinner and prop blades. While drying the blades, which are extremely thin, I got the towel caught on one of the them and broke the tip off. After 3 attempts at CA glue, and another 2 with different epoxies, I decides to chuck the one resin blade and replace it with one modified from the kit. At left below is the broken blade and you can just see the broken tip out of focus. The piece on the right is an unmodified kit blade and the one in the center is the one I modified. You can see quite a difference between the kit blade, which are kinda chunky, and the resin one.
The next picture shows the blades attached to the spinner, which has now received its coat of Sky. Hard to tell the modified blade (pointing away from camera) from the resin ones.
Next, I wanted to install the slipper tank as almost all the period pics I've seen of Canadian spits have the tanks. Unfortunately, the one supplied with the kit is poorly done as the notch that receives the carb air intake duct is much too large. I set about modifying the notch and then it occurred to me that the tank is also the much larger 90 gal tank whereas every one I've seen in the period photos are the 30 gallon tanks. So I ended up not finishing the tank and am mulling over whether to shorten the kit one (not as easy as it sounds), make one from scratch, or leave it off all together.
Having moved on from the tank, I started to paint the Sky fuselage band and yellow wing edges.
After allowing the paint to dry overnight, I masked the band and yellow wing edges and proceeded to paint the undersides. The result shown below is after a few attempts at achieving the patchy effect I was looking for. The first coat of grey (Pollyscale Br. Ocean Grey) came out too dark so I lightened it with white. For the next step, I tried to post shade some of the panel lines with a darker grey using my new Iwata HP-C airbrush (thanks Santa!) but it didn't go so well. So I whipped out my old Paasche and, mixing a bit more white into the grey, I went over the post-shaded panel lines, dulling them down significantly, then also continued to highlight panel centers and high points to complete the effect shown below, which I'm pretty happy with.
That's how she looks as of today. More work tomorrow. Thanks for looking in.
Aaron Brooks Wolters
Brigadier General
Wow, you guys have a lot more knowledge on this stuff than I do. This is amazing to me. Thank you for the school CR.
Vic Balshaw
Major General
What Aaron said, you knowledge and observation leave me scratching my head in wonder. Nicely done to Andy, I can just make out the subtle shading on the stbd wing.
Lookin' real good Andy!
Airframes
Benevolens Magister
Nice work Andy. from what I've seen, the 'slipper' tank is designed for use when the lower cowling with the 'Aero Vee' combined intake/filter is fitted, on the late MkIX and MkVIII, hence the larger 'notch' in the front. I've got a spare tank from an old Otaki kit, which I think is the smaller version. I'll have a look and compare with the ICM tank, and it's yours if you want it. However, even though you've seen a lot of photos with the tank in place, AFAIK, they were only fitted for (relatively) long-range escort missions, although I have at least one pic showing rows of them stacked-up at dispersal, in Holland I believe.
- Thread starter
- #154
Crimea_River
Marshal
Thanks guys.
Vic, "subtle" is exactly what I was going for. I find a lot of weathering overdone and try to find a balance between factory fresh and battle weary unless specific evidence points to severely weathered finishes.
Terry, thanks but I may have a go at scratch building the tank if I install it at all. Seems easy enough and saves you postage. There's a close up in Bracken's book of the "Popeye" on Keltie's rig and the 30 gal tank is definitely on it as it is in many other shots in the same book.
Airframes
Benevolens Magister
No probs mate. I'm fairly sure I have some works drawings of the tank(s), possibly with dimensions. I'll see what I've got and e-mail them to you, and there's some pics on the CD I sent which show the deflector lugs (not the mounting points as some people think), fore and aft of the tank, which were to ensure it fell clear when jettisoned. Bet they made a dent when they landed !!
- Thread starter
- #156
Crimea_River
Marshal
Yes, I saw those details Terry, thanks. If you have drawings of the tank that would be great, although not essential as they seem to be fairly simple in section.
T Bolt
Colonel
Great work on the prop blade Andy. Can't tell the deference.
- Thread starter
- #158
Crimea_River
Marshal
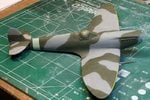
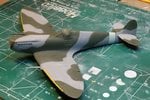
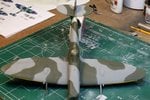
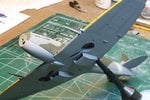
Herewith the results of some 5 hours of upper side camo painting over two days. The Sea Grey has been lightened to reproduce the apparent lighter grey evident on this and other Spit IX pics I've seen which show a very high contrast betweent the green and grey (see photo in post 1). There has been some debate on this topic in periodicals and on some web sites and, debates aside, I'm happy with the way the colours came out.
What I was less happy about was how my Pollyscale Acrylic Dark Green behaved in my new Iwata HP airbrush. I bought this brush for fine detail work as it has a pretty small valve which I found clogged repeatedly and refused to paint a fine line with this paint, despite many attempts at different ratios of water/paint, Windex/paint and drops of retarder. I wanted to get a nice, tight, soft edge along the green/grey interface which I did finally achieve after long hours of freehand painting, although the edge is still softer than I would have liked. This morning, I went back to my Paasche VL and touched up the grey areas and the pics below show the final results. Although a bit patchy, the finish should even out a bit with a clear coat and then dullcoat following decal application. The patchiness is conducive to the subtle weathering I plan to do anyway.
The masks were removed and a few areas will need to be touched up (not yet done in these pics) but no major catastrophies. Overall, I'm, 75% happy with the result (still learning the finer points of airbrushing) and I'll probably be mroe satisfied once the decals are on.
Thanks for looking in. Next will be some detail finishing on the prop and finishing off the landing gear.
Attachments
ozhawk40
Master Sergeant
Great job with the camo Andy, well done.
Cheers
Peter
Cheers
Peter
Vic Balshaw
Major General
Got to give it to you Andy, that's looking real sweet.
Users who are viewing this thread
Total: 1 (members: 0, guests: 1)


