**** DONE: 1/72 Aichi M6A1 Seiran - Seaplanes / Floatplanes of WWII

Ad: This forum contains affiliate links to products on Amazon and eBay. More information in Terms and rules

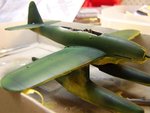
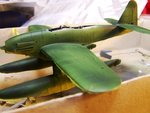
quick update guys. Have started the painting and masking process of the main body of the aircraft. Ive applied the Light grey to the underside, and have nearly finished the masking up of that element. Should be able to apply the green to the upper surfaces. Still trying to perfect the colour. its tricky. Also trying to master the patchy effect that Aviatik used on his 1/32 George. not at all easy....I may just have to settle for something less at this stage, but Ill keep trying until the end. Should have some good pictures soon fingers crossed.

Panel lines on the light coloured underside came through, but are a little faint. I suppose these effects are meant to be subtle....
 
well this is my attempt at a IJN late war green finish. im not sure i like it or not. Have i captured that patchy finish effect or just applied a very bad paint job..... would appreciate some genuine feedback guys. i obviously have some touching up around the cockpit tub to do....thats not really the issue....its whether this deliberately patchy finish is accurate or not.
colour wise, this is a mix of XF11 and 27, thinned right down as far as i can go. ive applied this with light curving strokes. Panel lines effects are clearly visible and im happy with that.....
 

Attachments

  • 102_2985.jpg
    102_2985.jpg
    79.9 KB · Views: 204
  • 102_2986.jpg
    102_2986.jpg
    63.2 KB · Views: 129
  • 102_2988.jpg
    102_2988.jpg
    67 KB · Views: 111
  • 102_2989.jpg
    102_2989.jpg
    78.2 KB · Views: 130
Lightly overspray the Lighter Green areas with your thinned mix, the Darker green is pretty good the lighter green is too light and bright, this needs to be blended more toward the darker green.

Bear in mind Michael the Seiran was a late war aircraft and would not have really had the time to have large areas of the surface fade or change too much from the overall colour application, I do applaud your efforts in trying the effect though.

Found my colour pic of a Seiran sure it's somewhere on the net too, where I got it from, you can see the Dark overall Green colour.

Image Source: The Internet
 

Attachments

  • Aichi M6A1_Seiran_a.jpg
    Aichi M6A1_Seiran_a.jpg
    110.3 KB · Views: 154
thanks wayne. i wish id known about that colour photo before.....the black green you mentioned is probably the correct colour to apply, though I suspect the colouration of that photo is not entirely faithful to the real colour. Early colour photos often dont give a completely faithful rendition of the actual colour, though I now know that my version of the colour is not correct either.

I also notice that floats are not finished as the kit shows them to be finished. All of the floats are finished in the IJN Green, except the chine areas, which have an almost orange look. I suspect the orange is rust, but it might be something else again.

Not all the Seirans were all that new. The first of eight prototype Seirans was completed in October 1943, commencing flight testing in November that year.

The first production examples of the Seiran were completed in October 1944. Deliveries were slowed by an earthquake near Nagoya on 7 December 1944, and by an American air-raid on 12 March 1945. Construction of the STo submarines was stopped in March 1945, after two submarine aircraft carriers had been completed and a third finished as a fuel tanker. These were supplemented by two smaller Type AM submarines, originally designed as command submarines carrying reconnaissance floatplanes, but capable of carrying two Seirans. Owing to the reduced carrier submarine force, production of the Seiran was halted at around that time as well, with a total of 28 completed (including the prototypes and the M6A1-Ks). Most of the Seirans that reached squadron service dated back to 1944

Ill go back and give a light respray as suggested
 
an update guys, but no pics. . ive slightly darkened the colour and resprayed, for a more even all over finish. Much closer to the photo wayne supplied/ i think its better but the rectification was not without some drama. Whilst spraying I accidentally dropped a blob of paint on the starboard wing. I quickly removed it,, but i didnt reallise that wet pain can cause the plastic to soften as its beginning it drying process. I reduced the panel lines where I made the blot. im not going to risk re=doing the panel lines where ive buggered it up. its not very visible, and risks are just too great .

Ive also completed the masking of the main canopy. That part went well. Ive touched up around the cockpit area. all good. The canopy comes in two parts, i might fit one piece and spary the clear glass framing on the model , and then do the smaller front screen. Should have a better chance of covering any glue overruns.

I was finally putting together the prop assembly when i had a minor disaster. The prop has a backing disk, onto which the propo is glued, and then there is a sheath that is glued in front of that, and then finally the spinner. pretty easy except all the shaft holes have to line up perfectly for the prop to spin true. Okay. but whilt i was putting this all together, i managed to lose the backing plate. Dumbass i am. ive manged to fabricate a replacement but its not as good as the original. Wont be visible, but necessarily its not quirte as snug a fit as the kit piece. i absolutly hate it when i lose bits of the kit like that....it just fell off the bench to be devoured by the carpet monster.

According to the Kit instructions, im supposed to finish the whole prop assembly in XF 9, which is a reddish brown colour. Everything is supposed to be painted in that colour. but the photo shows the spinner to be finished in IJN green whilst the prop loos almost grey. I might have a look at the colour images of the restored example at the Smithsonian and see what they come up with.

a
 
well here are some photos. looks like tamiya may have gotten that bit wrong....
 

Attachments

  • Image3.bmp
    745.4 KB · Views: 123
  • Box Art.bmp
    817.8 KB · Views: 106
  • Image1.bmp
    928.4 KB · Views: 109
  • Image2.bmp
    928.4 KB · Views: 113
I know of one photo that seems to show the spinner and prop blades to be the same colour, which is different from the airframe colour, however a colour (above)pic tells no lies...:D
 
I think there could have been variations of the spinner colours. However a book about the plane says the brown was of the spinner and prop.

What do you think about the spinner?

Aichi M6A1 Seiran.jpg


Aichi M6A1 Seiran _1.jpg
 
Last edited:
those B&W photos seem to show the spinner and prop being the same colour. Prop is pretty conclusively red brown, so it follows the spinner may well be red brown as well
 
Yes Michael. But if you have a close up look at the spinner you can notice that the back ring ( band ) of the spinner looks like being a little bit darker than the front one. It may indicate there were two colours on the spinner.


Also have a look at these shots...

Serain.jpg


Seiran_1.jpg


And the one... I'm not sure if the image was B&W and colourized later or was taken as colour one. It seems that the blue paint was just applied because looks very fresh comparing to the rest of "the plane uniform". But this isn't important. Have a look at the enlarged part of the pic. There is a narrow band between the blue coat and the back ring of the spinner undoubtedly being painted with the camo colour. Can you see...? The colour of the narrow band looks the same the prop blades are of.

Serain1.jpg


Serain1a.jpg
 
Last edited:
Oh ... I have forgotten ... it can indicate the front part of the spinner had been of the brown colour before the blue was applied.
 

Users who are viewing this thread

Back