**** DONE: 1/72 De Havilland Sea Venom FAW 53 – Carrier Aircraft GB

Ad: This forum contains affiliate links to products on Amazon and eBay. More information in Terms and rules

Cool, we'll work on this Mike!

Edit post:
Just found this: http://www.pavlamodels.cz/katalogy/detail.php?k=cockpits&c=C72109&styl=styly.css. Designed for the Cyber Hobby kit, but should fit yours with a little modification.
Maybe better for you just to grab this for this build, everything's in there!

If you still do want to get the canopy set anyway, we'll talk further on that.

Evan
 
Last edited:
Cool, we'll work on this Mike!

Edit post:
Just found this: C72109 - product detail. Designed for the Cyber Hobby kit, but should fit yours with a little modification.
Maybe better for you just to grab this for this build, everything's in there!

If you still do want to get the canopy set anyway, we'll talk further on that.

Evan

I have admit, that aftermarket kit is exactly what I am looking for, and if okay, I might see if i can obtain a copy for this build.....yes we can discuss the "job lot" further down the track.

I do have a question, sorry to be a pest. Should I purchase the Airwaves PE cockpit kit, or is that now superfluos to the finish. Airwaves also do a PE for the exterior, which I am not sure I need. Whats your opinion, if I can impose a little further?
 
No worries mate, I'd grab the Pavla set if I were you too! Got all you need in there. (Canopy isn't needed urgently, so it can wait!)

Re the Airwaves PE: personally I'd forget the interior set in light of the Pavla set. I've used the Airwaves set for the Hampden and to be honest it is extremely inaccurate (though maybe their Venom set is better, haven't seen it personally)
Likewise haven't seen their exterior set, so I would advise comparing reference photos of the set and the real aircraft and deciding from there.

If you want improved wheels and jet pipes, Pavla do a couple of sets for early and late model Vampires, one of these should be ideal for the Sea Venom aswell:

U72-127 - product detail
U72-128 - product detail


Cheers, and you're not imposing at all - glad to be able to help! :)
Evan
 
I think to do the aftermarket interior justice i will have to master drybrushing. Have been studying the net a bit to try and learn.

Anyways will look at the tail pies and other bits to see if they are needed, and thanks for the heads up re the airwaves kits.
 
A related but different question. These dry brushing notes I am reading say that to achieve the glassy effect of the dials in the cockpit, I should apply "Futures" floor polish . All good, but Futures is not available in Oz. Do any of the Aussie old hands know what is the equivalent in Australia. I am led to believe that Pledge floor polish is the Australian equivalent.

If not, any ideas on where and how I can get my hands on this stuff? If not......what is the best method of getting a gloss effect over the dials for the cockpit dash?

Edit: I did find this article on the net. Really the only products that appear the same are the two "Pledge" floor waxes

Is these article any good?

http://www.swannysmodels.com/TheCompleteFuture.html

Here are a couple of articles on Drybrushing techniques that I found. Does anyone have any tricks they would like to share?

http://www.scalemodelguide.com/guide/painting/Drybrushing-1/

http://www.scalemodelguide.com/guide/painting/Drybrushing-1/
 
Last edited:
I've never lived anywhere where it was available either Mike, and can't find a useful equivalent. Have tried the recommended parkett polishes, but so far without success.
Can't get pledge here either unfortunately, so don't know how good it is.

My process for instruments: Paint the whole dash White, panel colour and black for dials afterwards, dial ring colours if any, then scratch the instrument bevels with a sharp needle.
For recessed instruments, the glass effect can be achieved by adding a drop of PVA (white woodworking glue) - spreads and fills the recess and dries clear.
For raised instrument faces, a small drop of Humbrol 35 Clear carefully applied with a brush or toothpick does the trick.


Haven't read those guides yet, but my advice re drybushing: subtle is better than overboard! A too subtle wash will just look clean, a too heavy wash can turn a cockpit into an oil pit!
 
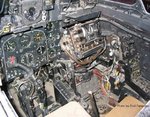
A photo of the cockpit interior is attached. My reading of that image is that the dash is finished in an overal very dark grey. The dials are a bit faded, but my best guess is that the dial faces would have been closer to a true black than the surrounds. Then of course there is the white dial markings, and a clear glass face over the dial face.

The Pavla kit I have purchased appears to have recessed rather than raised gauges.

I think I will attempt this task by applying a white base coat aound the dial faces as you say. Next I will apply an overall dark RN matt Grey (which is somewhat darker than our RAN grey) to the dash areas other than the gauges. I may even add a few parts of black added to make it even darker. I will apply a pure black coat to the dial faces, possibly as a gloss finish. The dials will only take a dab by a small pointed high quality brush. Next i will use Evans idea of using a needle to scratch some small dial markings, revealing the white undersurface (thats going to be a the hard bit for sure). Lastly I will use a clear finish applied by brush point onto the dial surfaces to get the glass effect.

Great theory. Now to see if I can put it into practice. I will have to wait a wek or 10 days now whilst the cockpit arrives.
 

Attachments

  • ADF Cockpit.jpg
    ADF Cockpit.jpg
    83 KB · Views: 238
Looking forward to it mate.

Good call with the dash IMO.
A thin wash of a very dark grey will bring out the panel line details where they join, and a VERY careful (minimal) drybrushing of Gloss Alumium (or even very light Grey) to overhanging panel edges and raised switches (etc) will give them a metal effect, like in the pic you posted.
 
If the IP isn't very detailed I also do the "needle scratch", but if it has fine details I use colored pencils, silver, white and red are the most used. Future works but so does white glue for the glass dial covers, equally well as far as I have discovered.
But the most importaint thing on my bench is the magnifying glass!
 
here are the results of some testing i did on a fury IP I have, and have not yet built. basically I put a black background down, then white dots on the gauge faces, and finally a dry brush coaat of 'smole', a tamiya semi transprent coat that tended to "tidy up the whit dots.

at 1/72 i find it very hard to get much detail on the cockpit details. Thise white dots you see are the size of a pin point. im opening the discussion up for advice here, so please be honest....i want to learn the skill at this point. I would very much like to hear your knowledge so that i can improve the technique....
 

Attachments

  • 000_0365[1].jpg
    000_0365[1].jpg
    52.4 KB · Views: 109
  • 000_0366[1].jpg
    000_0366[1].jpg
    45.1 KB · Views: 114
Used to do it that way myself, but changed to the method I described as I found it better. Wanted to post pics to show you some of mine but the camera had other ideas....

Still looks the part though, the effect will be there.
 
I know that it looks rougher than i would like, but i am hoping I can improve the crispness and/or regularity of the white dots. The IP looks okay without magnification of the image, but it perturbs me that the the piece is so rough.

The problem that i see with those images is that the "white dots" are not regular. they are allover the place. I was wondering if i used something called a fine tipped white paint pen, if i would not get a more regular shaped white dot? My opinion is that if i can make those "gauge' dots more regular, the overall effect will be better
 
Add a bit more of the white use the tip of a pin or tooth pick, then you could dry brush the black over the raised detail to get a more uniform appearance of the white.
 
Thanks for the advices guys. i went back and tried a different technique to see if i could do any better. i applied a thiinned down white coat as a wash over the entire panel, and then wiped the excess (ie the white bits that werent in the gauge depressions) off the panel. I then applied firstly a black dry brush to restore the black back panel, and finally a smoke dry brush top coat. Im fairly pleased with the result, but welcome any comments, as im trying to learn a new skill here

Even though the IP looks a little rough, this really is not visible when there is no magnification. I am happy because im getting regulr shape for the white gauges....they look pretty good at normal viewing
 

Attachments

  • 000_0371[1].jpg
    000_0371[1].jpg
    59.2 KB · Views: 108
  • 000_0372[1].jpg
    000_0372[1].jpg
    49.6 KB · Views: 106
Last edited:
Yep, with Andy on that! Looks good to me too.

I know excatly your feelings re the close ups though - I also work 1:72.
Painting looks good with the Mk.1 eyeball or even under the magnifying glass, then take a pic and "WT...???!!!"
 
Looks good enough to me. I think that, even in 1/72nd scale, the 'scratch-off' method might be easier, and give more consistent results. I rarely do 1/72nd scale, but it worked on the Halifax currently under construction, and that was on to bare panels - no moulded detail to follow.
 

Users who are viewing this thread

Back