Matt308
Glock Perfection
...oh man this is bringing back fond memories. Looking good!
Follow along with the video below to see how to install our site as a web app on your home screen.
Note: This feature may not be available in some browsers.
Ad: This forum contains affiliate links to products on Amazon and eBay. More information in Terms and rules
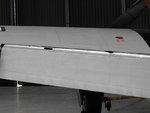
Ah, I can see the pics now! Looking good Dirk. If you add a half-round section to the gap in the front of the flaps (or a section of round rod, set into each flap), once positioned, this should blank out the gap in the wing.


")