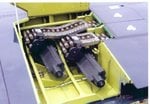
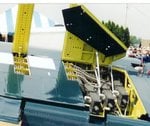
DONE: F4U-1A of Lt. Bill Case of VMF-214, Group Build...

Ad: This forum contains affiliate links to products on Amazon and eBay. More information in Terms and rules

Status
Not open for further replies.
Of course Dan, if you want to go the 'aftermarket' route, there are gun-bay and other detailing accessories available, I believe from Aires and Eduard. Not the route I'd normally choose, but in this case, the model is rather special, so maybe worth it.
 
I looked through all the after-market suppliers for 1/32 Corsair gun bays in FE and resin. No dice.

Dan, are you trying to smack that Corsair with true-to-your-school scale details? You sound pretty focused on that. I could be wrong but I don't think the F4U-1 Corsairs had a cockpit floor. All they had were the seat rails (troughs). The under-belly of the airplane was exposed in those birds. You didn't want to drop your cigarette lighter. I believe the floors came in with the F4U-4's. That much I remember from reading Boone Guyton's book Whistling Death. That book has a wealth of information on the Corsair from day one on to the FG series. There are lot's of illustrations as well. I think it's still available through on-line book sellers. You're building this one as a tribute to your grandfather and that is an admirable effort. Just thought you'd like to know before you closed that bird up and discovered later.
 
Seems like there are some good gun bay accessories in 1/48th scale, but I've only found one for 1/32nd scale, from Verlinden Productions. Don't know whether you'd be interested though Dan, as it's a Cockpit and Gun improvement set, in resin. The Verlinden part niumber is #20, at a price of $19.95. As the name suggests, the major part of the kit is the cockpit update, for the F4U-4, and what appears to be detailing for the guns, feed chutes and ammo bays. The pic on the Verlinden web-site doesn't show any gun bay hatch covers, and it isn't that clear or sharp either, but it's designed specifically for the Trumpeter kit. See what you think at verlindenonline.com
 
Thanks Terry......

Yea Sweb, I know about the cockpit floor, which is why I painted it black, to kind of help it disapeer once its closed up... Not much I can do bout it cept buy a cockpit set, and I dont have the $$$ for those extras right now....

20 beans for the gunbay set is alittle steep... When I get some spare time Ill research around some and see what I can come up with.... I just picked up some zinc chromate yellow, so I can get to some more interior painting...
 
Yeah, don't think I'd invest the equivalent of $20 in a set that would be mostly unused, especially if the gun bay parts are mainly for the gun feeds etc. I'll see if I can find that shot again, as it shows the hatch cover support arms, and the top hatch cover folded back on itself. Looks like there's not too much work to do to get it looking right. If you think those 'flex-feed' parts will help, let me know, and I'll bung 'em on the great silver bird across the pond, with your print and kit!
 
Right Dan. I was able to save the whole page with the pic mentioned, but can't get the bl**dy thing to transfer into any of my editing systems, or even upload the page! So, the address is:- [URL=http://rides.webshots.com/photo204449683004
This pic was taken at Vintage Wings of Canada, and there's another shot on the Vintage Wings own web-site, although the tops of the gun bay covers are not visible in the latter. But, with even the latter and Paul's shot, you'll have enough to show what's what. Phew!
 
Found this there though:

2_corsair5.jpg
 
AH! B*ll*cks!
That's the Vintage Wings web-site shot Cory. The other pic I can't seem to get in any way, is the same aircraft, same angle, but shows the whole bay and the doors. So, to try to find it, the only thing I can suggest is to enter 'Pictures of F4U Corsair gun bay' , and look on the second page (I think!). There's an entry there which will include the name 'webshots', and it's in there. There's a great big advertisement on the right of the screen on the relevant page.
I've got the darned thing saved, but it won't pick up when I go to put it into an editing programme, and can't be found at all if I try to upload to anywhere!
 
Humm well at least its a start. I cant find any better pictures then the ones ive posted. Though I do have the one of the guns open armed with 20mm cannon
 
Duhhh I didnt think of this, try this. I played around with some setting's on my scanner with one of my pictures and came up with this.
 

Attachments

  • Scan0001.jpg
    Scan0001.jpg
    57 KB · Views: 426
Last edited:
Great work Paul! That should do it - with a combination of those pics. There's nothing much more to see, except maybe the end of the support arms that fit inside the bay. But they're just going to be flattened and drilled, with swivel bolts, just like any other similar rod arm. Jobs a goodun!
 
Great work Paul! That should do it - with a combination of those pics. There's nothing much more to see, except maybe the end of the support arms that fit inside the bay. But they're just going to be flattened and drilled, with swivel bolts, just like any other similar rod arm. Jobs a goodun!

Thanks Terry!!!
 
You need to change your user name Paul - maybe GB Tech Support .Com - open 24 hours or by appointment!
Motto = 'Satisfaction guaranteed, if not sod off and find your own extensive library!'
 
Thanks again for the super help....

I cant do much right now, but tomorrow Ill take some pics of what Im dealing with and go through some of my books and see if I can find some actual shots from 43-44 to compare with the modern pics above....

Also, the door on the kit is 2 pieces not one, pics tomorrow...
 
Dan, the door in the pics is two pieces also. Note how the rear (trailing edge) hatch cover is hinged to the main cover, upright in the pic. It's folded back, displaying the upper (outer) surface. When the covers are closed, the smaller (trailing edge part) is hinged back up, and drops into the top of the rear part of the open bay.
The space between the bay and the open ammo access hatch, is also three separate hatch covers, running span-wise, each covering an ammo belt track. These would be removed, independantly if required, as separate, loose pieces.
Try to get some pics of the kit top wing in the hatch area, the parts for the hatch covers, and the parts for the bays, along with the drawing on the instruction sheet (or e-mail them to me) and I'll do a sketch of how the bay, fittings and feeds are constructed, so that you can compare with Paul's and Corey's pics. I can also do suggestion sketches of how to construct door and bay detail etc.
I'll also be able to see if the 'Flexi-Feed' chutes I have will be usable when modified. From what I've seen so far, they will be.
 
Status
Not open for further replies.

Users who are viewing this thread

Back