Nice work Andy!
Navigation
Install the app
How to install the app on iOS
Follow along with the video below to see how to install our site as a web app on your home screen.
Note: This feature may not be available in some browsers.
More options
You are using an out of date browser. It may not display this or other websites correctly.
You should upgrade or use an alternative browser.
You should upgrade or use an alternative browser.
**** DONE: Kittyhawk Mk III James F. "Eddie" Edwards RCAF - Aircraft of the Aces GB. (2 Viewers)
- Thread starter Crimea_River
- Start date
Ad: This forum contains affiliate links to products on Amazon and eBay. More information in Terms and rules
More options
Who Replied?brucejscott
Staff Sergeant
That is looking great Andy. Excellent job on the paint.
Give us more.....")
- Thread starter
- #184
Crimea_River
Marshal
Thanks guys. Patience Wayne. Late night at work last night so nothing done.
- Thread starter
- #185
Crimea_River
Marshal
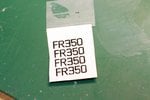
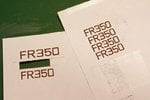
Below are the results of my Photoshop session to create the correct lettering for the FR350 serial number, prints of various trial sizes to cut out and try on the model, and finally, the printed decals which I'll seal and allow to set overnight before applying tomorrow. I always print more than I need as there are always one or two that are not as good as the rest. As you can see, the bottom one has a bit of smudging going on so will be discarded.
Attachments
hub
Senior Airman
They came out really well!
ozhawk40
Master Sergeant
Not bad CR - what type and model printer are you running? Was that a single run through?
Cheers
Peter
Cheers
Peter
- Thread starter
- #188
Crimea_River
Marshal
Thanks guys.
Peter, its a Canon MP560 Inkjet. Single run through at photo setting. However, it's a bit of a dirty print because of an earlier unsuccessful try onto decal paper that I did not realize had a seal coat on it from a previous decal. I'm still learning here and have determined that it's easiest to print a test shot on plain paper, then cut a small piece of clean decal paper and tape it over the test print and run the same paper through again to make the final decal. I should have run a self clean on the printer after the botched decal before printing the good one - another learning but I'm glad I printed 4 number strings. I let the ink dry for a couple of hours and sprayed the sealer on to set overnight. Tonight I'll apply them to the model.
Peter, its a Canon MP560 Inkjet. Single run through at photo setting. However, it's a bit of a dirty print because of an earlier unsuccessful try onto decal paper that I did not realize had a seal coat on it from a previous decal. I'm still learning here and have determined that it's easiest to print a test shot on plain paper, then cut a small piece of clean decal paper and tape it over the test print and run the same paper through again to make the final decal. I should have run a self clean on the printer after the botched decal before printing the good one - another learning but I'm glad I printed 4 number strings. I let the ink dry for a couple of hours and sprayed the sealer on to set overnight. Tonight I'll apply them to the model.
Nice work Andy!
- Thread starter
- #190
Crimea_River
Marshal
Thanks Hugh.
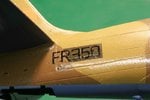
Well I'm moderately happy with the results, although the extreme close-ups are quite unforgiving. It seems the seal coat on the decal was inadequate, resulting in some parts of the decals being unprotected against the water. (Gerry, I think that's waht happened to the ones I made for you). As a result, some parts of the lettering disappeared or smudged and I was loathe to apply decal solution to them for fear of further smudging. There's a bit of silvering as a result but I think I can fix this with some surgical applications of Future onto pinprick holes. There's been a bit of touch up work done using a .5mm artist pen and these appear to be a flat finish and should blend in once another gloss coat is applied. The upside to all this is that a large chunk of each of these decals will be hidden under the squadron codes so I'll accept the few imperfections that have cropped up.
Thanks for the comments and continued interest guys.
Attachments
Last edited:
brucejscott
Staff Sergeant
Andy, I refuse to say anything bad about something I cannot even do. To me it looks great. I'm sure any blotches or smudges you are worried about can be touched up with a brush.
Thats a pretty darn good effort there Andy...nicely done mate!
Airframes
Benevolens Magister
Great stuff Andy. They look OK to me, and are exhibiting the typical effect of decals printed via ink jet. The density isn't really top quality, but, to be honest, once applied and clear coated etc, this can't be noticed, unless some 'Anorak' gets a magnifying glass out and inspects closely!!
- Thread starter
- #194
Crimea_River
Marshal
Thanks guys.
Now comes the hard part and the focus of my weekend work. The HS-B code will be done in one of three ways. The Hasegawa kit sheet contains codes for aircraft DB-H of No 2 SAAF. I therefore have the H and B and the squared off D could actually be made into the square S with careful cutting and repositioning of pieces. The problem is that, although the letters are the right size, the thickness is more than on Eddie's plane so that, if accuracy is to be maintained, I'd have to trim each decal a bit. A sharp, new x-acto blade and steady hand should do the trick although I admit getting this to look good will be a bit of a longshot. Option 2 is printing decals on white paper with a bit of edging done in the background camo colour. I've never done this before and can't see getting the colours exactly right, not to mention find the exact demarcations between the Mid Stone and Dk Earth. Not too keen on this one but it may work if I trim closely. The third option is masking and painting but this would also be very intricate work.
I'll give the 1st option a try (nothing to lose except decals that I wasn't going to use anyway). If anyone has other ideas, I'd love to hear.
T Bolt
Colonel
Looking real good Andy! I love your idea of tapeing a small piece of decal to a test print. I'll be borrowing that idea! Good luck with the codes, sounds like option 1 is a good bet.
- Thread starter
- #197
Crimea_River
Marshal
Thanks Jerry and Glenn. Glenn, I've found this the best way to save on paper and avoid fiddling around with image placement to miss cutouts on the decal sheets.
- Thread starter
- #198
Crimea_River
Marshal
Well, scrap Option 1. Here's the sequence:
I started with the kit-supplied "B", cutting it out and taping it to the cutting mat.


I then securely taped a scribing template over the part I wanted to trim and began tracing the outlines...

...until I got the cuts I wanted.

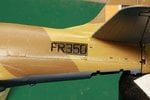
Then it got exciting. The decal came off the sheet beautifully and, when I applied it to the model, 4 things happened in quick succession that convinced me this option won't be pursued any further. First, the decal was a bit too transparent, showing the green patch distinct from the brown camo. Then it became evident that the B was too wide as it entirely obliterated the "3" in "FR2350" unlike the pictures of Eddie's plane. So I quickly sliced the B in half vertically with a sharp x-acto blade, hoping to overlap the halves and thereby narrowing the letter. As I did this, things 3 and 4 happened simultaneously. The sliding of the decal with a wet paint brush revealed that the decal was very brittle and started breaking apart. On top of that, the FR350 decal dissolved a bit, revealing the inadequate seal coat. The below is the unacceptable result.

I will now lightly sand off this set and start again. Luckily I have another FR350 decal which has now received a coat of Future to seal it better. The one that was applied on the port side also got a better seal coat. I will now try to print the HS-B code outlines on a sheet of white decal paper with a slightly yellow tinge and a darker outline, which I'll use as a cutting guide and see how that goes. If that doesn't work, I will mask and paint the codes.
I started with the kit-supplied "B", cutting it out and taping it to the cutting mat.
I then securely taped a scribing template over the part I wanted to trim and began tracing the outlines...
...until I got the cuts I wanted.
Then it got exciting. The decal came off the sheet beautifully and, when I applied it to the model, 4 things happened in quick succession that convinced me this option won't be pursued any further. First, the decal was a bit too transparent, showing the green patch distinct from the brown camo. Then it became evident that the B was too wide as it entirely obliterated the "3" in "FR2350" unlike the pictures of Eddie's plane. So I quickly sliced the B in half vertically with a sharp x-acto blade, hoping to overlap the halves and thereby narrowing the letter. As I did this, things 3 and 4 happened simultaneously. The sliding of the decal with a wet paint brush revealed that the decal was very brittle and started breaking apart. On top of that, the FR350 decal dissolved a bit, revealing the inadequate seal coat. The below is the unacceptable result.
I will now lightly sand off this set and start again. Luckily I have another FR350 decal which has now received a coat of Future to seal it better. The one that was applied on the port side also got a better seal coat. I will now try to print the HS-B code outlines on a sheet of white decal paper with a slightly yellow tinge and a darker outline, which I'll use as a cutting guide and see how that goes. If that doesn't work, I will mask and paint the codes.
unlucky Andy, though i'm sure you'll sort it out
Airframes
Benevolens Magister
Bit of a b*gg*r mate! What about making stencils/templates, to use for hand-painting the codes? Then, apply the serial number over the code letter, and retouch that letter as required?
Users who are viewing this thread
Total: 3 (members: 0, guests: 3)